Started doing some of the welding under the car, and the lights being all on the roof leaves a very big shadow under the car. No time like now to fit the lights back onto the hoist legs, so that I can see.
With those mounted, I finished off some of the welding under the car at the rear.
I am happy with how the rear is progressing, still needs some finish welding but it’s all lined up and I’m happy with it. So it was time to tackle the lower A-pillar area that also took a hit, as it needs to be pulled back out. First order of business was to find my chassis jig that I made back in 2016 and fish it out of the bush where it’s been laying since we moved.
I re-assembled the jig, but all the threaded holes were full of sand and rust and cleaning up the threads was only partially sucessful, so with a few bolts in place I just added some welds to back up the missing bolts.
After a few hours of pulling, hammering and measuring it was time to put a door on to see how things are lining up. It needed a little more pulling at the top of the door hinge area for the door to line up.
Next up is to fit a standard front guard to check its alignment, but I need to go and find it in the bush once its light outside. If this fits well, and if the windscreen fits, then it will be onto fitting the new outer skin back into place.
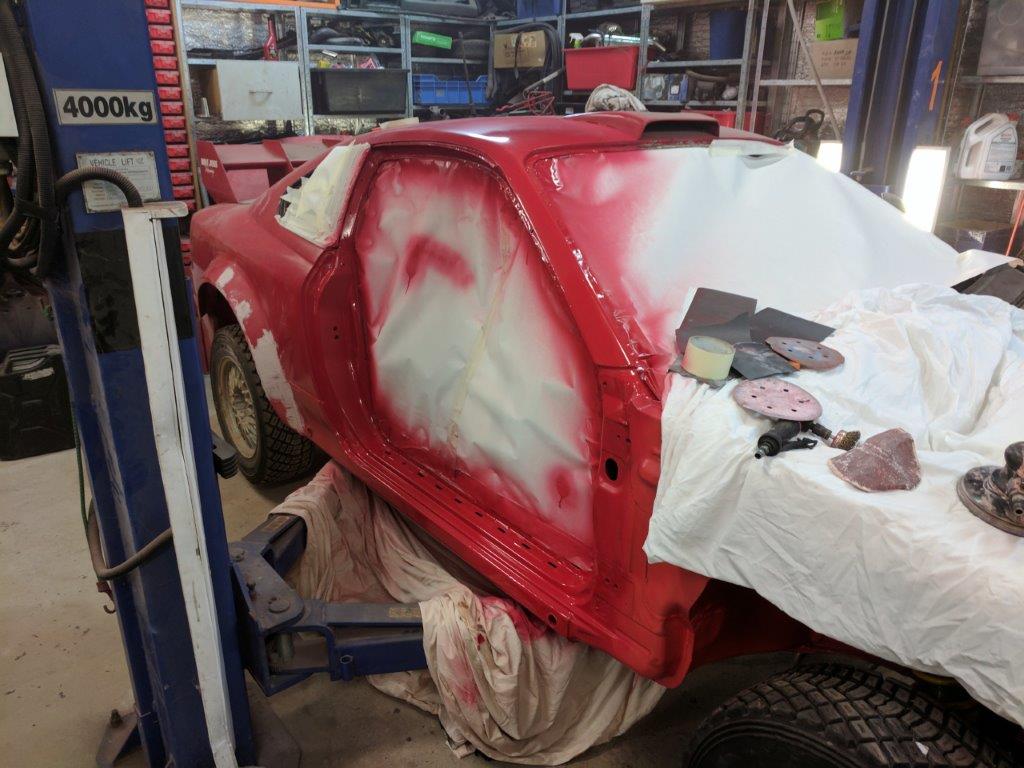
Spent the last hour of the day with the grinder cleaning up the areas where the outer skins will be re-atttached.
A short update this one, as cleaning up the shed took about 16 of the 20 hours that I spent ‘working on the car’.
16 hrs in and all I had to show for it was a clean floor, that I was about to make dirty again!
So how did I get back here to working on the race car? One of my mates had a bunch of ideas, and these gave me the motivation to at least start getting the S15 fixed – the aim to compete in some rallies next year, as well as going to some Khanacross events with the boy.
My ‘little’ boy is now a few mm taller than me, so he can easily reach the pedals in the S15 (the seat is fixed and only works for my 6’2″ frame). And if I am to ever beat him in an event ever again, I think the best chance that I have is the first time he competes in a RWD car – Totally unfair with my experience, and him having none, but this is what is needed now for me to beat him :). By the second event, I do expect to loose again, but that is life.
Anyway, over the last few years the area underneath the S15 (it has been up on the hoist) has become a storage area of all the things that didn’t have a home yet, or were put there in a container, after a job outside that I would clean up tomorrow.
Started on Sat, and by the end of the day things were still not completly packed away. Sun started, finished the cleaning, took the car off the hoist, serviced my daughers car, then went outside with the tractor to get some body panels. The first part of the car work.
Went and picked up the rear cut that I had sitting outside, and proceeded to drill out the spot welds and cut out the peices that I needed.
At this point, the progress is not earth shattering, but I have started and I hear that taking the first step is the hardest part, right?
At the moment its just held with some tex screws, next is putting the internal structures back in, then the skin on the top. Need to make sure all of these thigns align with the boot lid, rear window opening etc, and massage anything back into square that may not be in the right location.
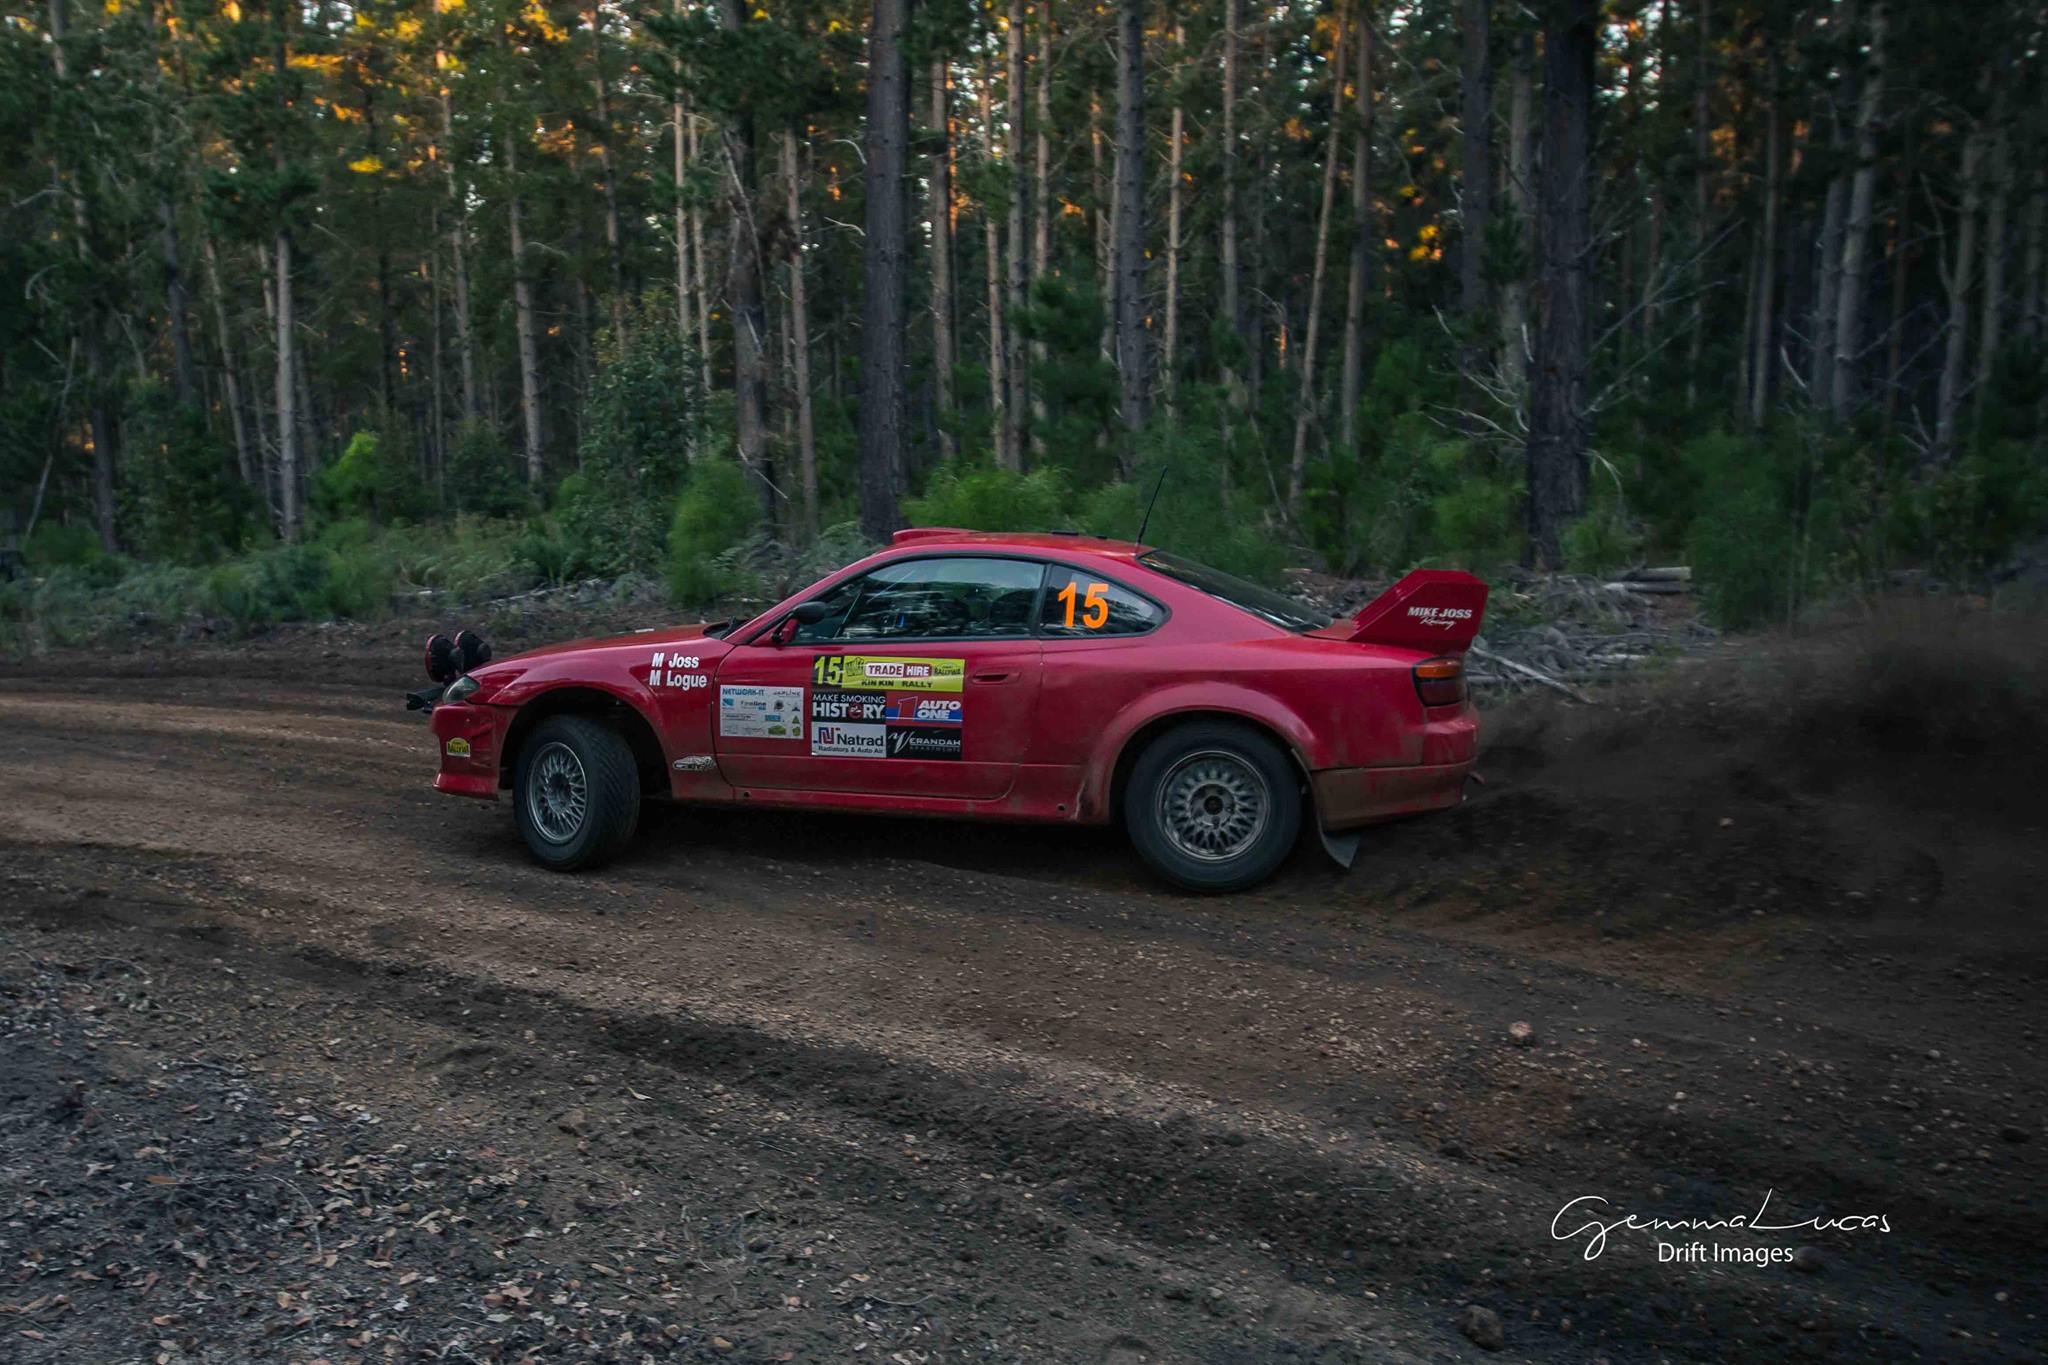
Early 2021 was the last rally that we competed in, what’s been happening since???
The last event, Forest Rally 2021 ended with some damage and bent suspension, all at the same time as buying a new place to live, which was at the time just vacant land.
The second half of 2021 was spent cleaning up and finishing our old place – no time like when you move out to finish all of those little jobs that you were ‘getting too’.
Add to that needing to get a shed and house build, so that we had somewhere to move into and most importantly I had somewhere to put all of my stuff from the shed.
Many long days and nights to get all of the earthworks setup for the shed pad consumed all of my time until early December, when the pad went down. Now to just wait until the shed parts arrived (which was supposed to be October, but it was December at this point and it was being delivered “soon”.
Focus then went back to the current house and getting it all nice for selling, packing up the shed, etc etc. No time or energy left to start bodywork on a racecar.
It was now Feb 6th 2022, and finally the shed components were delivered. As you would expect, we had one of the hotest summers in recent years at that time – 42 degrees on a white concrete slab moving around pecices of metal was no fun at all – so much of the work happened from 4pm until midnight or later – luckily as we are now so remote I could make a bit of noise without upsetting them.
By the second of March I had the main frame mostly completed (working on it after work and on the weekend).
March 22 and most of the roof was completed, and some of the walls sheeted, and it was time to clear out the old shed.
The birthplace of the S15 was now just an empty space, with only history remaining.
At this point my boy was 12 and the new block gave him a place to play, so as $500 bunky was added to the fleet. He already had Gerold (a blue Pulsar, auto) where I wanted him to be able to learn left foot braking, and as with young kids, he picked it up so quick that it was soon time for a manual transmission car.
By April the shed was roughly closed in, so some of my focus could finally start to move to other things, like taking my boy to do some Khancross events.
After a couple of events in ‘Gerold’, it was time to move up from the auto trans, to a manual. As usual with this kid, it took him less than an hour to transistion to the manual, left foot braking, and moving his feet across all three pedals like he had been doing it his whole life.
The work on shed, creating fencing and structure for animals and starting a new motorsport adventure coninued throughout 2023. My car still sat there in the corner gathering dust and spiders webs.
It wasn’t long before he won a couple of Khanascross events, even with a field full of adults.
During this time, it was looking like he also wanted to rally – and I found a WRX for cheap that had a ‘dead’ motor after a broken timing belt.
The aim was to build it as a FWD non turbo, but with all of the WRX brakes and suspension, so he could turn it into a 4WD after a few years with just a motor and GBox change.
There was no plan to use this for some time, but Jun 18th things changed.
Until this point, I was required to sit with him by the rules, but he was now old enough to go by himself. First run of the day I sat with him, on his second run he was going solo. About 1/4 way through the run a drive shaft broke, leaving him stranded out there. He did the right things, just rolled to the side of the track and waited for them to come and tow him back.
Huge thanks to Cam and Brent for letting him finish the event in their car.
The next week, we found it really hard to find a driveshaft for it and the next Khanacross was only 2 weeks away. Cody wanted to get the WRX going, but I explained that when a timing belt goes then 99% of the time it will have bent valves in these engines. Rang a couple of people that know more about the EJ20 than me, and they all had the same oppinion.
He didn’t really care, and wanted to try it anyway.
When we dug into it, it was almost worse – the bolt hoding a cam sproket had broken off. I was even less convinced that this engine will ever run again.
I checked the positions of the valves, and they were all in the shut position. Turned it over by hand, and all cylinders had good and similar compression – at least as much as you can tell when turning it over with hand tools. I was very suprised, but it did prove that it was worth at least putting it back together to see.
I got the parts that we needed from some friends, and we put it all back together, he learnt how to do the timing on these engines, and we got it together enough to see what would happen.
Flicked the key and the thing started and ran nice and smoothly. We put the radiator etc back in it and we took it out of the shed for a quick drive around our paddock, let it warm up, no overheating. It had good power, everything felt really good. I have no idea how he got that lucky.
We quickly got together some 15 inch rims, slapped on some old rally tyres, got a new cam belt, tensioner, water pump, seals and all the other bits in that area. Slapped a fuel pump in it for safety and we went to his next Khanacross.
If memory serves, I think he won this event – first time out in a 4WD…. With only some minor pointers from me, it was amazing for me to see how quickly he adapted from the FWD to the 4WD, maily around having a far less effective handbrake and needing to move the car around more to turn it.
August, another event, another 1st place.
In September dislocated my finger, so that set me back a bit, as it was my right hand. Come Dec and an appointment as my usual doc, she wanted to see it and at that time I had very limited movement of that finger. This started another 3-4 months of finger being strapped and physio to get the movement back – When you go to hospital and they tell you to just strap it for a bit, make sure you go and see someone who knows more about it, as in my case I had done a lot of tendon damage that would not have healed on its own!
A couple more events for him finsihed off the year.
With his events over for the year, and me with a touch of motivation, I did spent one night hammering out and removing all of the dead bodywork in the rear of the S15. Got it prepped to accept some new parts on all of the factory part joining locations.
It was post this that the above docs appointment was, so within days of this my hand was all strapped back up and using a grinder was not very difficult.
End of Jan 2024 we had a localised severe storm rip through, pulling down a bunch of trees all over the place.
Still with a strapped hand, the next two months were spent on most weekends clearing up all of the mess.
Before I knew it we were in July 2024. Cody was also doing very well at Baseball, and his focus had turned from car events to Baseball – both being on the same day on the weekends there was no way to do both.
November 2024 and there was another Khanacross on, the boy had baseball. I was getting the itch back so I entered myself into the event and took his WRX. I had a really good day, and it reminded me of what I was missing. I was very content with him competing and me just helping him and watching, but with his focus being baseball and no events this year, I had lost this part of me.
Blink again it was Feb 2025. Another freak storm.
Somehow no ducks or chicken were lost, but the same could not be said for there homes.
It taken a good 5 months to rebuild everything, and even today its not totally finsihed yet, but they are safe from foxes and eagles both day and night.
Add in another 100 mini projects around the place and 2021 until now has disappeared in a flash.
June 2025. Baseball and a Khanacross did not overlap for the first time in 18 months, we we entered an event. This time we both entered in his car.
After test 1, I made sure I rubbed it in that I beat him. This was because I know its been 18 months for him since he did an event, and this first test would be the slowest that he would be all day. As I only beat him by a few tenths, I also knew this was the last time that I would beat him today, or maybe ever.
I did manage to win one more test later in the day, but he won the other 6 and beat me fair and square. So it was Joss 1st and 2nd, with the little man getting the spoils. I am really pround of how he drove, hard but with almost no mistakes, fast but in control. I tried all that I could, and it was not enough – he can just drive a 4wd car better than me on these tracks. A very proud dad.
And that completes the story from then until now – The s15’s comeback can now begin.
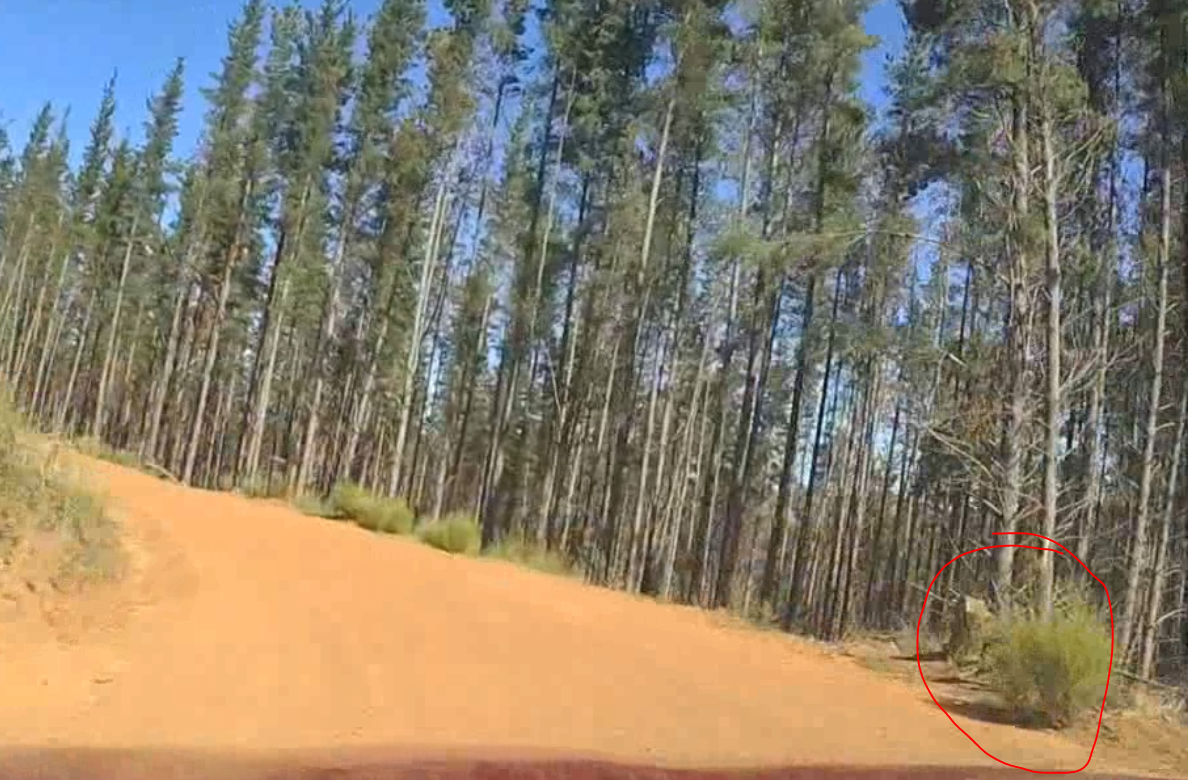
Stage 1 started well, but only a few KMs into the stage we hit something hard when I cut under some bushes on the inside of the corner. We had hit what I later could see was a very short tree stump. Instantly the steering wheel was not straight and more, and the front end was not longer as responsive at is normally is – great…
Before Stage 2, a look under the car showed a nice big bend in the steering arm, and the stage didn’t start well either, while still trying to push as hard as possible, we had a big overshoot. Just need to survive until service and fix this thing up.
Stage 3 completed without any serious mishaps, but while pushing as hard as we could, we were still losing time.
By the time that we got back to service, we were in 13th outright, and down in 4th 2wd.
We changed the arm at service, and we ended up about 10 seconds late out of service, earning us another 5 seconds in penalties. I was less than impressed, and it was game on to claw back as much of the 40 seconds of time loss as we could.
SS4. Pushed hard, but without making any silly mistakes, we took fastest 2wd by 10 seconds, 25 seconds faster than 3rd place and this was enough to get us back into 3rd 2wd.
SS5 was another push, but a small mistake meant that we could not beat Dave in his escort. This stage would prove to be a tough one for us against the escort. Beating 2nd place 2wd by 6 seconds on this stage, and 14 the stage before was enough for us to pass them. Now to try and catch Dave in the escort.
SS6 still going, close to the limit but never over it, we took another 9 seconds out of his lead, but were still 27 odd seconds behind. At this rate we will not make up enough time.
It was decision time at service, keep pushing hard with the hope that we could make up more time this loop, or take the points, as we were still ahead of our championship rivals.
I left service with the intend of making sure we finished, with all that we had taken out of Dave’s lead in the last loop it was not going to be enough to catch him. A DNF here for me would mean that the championship was over.
It was a long drive out to the next stage, lots of time to think, ponder, doubt and dream.
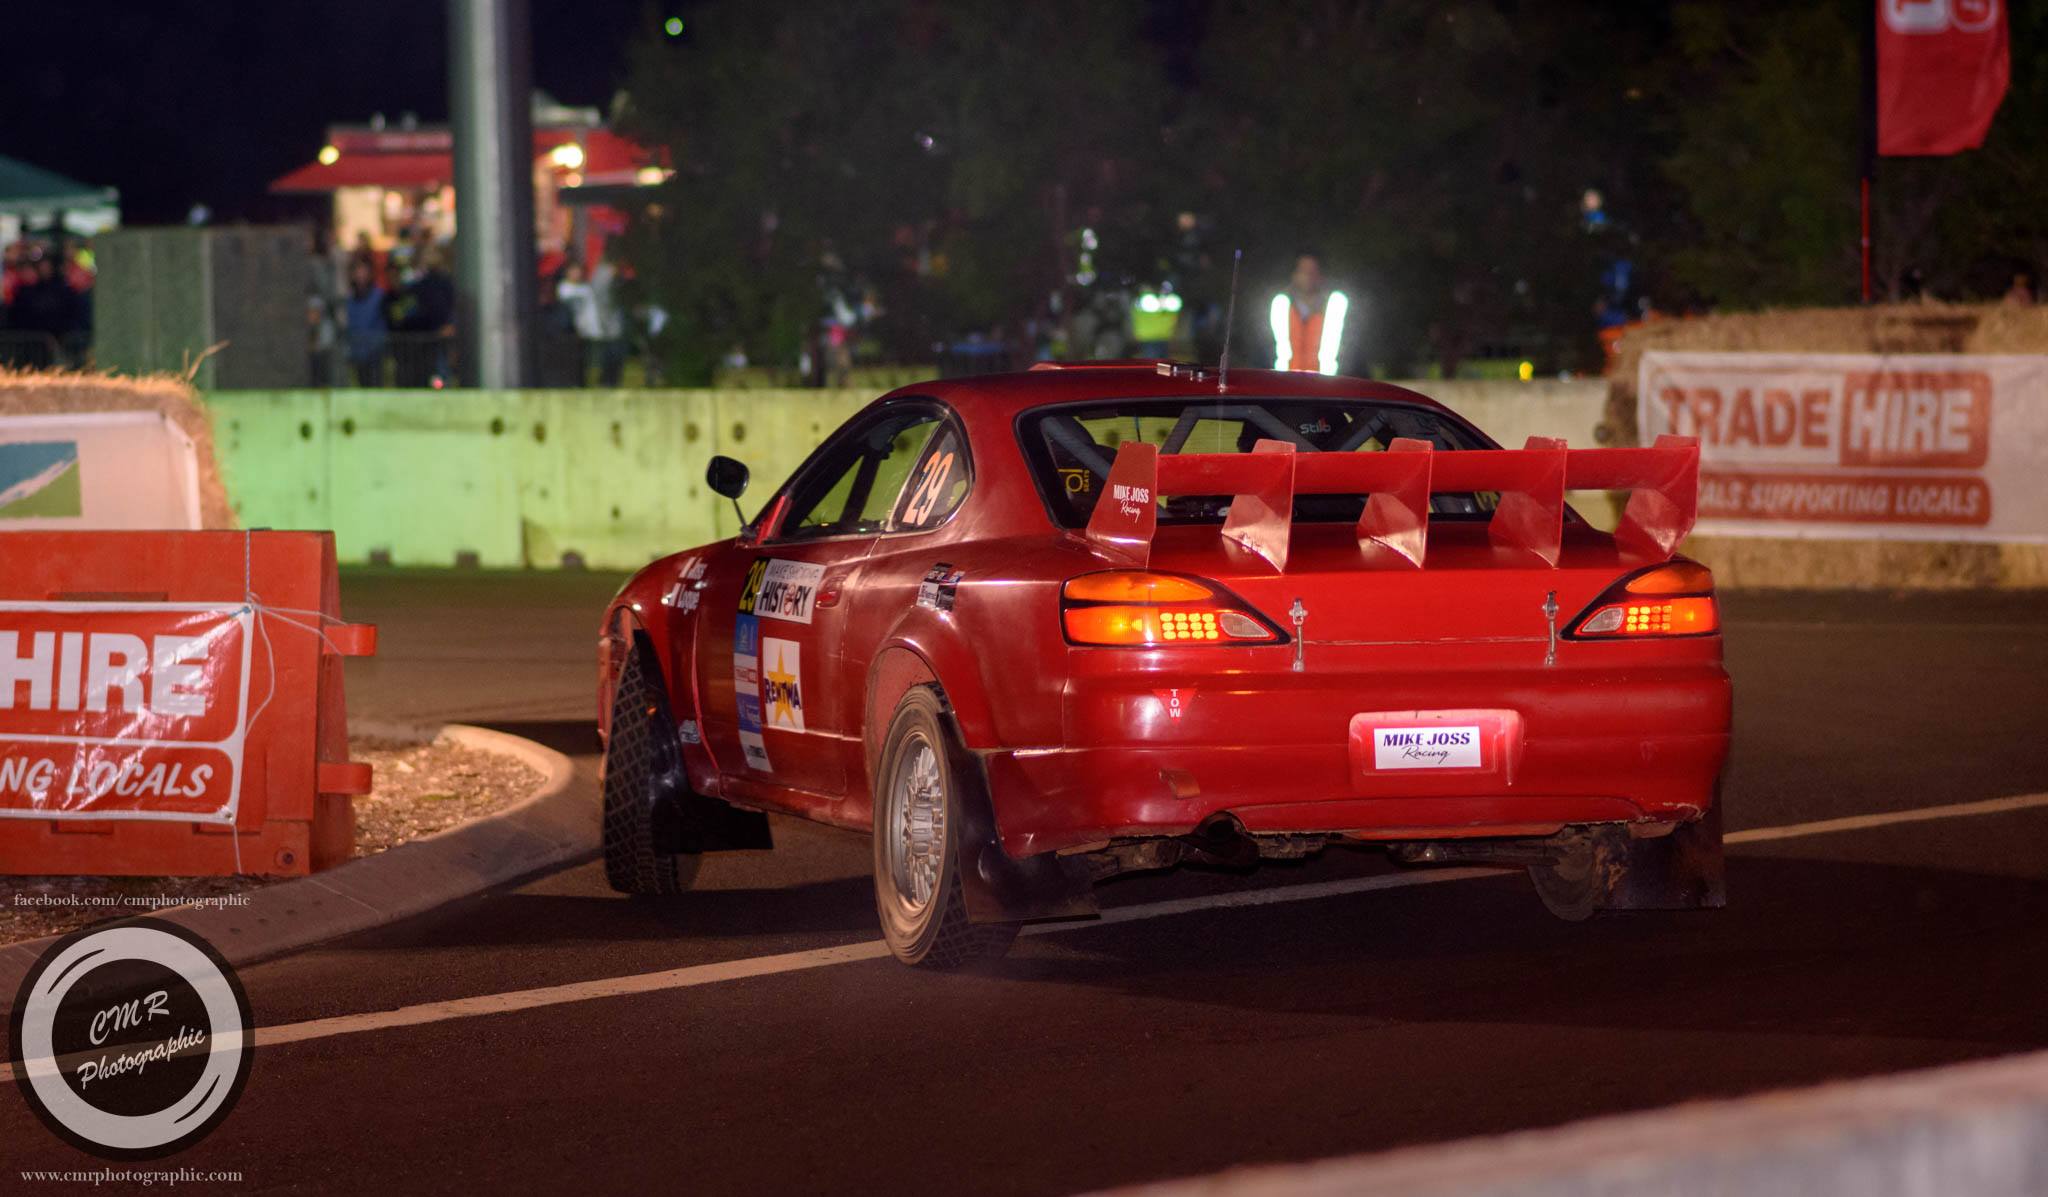
Photo by Blake Rattenbury Photography
Start line of SS7, one of those cartoon scenes was playing out on my shoulders, the devil on one side, the angel on the other. Win it or bin it, no make sure you finish, 2nd is the first loser, think of the big picture….
Pulled the straps tighter, the devil had won.
Finished fastest 2wd again on this stage, but it was only by tenths – not enough.
SS8, fastest 2wd again, but only by 2 seconds this time, faster than the first time through this stage, but not nearly enough.
SS9 – In the dark this time – maybe I can make a difference in the dark. Fastest 2wd again, but only 9 seconds taken back, it would not be enough.
Dave would finish fastest over the stages, but little did I know he had an issue and could not get his car to start before one of the stages, and collected 40 seconds in penalties for being late getting to the start of the stage.
Dave drove really well, and for me he won this round, but the records will show that we got the points and that was important (so I thought at the time) for the championship.
Once the car was steering straight, I was really happy with how we performed, and my driving and notes are getting better and better each event, and I’m getting my confidence back, so overall it was a good event for us.
At this point, the championship was still a long shot after our double DNF at the forest rally when I broke the motor, we needed to win and have the White’s finish well down the points, something that had not happened all year.
Photo by Blake Rattenbury Photography
Due to the area of forest that we were going to use for the next event being closed for a prescribed burn, the event was not able to be run on its original date.
The organisers were able to move the event to another location, and on different date, but unfortunately there were not enough entries to the event to make it viable. I thank them for all of there hard work in trying everything to get this event to run, but it was not to be.
With that, the year was over, and so was the championship. Congratulations to Alex and Lisa White for winning the State 2wd Championship.
Onto next year, my priority is to have a replacement engine built, and retire the stock one that is in there at the moment. I haven’t gotten very far yet, have just been collecting parts and getting one of my old worn out engines stripped down ready for machining.
The head has also been stripped, and I am in the process of cleaning up the ports and then that is off to the machine shop to be cleaned up.
Hopefully I can also get the time to build myself a new set of exhaust headers as well, the current ones being a factory set from one of the Autech edition S15s which are too small for what I’m trying to do with this car.
After the Forest Rally when I had to go back to the stock spare motor, we have been down just over 50hp, so I am really looking forward to this new engine, as it is a much more comprehensive build than the old “good” motor so should make more power than I’ve ever had before. I’m looking forward to having the extra grunt, to see what we can achieve next year!
First order of business was to see how bad the engine was. With the help of a mate, it was pulled apart and was in a very sad state. Note to self – you have a second to shut the engine off when oil pressure is low, if you spend a few seconds thinking about it, then its too late.
Have two options now, put in just enough money to replace what I have to, and get it back in the car, or wait a bit longer and make it even better than it was. Either way, the standard engine needs to go back in, as 3 weeks is not enough time for me to build a new motor, as I need a lot of external help.
I have taken the decision to build something more serious, but this will take me more time to afford it all, and to run the rest of this year on the standard engine. It was a hard decision as the standard engine is over 50hp down on power compared to the good one – it is a lot!
The Boddington event was next. The event has a slippery surface, and a lot of tight corners, and so the power deficit wasn’t that noticeable – other than the 2km straight run down the fence line, where the car topped out at a speed well below the previous events!
In terms of the 2wd class, we won the first 4 stages and had a bit of a lead. The next two stages were a repeat of the first two, and they were now very rough, so I backed off on these two stages to ensure that we didn’t get a puncture, or do anything silly to damage the car and loose the lead.
We pushed again on the last two stages, with another two stage wins, retaining 1st two wheel drive, very happy with the car and its performance and had a great time at the event.
Over the next few weekends, I did nothing to the car – it was all in good condition.
Its now the weekend before the Kirrup rally, so I completed the usual routine, checking and changing the required oils, making sure everything is still tight, making a couple of performance enhancements.
Pretty much finished checking everything, its Sunday night, all looks great, until…
Long story short, this piece here is the part that attaches the wheel to the rest of the suspension, and that large crack in it should not be there.
It would have been really nice if I’d seen this 3 or 4 hours ago – #rallylife
So it’s well after midnight, but there are two new knuckles back in the car and its now really read to go.
The week before the event saw a lot of rain fall, but after Recce the roads looks really nice. A couple of very vet/muddy corners, but 99% of it looks awesome.
Stage one, first real corner, got off the road – it looks nice, but it’s really greasy at speed. Stage two was no different, with me making lots of small mistakes, getting very wide, small overshoots and even a spin – first one in this car. Was worried that I may have lost a lot of time one these two stages, but it turns out everyone was having similar issues. 5th outright and 1st two wheel drive at this point.
Stage three was a very different feeling surface, and was so much more fun to drive – the first two were more scary than fun. Stage 4 was a repeat of stage one, and this time it was a little slippery, but more consistent with grip than the first pass.
The last two stages were a repeat of stage two, again more fun this time, and then a repeat of stage 3, but in the dark. Came close to throwing it all away on the last stage of the event, overshooting a junction and lucky not to get bogged.
Finished 4th outright on both of these stages, and ending up 4th outright and 1st two wheel drive.
On the last transport back to the finish she would not shift into 6th gear, so something to fix before the next event….
Getting here to type has been a struggle recently, so this one has been a long time coming.
When we left off, the car was in pieces again, after a successful event – who would have thought….
The weekend after it was on at full speed, with less than 4 weeks before the next event, so in real world time that was 4 to 5 days. At the end of day one I was in trouble, again.
Over the next few weekends there was lots of late nights, and with the help of my beautiful wife putting in hours and hours of sanding and assembly, we ended up here, the day before scrutineering:
So that was all completed, and now it was time to modify the car. For a while, I had wanted to try a different spring rate, as I felt that the handling could be improved. So pulled the shocks out, swapped springs, re-greased the front inserts and put it all back together. Time will tell if this was a good idea or not!
Then, we were off to Busselton for the next event.
The first two stages were a bit of a struggle, the car needed to be driven differently, and the brake bias took a lot of fiddling to get right, but it felt like it could be driven faster.
Four stages in, and I was getting the hang of it, and at the afternoon service I was closer to the usual faster guys than before – time for a bit more of a push on the repeat stages.
The Koala repeat stage was good, everything felt right, was fast but not taking any big risks. Next up was Ferndale repeat stage, about a minute into the stage, we rubbed the ground in a compression, nothing hard, just the usual rub that happens when you are in deep ruts.
Dash starts flashing, Oil Pressure Low – How, that wasn’t a hard hit, surely that was not enough to hurt anything, maybe a wire fell off, or the sensor broke….. Side road here, pulled off the road. A quick open of the bonnet and the sump guard is crushed up into the sump, with the sides of sump being bulged out – flattened. The knocking sound was a sure indicator that she was very unhappy inside, and we are out for the day.
After the stage is complete, we get towed out of the stage and we wait for our trailer to arrive. Its nearly sunset by the time we are loaded up and are on our way back to Busselton.
I’m usually not one to give up, but the fact that I am a computer programmer, and not a mechanic, means that an engine swap, or a partial rebuild is not a fast process. Its 6pm now, so 9pm by the time I get the car home (yes, i left the other engine at home…..). It is going to take me a minimum of 6 hours to swap it, as everything needs to be swapped over, all of the intake, water pump, all inlet and outlets for water and oil, all of the sensors, wiring, crank angle sensors etc… So that takes us to around 3am, if all went well. 2.5hrs to drive back to Bussleton and that brings us to 5.30am, giving me an hours sleep before getting up for day two. Add to this the fact that the tune for the standard motor is going to be very different to the tune that is in the car – its a risk that we decided not to take, a day’s competition on no sleep with a car with a bad tune wasn’t worth it.
So that was it for the event, day two was not going to happen…
With the drama of the week behind us, we arrive in Nyamup, unload, setup camp, cook a simple dinner and get off to sleep ready for the day ahead.
The wheel alignment that I mentioned in the previous story was never done amids all of the running around of the previous days. It’s dark now, I’ll just do it in the morning.
When the morning finally rolls around, we head off for recce. When we get back to the service park, its raining, cold, and the tarp is covered in puddles of water. The perfect time to lay down under the car and align it…
After finding where I put my big boy pants, we got the alignment where I wanted it. Time to race.
Stage 1 – A high speed and short blast to get warmed up. Took a couple of corners to get into it, but all feels good. Just over 2 minutes and the stage is complete.
Stage 2 – The total opposite length, this one is 35kms, with a mix of fast and tight and technical. 2kms in there is a creek crossing, we hit it flat and bottomed out on the exit – somthing that would come back later. About 1/2 way into the stage, on the tight, slow hairpins and junctions, I can smell oil simmering. With this on my mind, and the constant checking of oil pressures and temps I didn’t have the best second half of a stage.
Stopping at the stop control at the end of the stage, smoke pours out from under the bonnet. I can see flames from the drivers seat – great….. We pull forward away from the officials tent, shut the car off, jump out with the fire extinguishers, carefully pop the bonnet.
Just some small flames on the extractors, with no wiring or anything above it, decided not to use the extinguisher, and within 10 seconds it had burnt itself out. One of the officials that was there pointed to the dip stick – it had come out by about 30mm – yeap, that old trick. It had been spitting little bits of oil onto the red hot exractors. Its now wired closed.
Back to service. Jo asks me where my bumper is. Huh? The old girl has no back end, the creek crossing started the process of tearing it off, depositing it on the stage a little later. Appologies to all the other competitors that had to avoid it – sorry!
Stage 3 is a repeat of stage 1. Got too deep into the spectactor point, and made a very slow exit wheel spinning in the soft sand on the outside. Ok, don’t do that again.
Stage 4 – About 18kms long. I really enjoyed this stage, another good mix of fast and technical and had a good rythm and made very few mistakes in the slower corners. I didn’t know at the time, but we were 4th fastest outright on the stage, I’m still lifting in places where I didn’t need to, but we’re going ok.
Stage 5 – Another run of the 35km stage. There were a couple of sections that had turned from hard packed ground to deep silt – made it difficult to keep the car in a straight line in many sections, and a lot of other corners that were perfect on run 1 where now covered in fine dust, making them much more slippery. Slower than the first pass through, but everyone else was slower too – we were closer to the cars in front this time, so another good improvement. Another 4th fastest outright. Still can’t catch Nick, the 2wd that is in front of me, but happy none the less.
Stage 6 – Another repeat of stage 1. Got very taily a couple of hundred meters into the stage, and had to lift in a fast section to tidy it up, so we ended up with a slower time. Got the spectactor point right this time though :).
Stage 7 – A repeat of the 18km stage 4. This time in the dark.
With very little wind, the dust was bad in a lot of places. A very scrappy stage from me, it was so hard to see a lot of the time. The stage that I loved so much on the first run was no fun the second time around. A big overshoot lost us 10+ seconds, and after that I turned my attention to just finishing the event. 5th fastest on the stage, so still good considering.
We get back to the finish, with some bunting in tow, park up and wait for the cars to be released from post event checking. All of the placings that I listed above I didn’t know at the time. I had been looking at Nick’s times every other stage, to try and judge if I was improving or not, but I hadn’t looked at any results.
In the end we finished 4th outright, and second 2wd car – That’s our best outright finish to date, so I have to be happy with that.
Next event is the Forest Rally, a round of the Australian Rally Championship and a big two and a bit days of competition – we can’t wait.
Now, as the car is straight, no major damage, and because I am me, she now looks like this:
It is time for a paint job as she is looking very scruffy!
I live to fiddle and optimize right up to the last minute, which usually results in a very busy last weekend, or even a busy day before an event. This year, the plan was to do it differently, getting it done earlier. Sunday night, the week before the event, I just had a wheel alignment and swap over to the new tyres/rims – less than an hour, easy right.
Tuesday rolls around, get the car out in the late arvo and let it idle for 10 mins while I wash it, checking that everything is working as it should, all is good.
Drive off, try to climb the first hill right near home and can’t get over 30 kays an hour – its running super lean. Shut it off, get out the laptop, can’t see anything wrong with any temps, TPS, pressures are all good, hmmm. Reset the min and max throttle positions (a mistake in the end), added 10% more fuel and tried again, it wasn’t great, but was better. Cody was operating the laptop, got him to push it to 20%, then 30% and finally got the mixtures right(ish) and we kept going to scrutineering, with all of the possible scenarios running through my head of what has changed that has caused this. Fuel pressure reg maybe – yeah, hopefully thats it.
We get through scrutineering, all passed, and we continue on home. Once home, get the fuel pressure guage out and hook it up. Hmm, fuel pressure is perfect, right where it should be. What have I done wrong when I re-wired the car, as thats the major thing that I’ve changed.
Wed night was a rally panel meeting, so no time to look at the car. Thurs night, hours checking everything, can’t find anything wrong. We’re leaving for the rally tomorrow, and I’m all out of ideas. Got in contact with Shannon at Tune Corp to see what he was doing in the morning. I was fortunate enough that he had enough time to have a look first thing Friday morning. We strap it onto the dyno and everything looks ok, other than its running lean (once my edits to the tune were removed).
Shannon suggested that we check the injectors, they are easy to get out so step one was to test them. The injector on Cylinder 4 was down on flow. Got a spare one and re-tested them and we now have 4 that are flowing the same. So pleased that we found it, running it like that flat out would have resulted in a lean cylinder and a blown engine.
Popped them back in, and he runs it up again. Its better, but its still not good – so there is still something else going on, from releif to despare in moments.
Shannon starts the process of re-tuning it.
When he turned the dyno cooling fan on, it was strong enough to push the bonnet up against the stops on the hinge. I figured as its only 4 bolts, it was easiest to just take it off. I quickly remove the bolts and an I was lifting the bonnet away the car stops – the dash and everything is off – total electrical failure?
With a worried look on his face, Shannon asks me if I touched anything – No. Heart sinks – all my new wiring and something has failed.
Shannon says it looks like the kill switch has failed, everything is off. Then it dawns on me that the outside battery kill is at the base of the windscreen. I pressed it when taking the bonnet off. Turn it back on again and its all fine – heart attack avoided.
After 5 minutes of tuning he soon notices that everything he is setting is exactly 1 column offset from what is already in the fuel map. Shannon has started to peice the problem together.
In looking at the data in the ECU, then next item to look into was the TPS voltage was reading 0.08 volts. Then when I wound the idle down a bit it didn’t change voltage. Repositioned the TPS to read about 0.5 volts at idle, so that we now have some more travel in the sensor. With this discovery, it dawns on me that about 4 months ago I moved the throttle wheel (where the cable attaches) across a bit as it was getting very close to rubbing the throttle body itself. In doing this, I must have moved the positions of the throttles, but as I had the sensor at its lower limit already, moving it has repositioned it, and now the ECU is seeing the same voltage on the low end, but the throttles have moved position.
With quad throttle bodies and no manifold, TPS provides the load signal, so moving it has confused everything. If the TPS was not at the bottom of its travel, it would have been fine. I effectily created a dead spot where 0-4% actual throttle was all read at the ECU as idle, so it never put enough fuel in. I noticed the issue at light throttle, and never pushed past that – If I had the car probably would have come to life again.
With the TPS moved, and min and max throttle reset in the ecu and she did a full power run with no issues. It was good to hear her scream and shoot flames again. Shannon spent a few moments making some tiny tweaks to fueling, and did a final power run to check it. Still the same HP as last time, she is FIXED!
Another case where a whole range of little things causes a big problem. If I had set the TPS to its current position when I first built the car then my other changes wouldn’t have caused a problem, which would have meant that I would not have messed with other things, that just all made it all worse. You learn new things every day, normally by messing it up 🙂
I was so stressed out that I wasn’t going to be able to figure out what was wrong, a huge weight was lifted.
I can’t that Shannon enough for helping me out, could not have fixed it without you mate!
So, after having had enough drama and stress for the month, its time to go home, finishing packing and start the drive to Manjimup. All this and the event hasn’t even started yet!
Since last time we’ve had another two events, the Karri Rally and the Safari Rally.
Karri Rally
It was one of those days that I should have just stayed at home. To start the day, felt terrible, had to stop a couple of time during Recee – this is not going to be pretty.
We get to the start of stage 1, finally with a bit of motivation, and less of the feeling of being sick. And the start has been delayed. After everything was resolved, and we were about to start again. 3, 2, 1, go – Off the line in first, 2nd, then into third and the throttle pedal felt dead, shift to 4th and she’s jammed at 100% – great. It was a long straight, so spent the next few seconds fishing around with my foot to see if I could pull the pedal back – nope. Shut the engine off and coasted into the T junction at the end of the straight. At this point, we managed to get 13 seconds into the stage when the pedal jammed – the day is just getting better. Pop the bonnet and can see that an adjustment bolt has backed out of the throttle assembly, jamming it open. By the time I get some allan keys out, take the bolt out, get gloves, helmet etc back on an a couple of minutes has been lost. A car had gone past 30 seconds prior, so we took off again. On the last corner of the stage, we followed Steve Oxley’s lead and turned left and did a doughnut, rather than simply turning right.
We make it to SS2 for our proper start position – ok, time to start the event now. While not fast, we complete the stage without any further dramas,
About 500m from service, we turn back onto the hwy, no power, running on 3…
Into service, and after a few minutes of troubleshooting and swapping parts around, we have a dead coil pack. No problem, just get the spare from the electrics container that I take to every event – well, that would have been the answer if I had not left this container at home…. Searched all of the Commodores in the service park for a v8 one (LS1 coil pack) – nothing. Day over.
Safari Rally
Took lots of spare coil packs this time. Didn’t need them though…. Hopefully this is the sign of a better day.
This event is hopefully the turning point for some more speed next year. For the first time this year my trust in my own notes in the high speed sections has taken a step forward, getting them right and trusting them is critical for ‘safe’ speed.
All was quite uneventful until the final stage, the sting in the tail – in the dark. I love night stages, although this one turned out a bit less enjoyable than normal. The first problem was the dust, intermittent but very thick in places. Coming around a corner, perfect visibility, then a wall of white. Making it even more fun was an issue about 5kms into the stage. It felt much like Collie when a rose joint broke in the rear suspension, every time you brake hard it flicked the car sideways – nothing to do but keep going.
Stopping with what felt like a handbrake, and the thick dust made for an interesting 15kms. Three overshoots in the dust made for a tense stage, but we made it through the stage and back to service. It turns out that it wasn’t broken, just a puncture.
We ended up losing 40 seconds on that stage, but at the end of the event it didn’t change any of the placings, 2nd two wheel drive and 5th outright was a good result for the last round. Hopefully we can take this new found confidence into next year, and get a bit closer to the front.
While we snapped a rose joint, and finished the event bogged of the side of the road, it was a positive event.
The roads were in sensational condition, there had been sooooo much rain the week before, I was expecting the worst. Other than a couple of slippery corners the rest of the roads were is great condition, consistent grip and were great fun to drive.
At each service I made another change, and got the car feeling better and better every loop. Each of the setup changes that I did made an improvement in how the car felt, it had more grip and felt more stable. While its hard to tell if it has made any changes in outright speed, the car felt a lot more comfortable and with time this should let me push it harder when I fully trust my notes. On average, we have improved by 1/2 a second per KM to the fastest guys from the previous event. Still a long way behind them, but at least this is one step closer.
Mid way through SS5, it felt like we had a flat or something. After a few more kms it didn’t feel like a complete flat, and the car was not handling consistently – what is it? Through most right handers it was fine, some left handers felt a bit off, but in a straight line the steering was not running straight any more, and the car was wandering at odd times, when it felt like it. There was no banging or rattling at all, so we keep pushing on, just being careful on lefts (except for the left at the spectator point – can’t let them down!). Got out at the stop point and the car was low in the right rear, and had 10 degrees or more of camber, hmmmm… We left the control and parked on the side of the road to take a closer look.
The top camber arm on the rear suspension was broken, so the hub was floating around causing the weird handling. The car was easily driveable, and if the championship was on the line I would have driven the next stage anyway, but as the hub was leaning up against the shock, holding the car up, I wasn’t willing to ruin the shock – so we drove back to service to fix it up. Event over.
Back at service I got a spare joint, threaded it in and gave it a basic wheel alignment. Put the spot lights on and waited for the field to get back so that we could rejoin after the scheduled service.
Other than 1/2 a stage at KinKin this year, this was the first real set of night stages that we have done. That small distance at KinKin changed my view on what I needed from my lights – so they were aimed differently this time and in general I had very good visibility. Ideally some wider spread on the short range light bar would be of benefit in seeing around corners a bit better, for the odd time where we are not backing it in, something that maybe would have helped two stage later.
About 1/2 way through the second last stage I very slightly missed my turn in point for a right hander that tightened, one that I had noted as being tricky. I got off the line on the way in, got into the loose and slid around the outside until it tightened and I ran out of road. Looking my logged data, I entered it slightly slower than I had done in the two daylight runs, the difference was simply being on the grippy line, or the loose stuff – any tiny lack of concentration in this game punishes you hard.
We were off the road, and the diff was on a dirt mound, and we didn’t have the grip to go anywhere. We made a couple of attempts at moving her, but to no avail – time to spectate for a bit. No damage done, so not a bad ending considering.
A huge thanks to the road closures, that stopped on their way out of the stage, for towing us back up onto the road. There was no way to get out without a tow back onto the road.
All up, the event was very positive, despite a mechanical failure and an off. With more more tweaks to my notes, I have made some little gains on corners that open or tighten – more detail in these areas have helped in not braking too early for tightens, and getting on the gas earlier for the opens.
I also got back to driving the car on the rear wheels a lot more, and pushing a bit harder in the medium and slower corners. I think the changes that I made that have increased the car’s front end grip have meant more confidence. I’m still not committed enough in the really fast corners (120kays +) and I know that the largest chunks of time that I am losing to the fastest guys are in these types of corners – I just need to get to the point that I trust my notes in these corners, I don’t have that yet.
Overall the car is feeling a lot better with the new setup, the grip seems to be a higher, and the stability or feel of the car is a lot better now. Its still amazing to me what a couple of clicks on a good damper will do to how the car feels.
We’ve got about a month until the next event, and a lot of work is still going on in the background to make the car faster 🙂
Credit to CMR Photograpic for the pic. Take a look at his website to purchase photos!
So, its been about a month since the Boddington Safari Rally, and after doing some work on the car this weekend it dawned on me that I’ve not done any sort of update for quite a while.
The last rally was great fun, quite slippery gravel, many kms of sideways action to be had. It’s quite a tight rally in most places, not in terms of road width, but in terms of lots of corners making it lot of fun. Our notes are getting better and better each rally, hopefully getting closer to the point where we can safely push harder without leaving the road. Hopefully by Kirrup I’ll have it sorted enough to push a bit harder again. It only takes one tiny error in your notes to be off the road, so my first priority is to get the notes right all of the time, then start pushing again…
Getting to the end of an event without hitting something means that for the first time in 4 years, I have some time where I wasn’t building or rebuilding the thing. Post event, we backed the car and trailer into the shed, where it has sat until the weekend.
After unloading it, I starting doing some of the jobs that I have wanted to try for the last year, all of these being performance related – rather than just damage repair. The car has run the same camber settings since it was built – and I think that it has too much camber. Job one was adjusting all 4 corners for less camber, and add some more caster to the front at the same time.
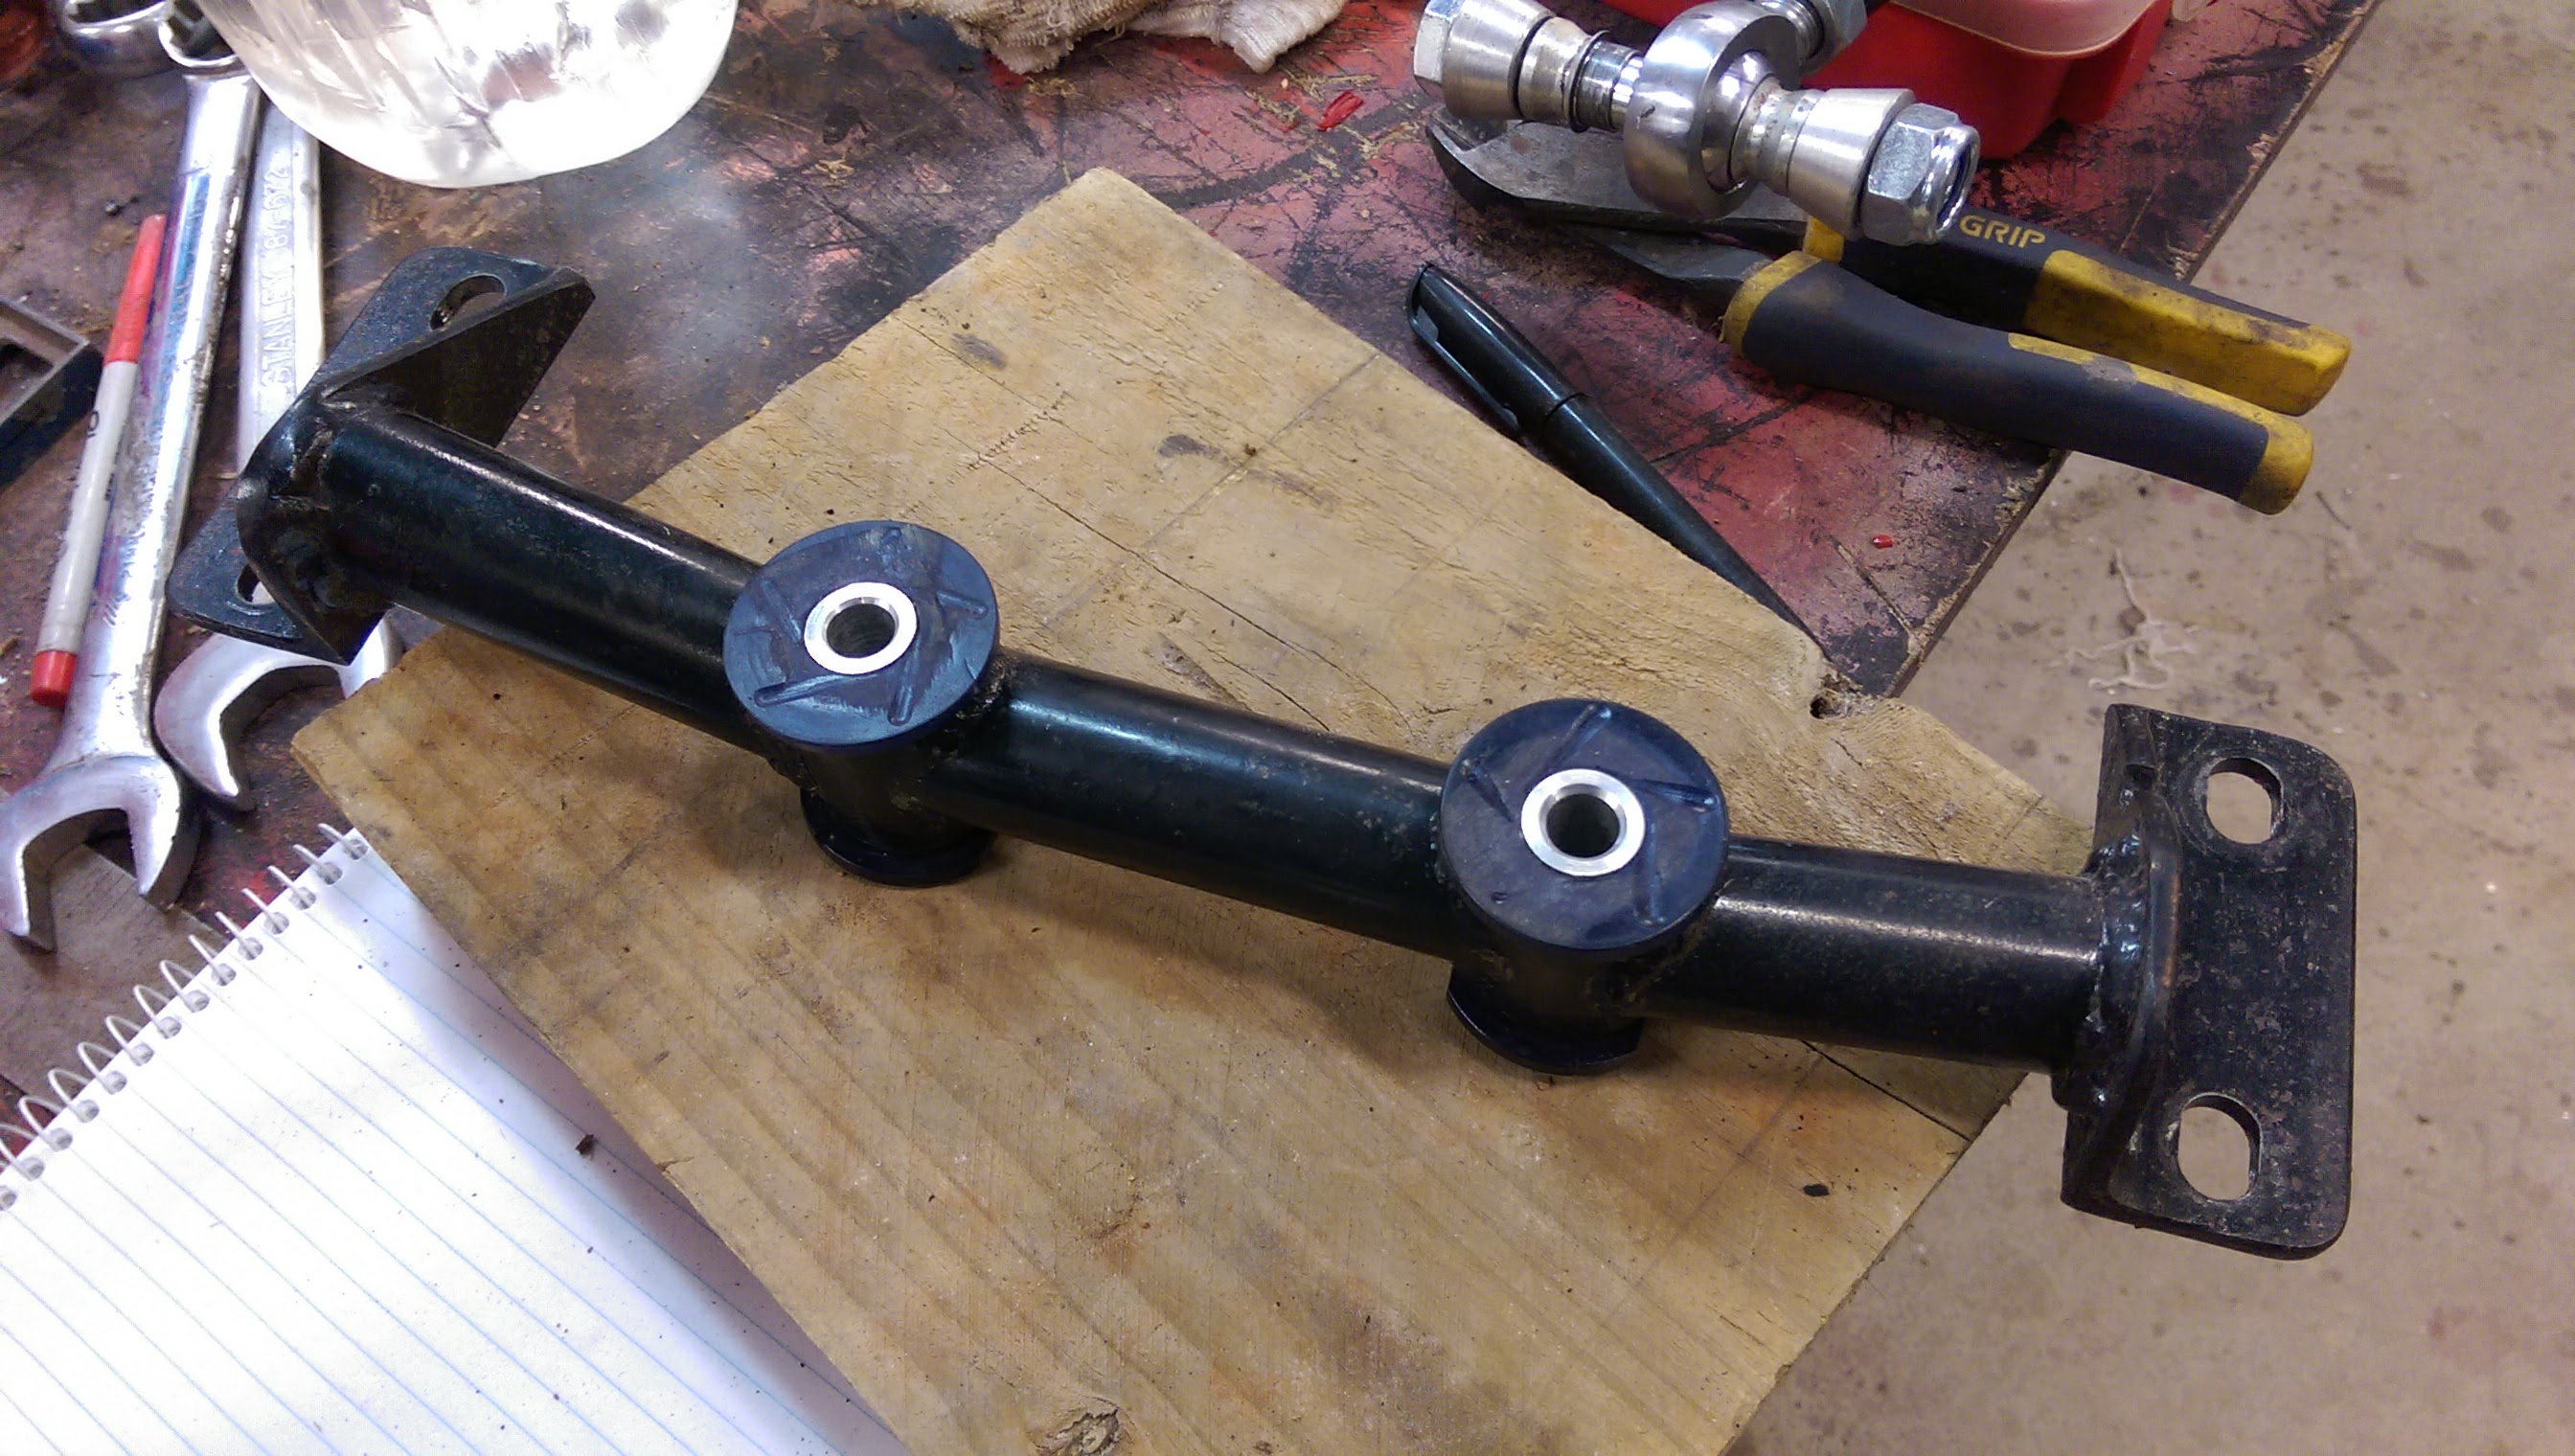
While the rear arms were apart, I replaced some of the bushes and a ball joint (split boot), and re-greased all of the other parts that needed it.
Also changed the front sway bar to see what effect that has during the corner as I transition onto the throttle, as I need some more front end here if I haven’t slid the back in hard enough. I may have just made it worse – time will tell!
Add to that some planned damper changes to try during the event and hopefully I’ve made it feel a bit more stable in the fast stuff.
Another item that has been on the shelf for quite some time is the build of an airbox. The 4 socks that are on it now was a temporary thing just for the first event, as I ran out of time. Its now two years later and the socks are still there, still sucking it lots and lots of hot engine bay air which is doing nothing to help power.
As I had so much free time, I spent a little bit of time to advance the progress of the air box buck.
I found a rag that was made from stretchy material, pulled it over the outlet pipe and secured it to the main air box body. This makes a nice, natural transition from the inlet tube to the rest of the box as the fabric is stretched it self-levels so to speak. I then coated the fabric in fiber glass resin and now it has set hard.
Post the Collie event, sand it all nice and smooth and it will be ready to make the fiber glass mold.
I’ve also got a couple more things that I’m working on the background, hopefully they will be ready for the Kirup Stages rally too.
Scrutineering for the Collie event is tomorrow night, see you all then!
Catch-up post number two – A challenging event to say the least.
In an effort to learn more about writing better pace notes, I took the opportunity to run Smoothline notes, to learn other ways of doing things, and to fast track my learning a little bit. They run the same 1-10 system as I tried last event, so hopefully not a large change, right?
Watching vids of the ARC top cars, there were a number of extra things that they use, that while I understood, I wasn’t in a position that I would know when I should use them when on Recce. The notes gave be a great understanding of these aspects, and also a lot of other options and things to think about during our next Recce. At the same time, while the notes were perfect, they use a lot of terms that didn’t make sense to me, purely due to what I was used to. So all in all I learnt a lot, including something that we need to do better in Recce next time, something that lead to the end of the event…
Another thing on the list of todo items was to spent a rally playing with the damper settings, something that I’ve not played with with this car.
Stage one – laps around the park in the middle of Busselton. Gave the crowd something to watch as we locked the rears and slid the car into the last corner – 10 clicks of bias to the front is not enough, let try 12 for the next run…
First gravel stage – The car feels like it has more grip after the damper changes, but it feels a lot more uncomfortable to drive, it doesn’t feel as planted. Need to do a couple more stages like this and see if it is faster, or if I have gone the wrong way.
During the first part of second gravel it feels like I have a flat, or a half flat tyre. We keeping going at a good pace, but not on it, as left handers don’t feel right, and much of this stage is on the edge of a cliff – not the place to run even the smallest amount wide.
On the road section, the tyre is fine, and the car doesn’t feel too bad on the Hwy, hmmm. Time for service now, so lets go back and have a closer look.
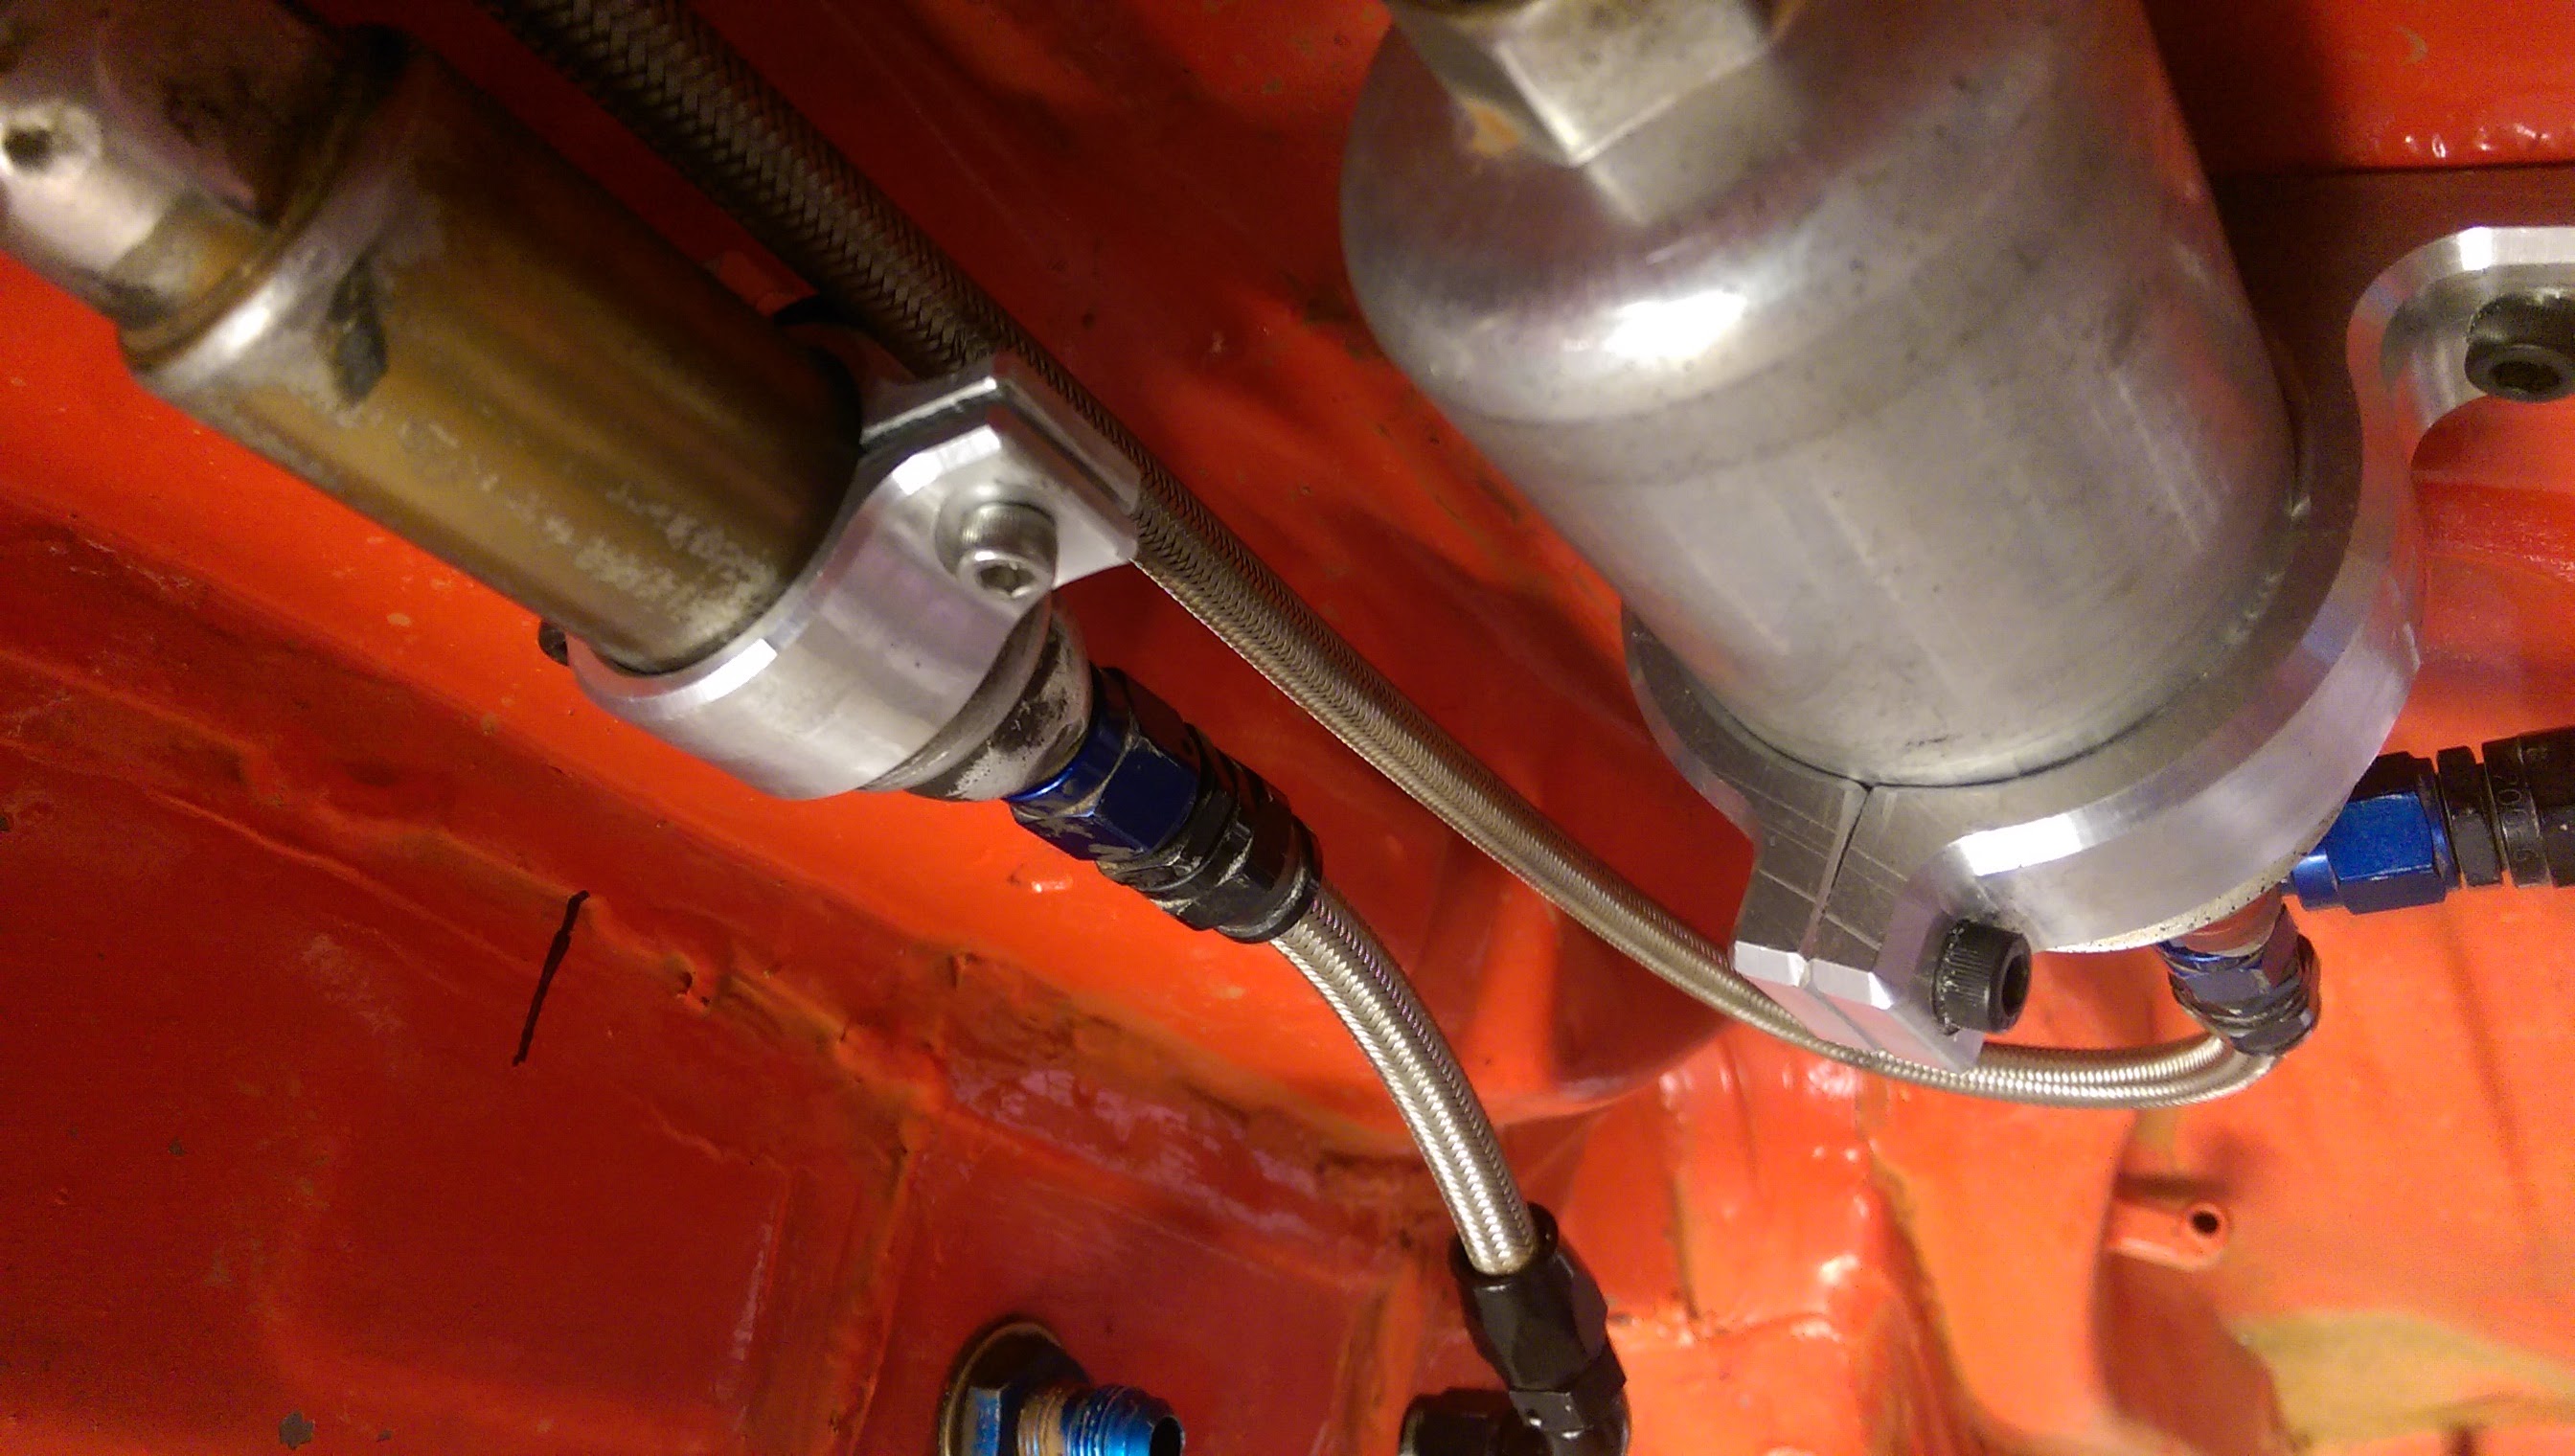
Back at the service, a rock or something has managed to get stuck between the suspension arm and the damper, and it has bent and broken the hose to the remote canister – oil is leaking out of it 😦 Great…
With the help of Luke (MCA) we patch it up the best that we can, considering I don’t have a spare hose. It has most of it’s oil, but no gas pressure.
At this point, time to concentrate on my notes, and my driving without getting too close to the limit, as the car is not behaving in the rear on any of the bump or jumps, having a couple of instances of jump out of the dip and 1/2 off the road, the most notable being at the end of Boomer 2 – even my heart skipped a beat on that one!
The end of day 1 is the start of day 2 (Saturday Night) – Another set of laps around the tarmac at Busselton. A much better run around the stage this time, a lot less understeer this time so we set a better time.
Sunday morning. Get into the car, let it warm up. Stopping at the time control exiting Park Ferme the brake pedal is soft. Not the start I needed at this time of the day.
The further we go, the pedal gets worse. The handbrake is equally soft, so it is somewhere in the rear brake system (front and back are on two separate circuits). Stopped outside the time control for service in, call the wife with a list of tools that I may need, not really knowing what the issue is.
Jump out, climb under the car, expecting to see a broken line or leaking caliper or something. Nope, nothing under hear is leaking. Climb into the back, to make sure its not leaking at the bulkhead fitting, where the line goes from inside the car to outside. Nope. Keep following the line back to the front, to find a puddle under my legs – coming out of the Tilton bias valve. Its coming our from around the adjuster, something has gone wrong inside it. Luckily the fittings on the valve are such that its easy to remove the valve, join the hoses and run with out it.
Big shout out to the boys from last minute motorsport that jumped in and helped us get the tyres changed, while we took the valve out and bled the rear brakes and cleaned the floor at my feet.
We get the service out control with about 30 seconds to spare, nice way to wake you up in the morning.
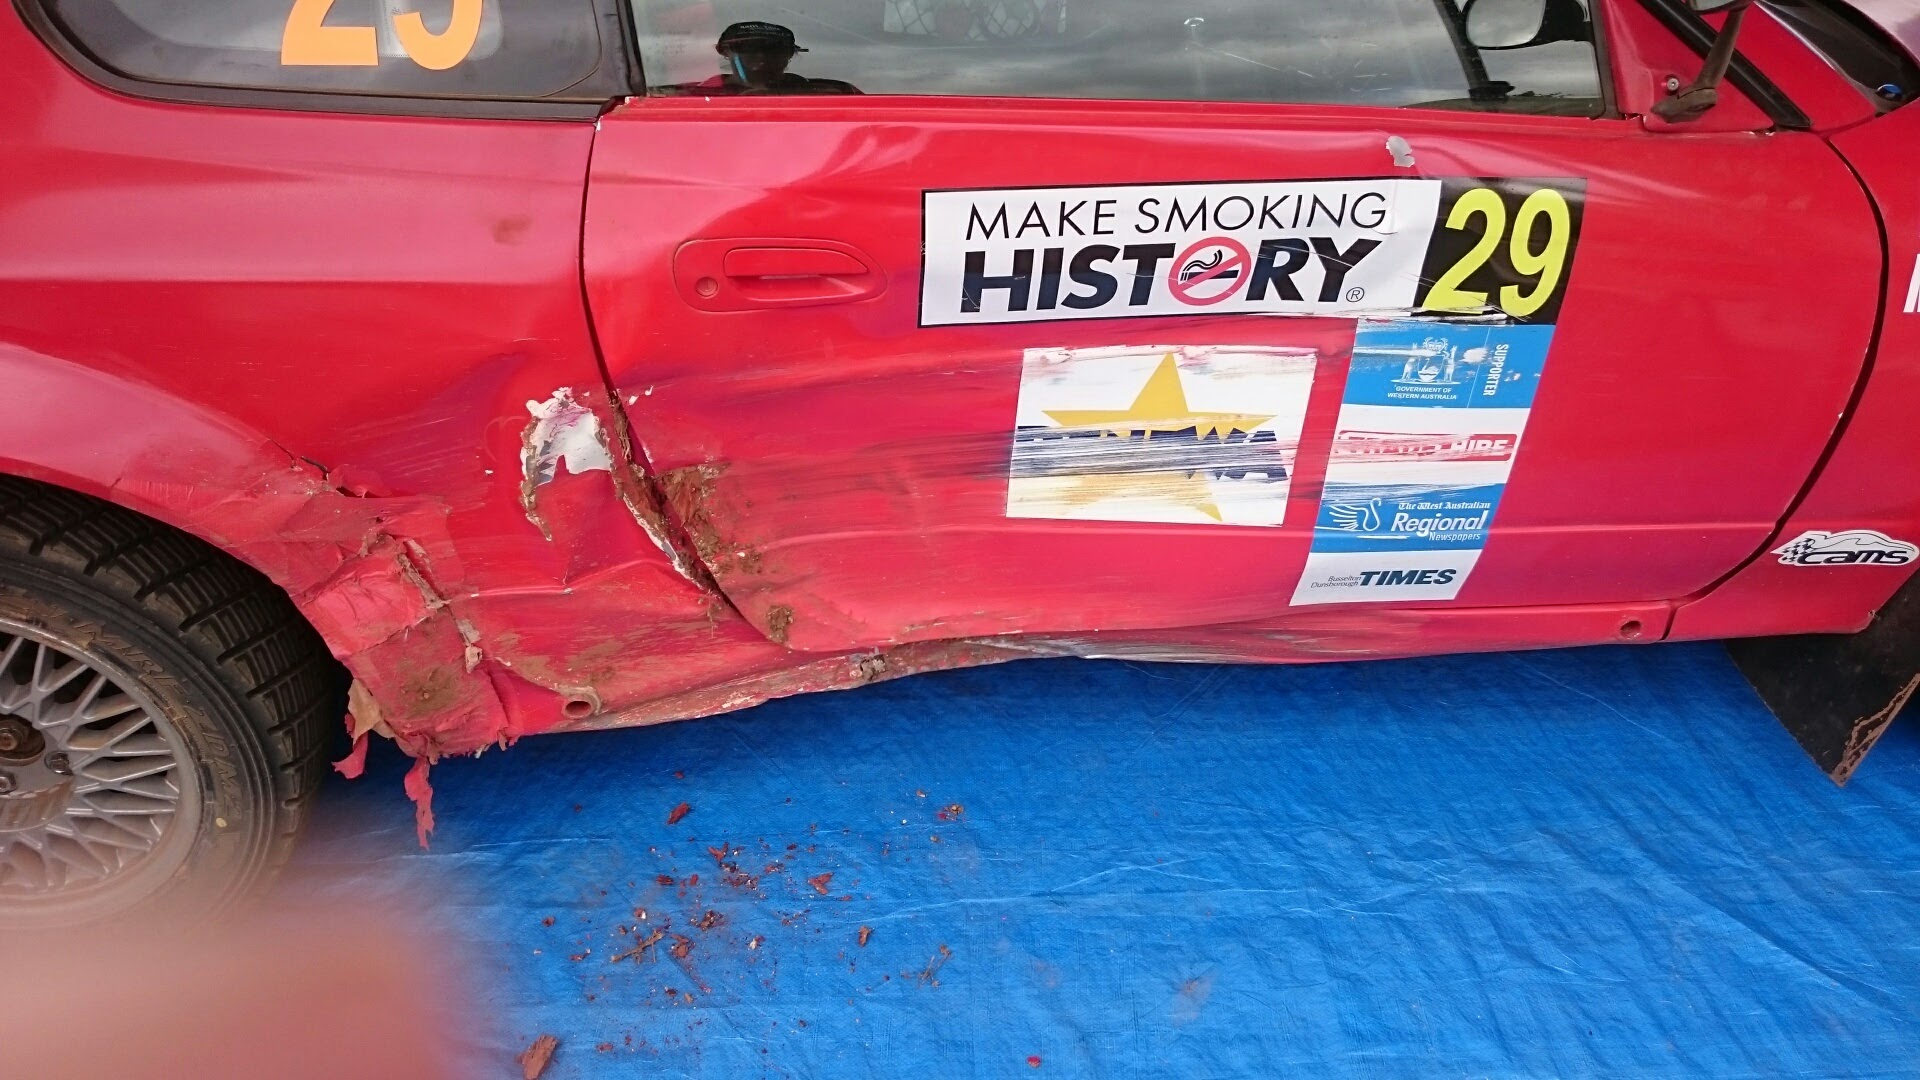
The first gravel stage of the day, was also the first stage that we did Recce on. Unfortunately, I didn’t think of this fact at the time… About 3.5 kays in, on a left 7 immediate left 5, we didn’t make it around the 5 and touched a stump on the outside – the only thing on the outside of the road for 50 meters in either direction…
It spun the car 180 degrees, leaving us facing the wrong way. After having to use the wipers to remove all of the dirt on the windscreen so that I could see, we flicked it back around and took off again.
The car won’t pull any more, and I imagine that the right rear is pointing out in some ugly direction – it feels like its dragging. Left handers are equally ugly – ok I’ve done some decent damage…
On the run out of the stage, I wanted to keep up enough pace to not affect the car behind us. The car is handling so bad that we have two more decent moments on the way out. Then, while doing 93 kays over a brow, a large something shoots under the car, BANG, lifts the rear tires off the road – my first thought was the rear susp just parted, and we ran over the tyre. The car is still driving straight-ish, we must have just run over something?
We leave the finish control, and find somewhere to park. Door won’t open. Out the window it is. Nope, the window only goes down 50mm and jams. Megs, I need help.
With Megs on the outside pulling the door, and me sholdering it from the inside we manage to pop it open. The rear end looks like it has a bit of toe, but not anywhere near as bad as it felt. Whatever went under the car later on in the stage has however torn huge holes in the floor under my seat. With this being stage 1 of the day, and the fact that we nearly had two more moments as it was handling so bad, I make the call to go back to service, because the only outcome of doing the next stage is another off and more damage. If we only had one stage to go, I would have kept going, but…
Back at service, the wheel alignment is ok, but the floor is torn up a lot from the rock or whatever it was on the road. We check the shock and its got almost no oil left. My the time we fix it, we would only be back for the last two stages, meaning that we miss too much. I call it for the event.
On reflection, I think the lack of power was because of how steep the next part of the road was, and the bad handling was down to no shock oil, rather than it being bent suspension arms. Watching the in-car vid, I think the shock was low on oil right from the start, with it not being until I slowed down after the stump that I could really feel how bad it was.
We pack up, head back to Busselton, and take the kids down to the beach for some fun.
Last post the thrash was still on to get everything finished on time. So a quick catch-up post to keep the story on this blog complete.
We got it all done in the end, without too much overtime being worked.
Passed scrutiny, and made the trek down to Manji for the weekend.
The aim for the weekend was two fold, just finish, and get used to a new notes system. I am trying a change from 1-6 to a 1-10 system. Writing the notes for this new way was easy enough – the challenge is going to be hearing a lot of numbers that I’ve not been used to hearing before.
The stages were really fun, very technical and tight in a lot of places, with patches of loose sand mixed in for some variety. We took a no risk approach, and with a bit of luck going our way we ended the day 2nd 2wd car, and 5th outright.
With nothing major to fix post this event, it was time to finish off a bunch of jobs that never got properly done in the lead up to this event, and to finish making a few more spare parts for the car.
With thrashing so hard to get everything done on the car, keeping this up to date has been a bit neglected. So here is the last month….
Last post, engine mounts where the next item on the list, and I got those cut out, awaiting the engine being fitted back into the car so that I can get it all lined up.
The next big jobs were getting the thing painted, so that I can start bolting things back on.
Jan 23 – the first coat of paint went on the underside and engine bay areas.
A couple of days later and the second coat was done, and now all that is left to do is wait for it to dry. Its now the 30th of Jan…
While waiting for that to dry, attention turned to putting some of the sub assemblies together, so they can be bolted in.
Gearbox mount was re-made and is now bolted back onto the gearbox.
My beautiful wife assembled the new pedal box for me while I worked on the front suspension.
I got the new calipers cleaned up and painted (snapped one off in the crash), and also got a new knuckle prepped and painted.
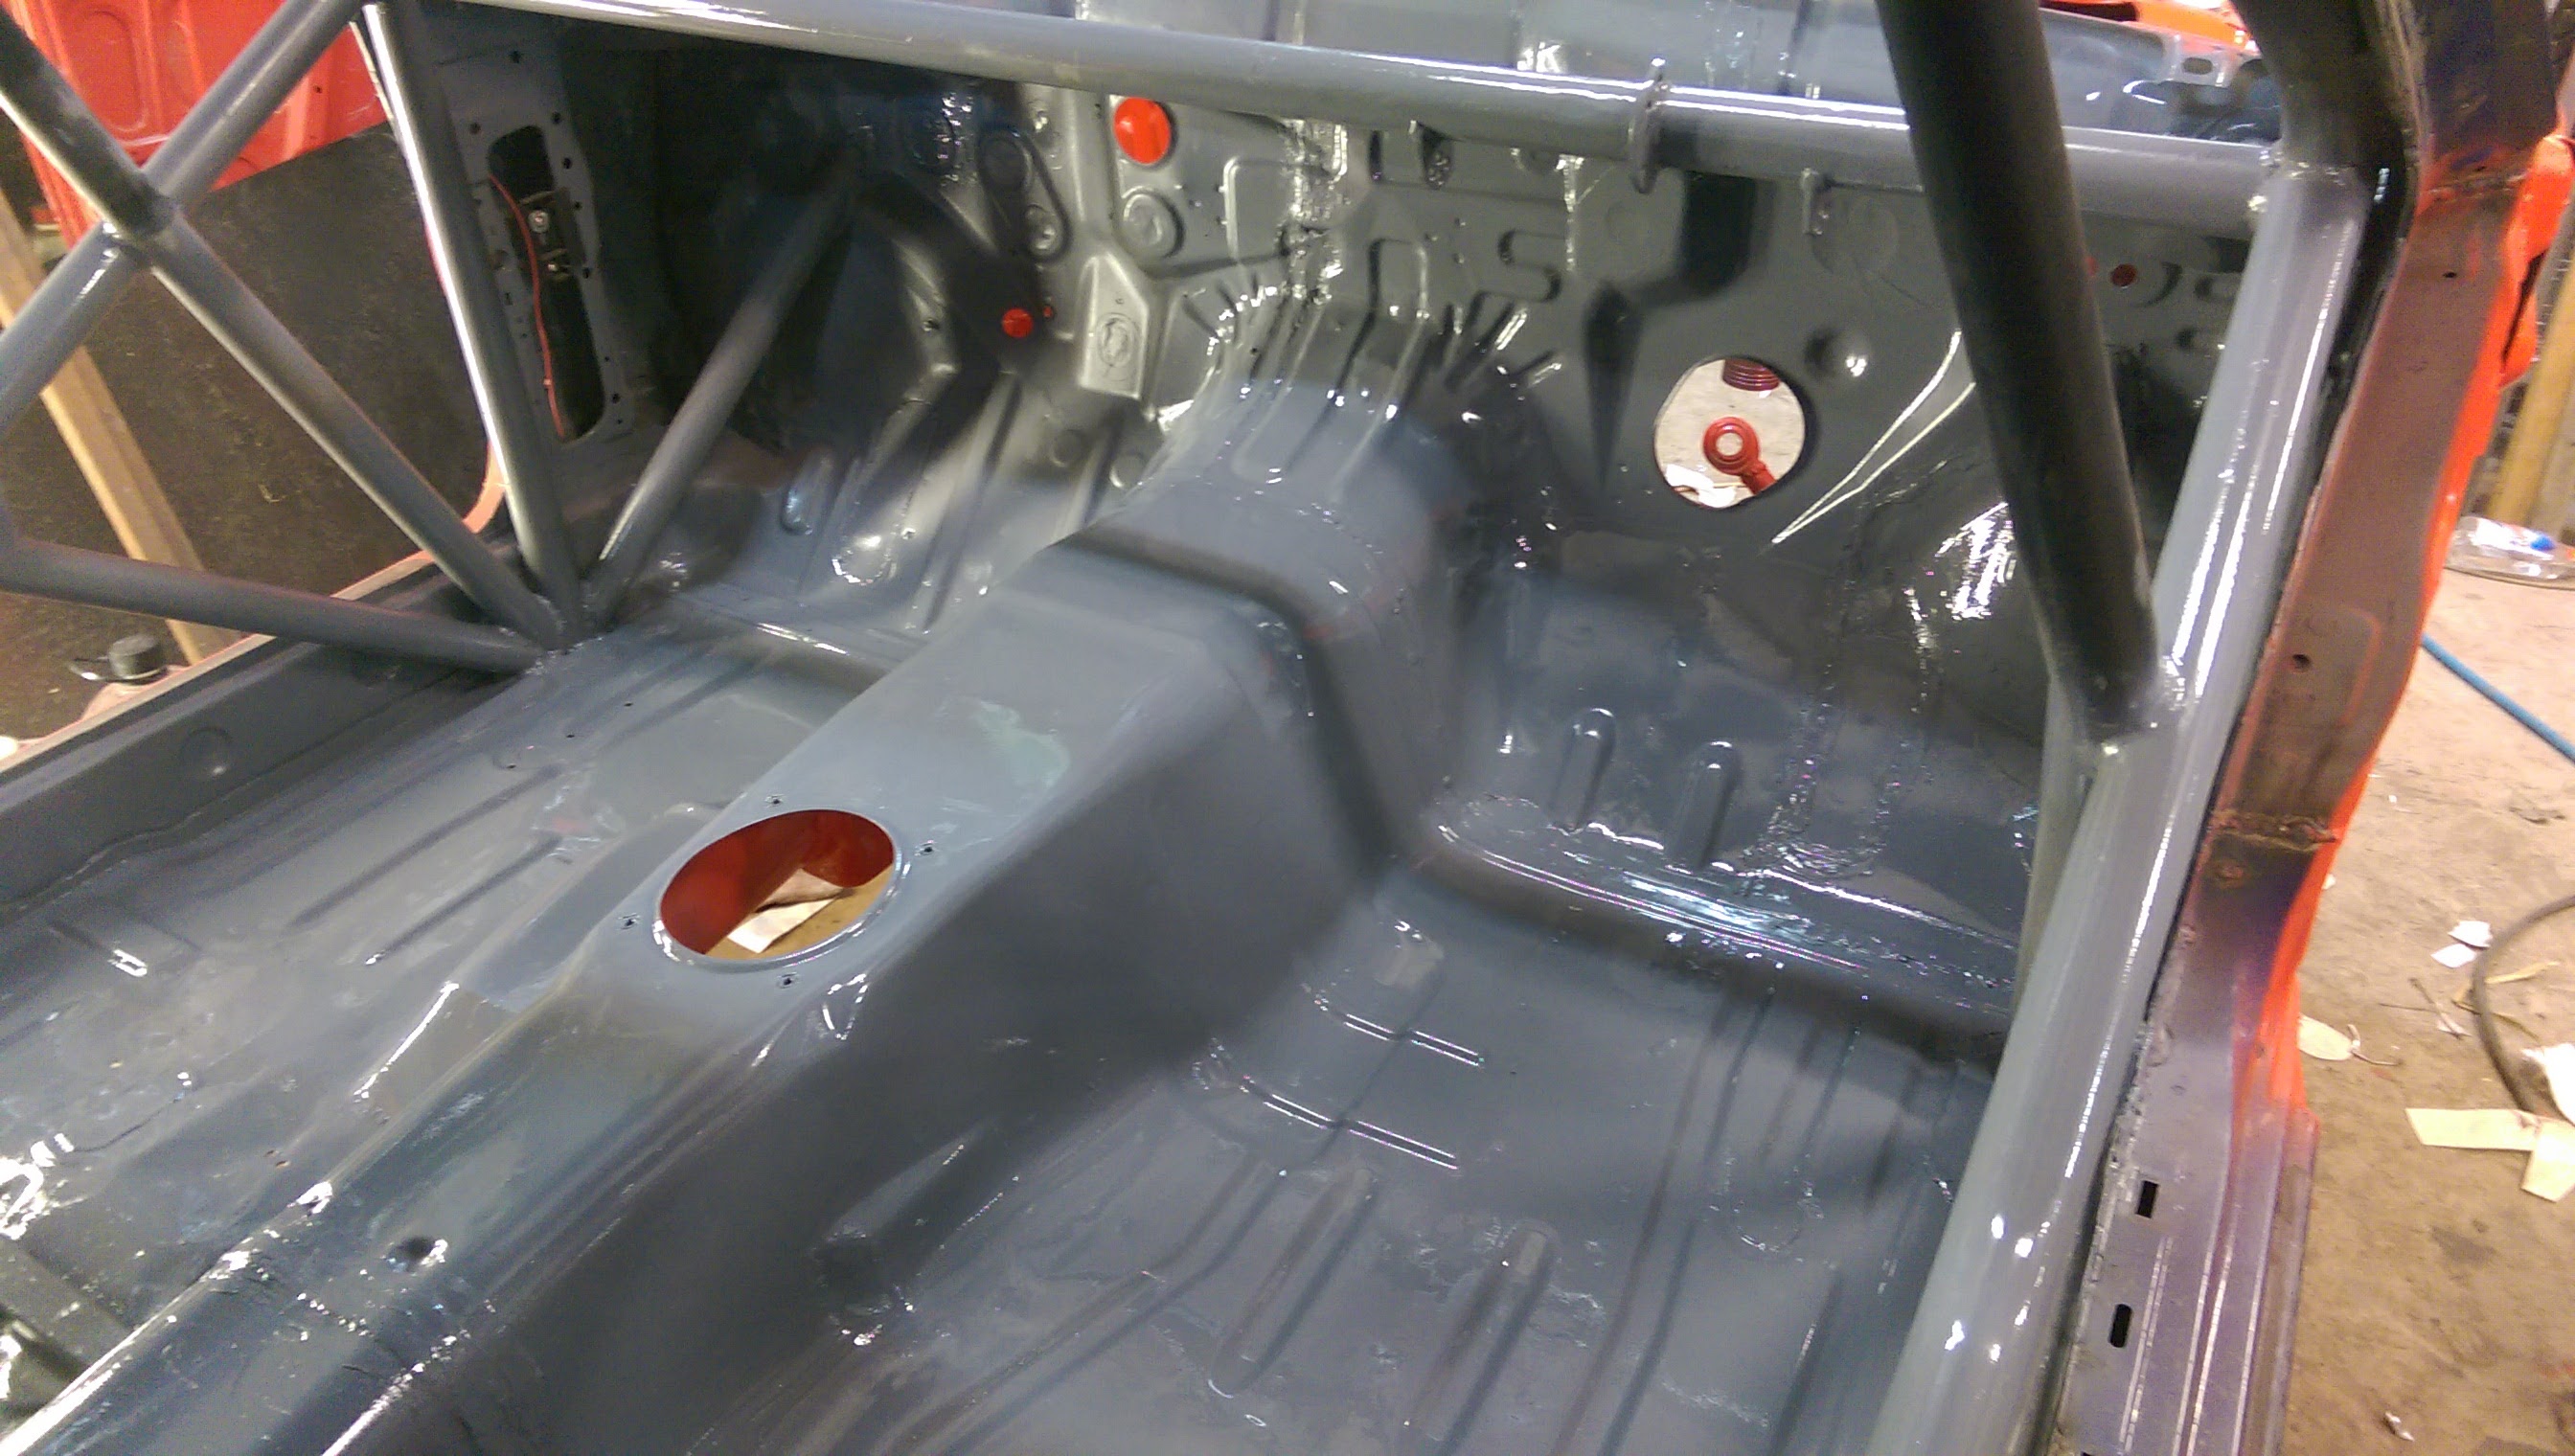
Also got the inside floor of the car prepared and a coat of paint on it.
While the inside was drying, it was time to start working underneath the car and getting as many parts as possible fitted.
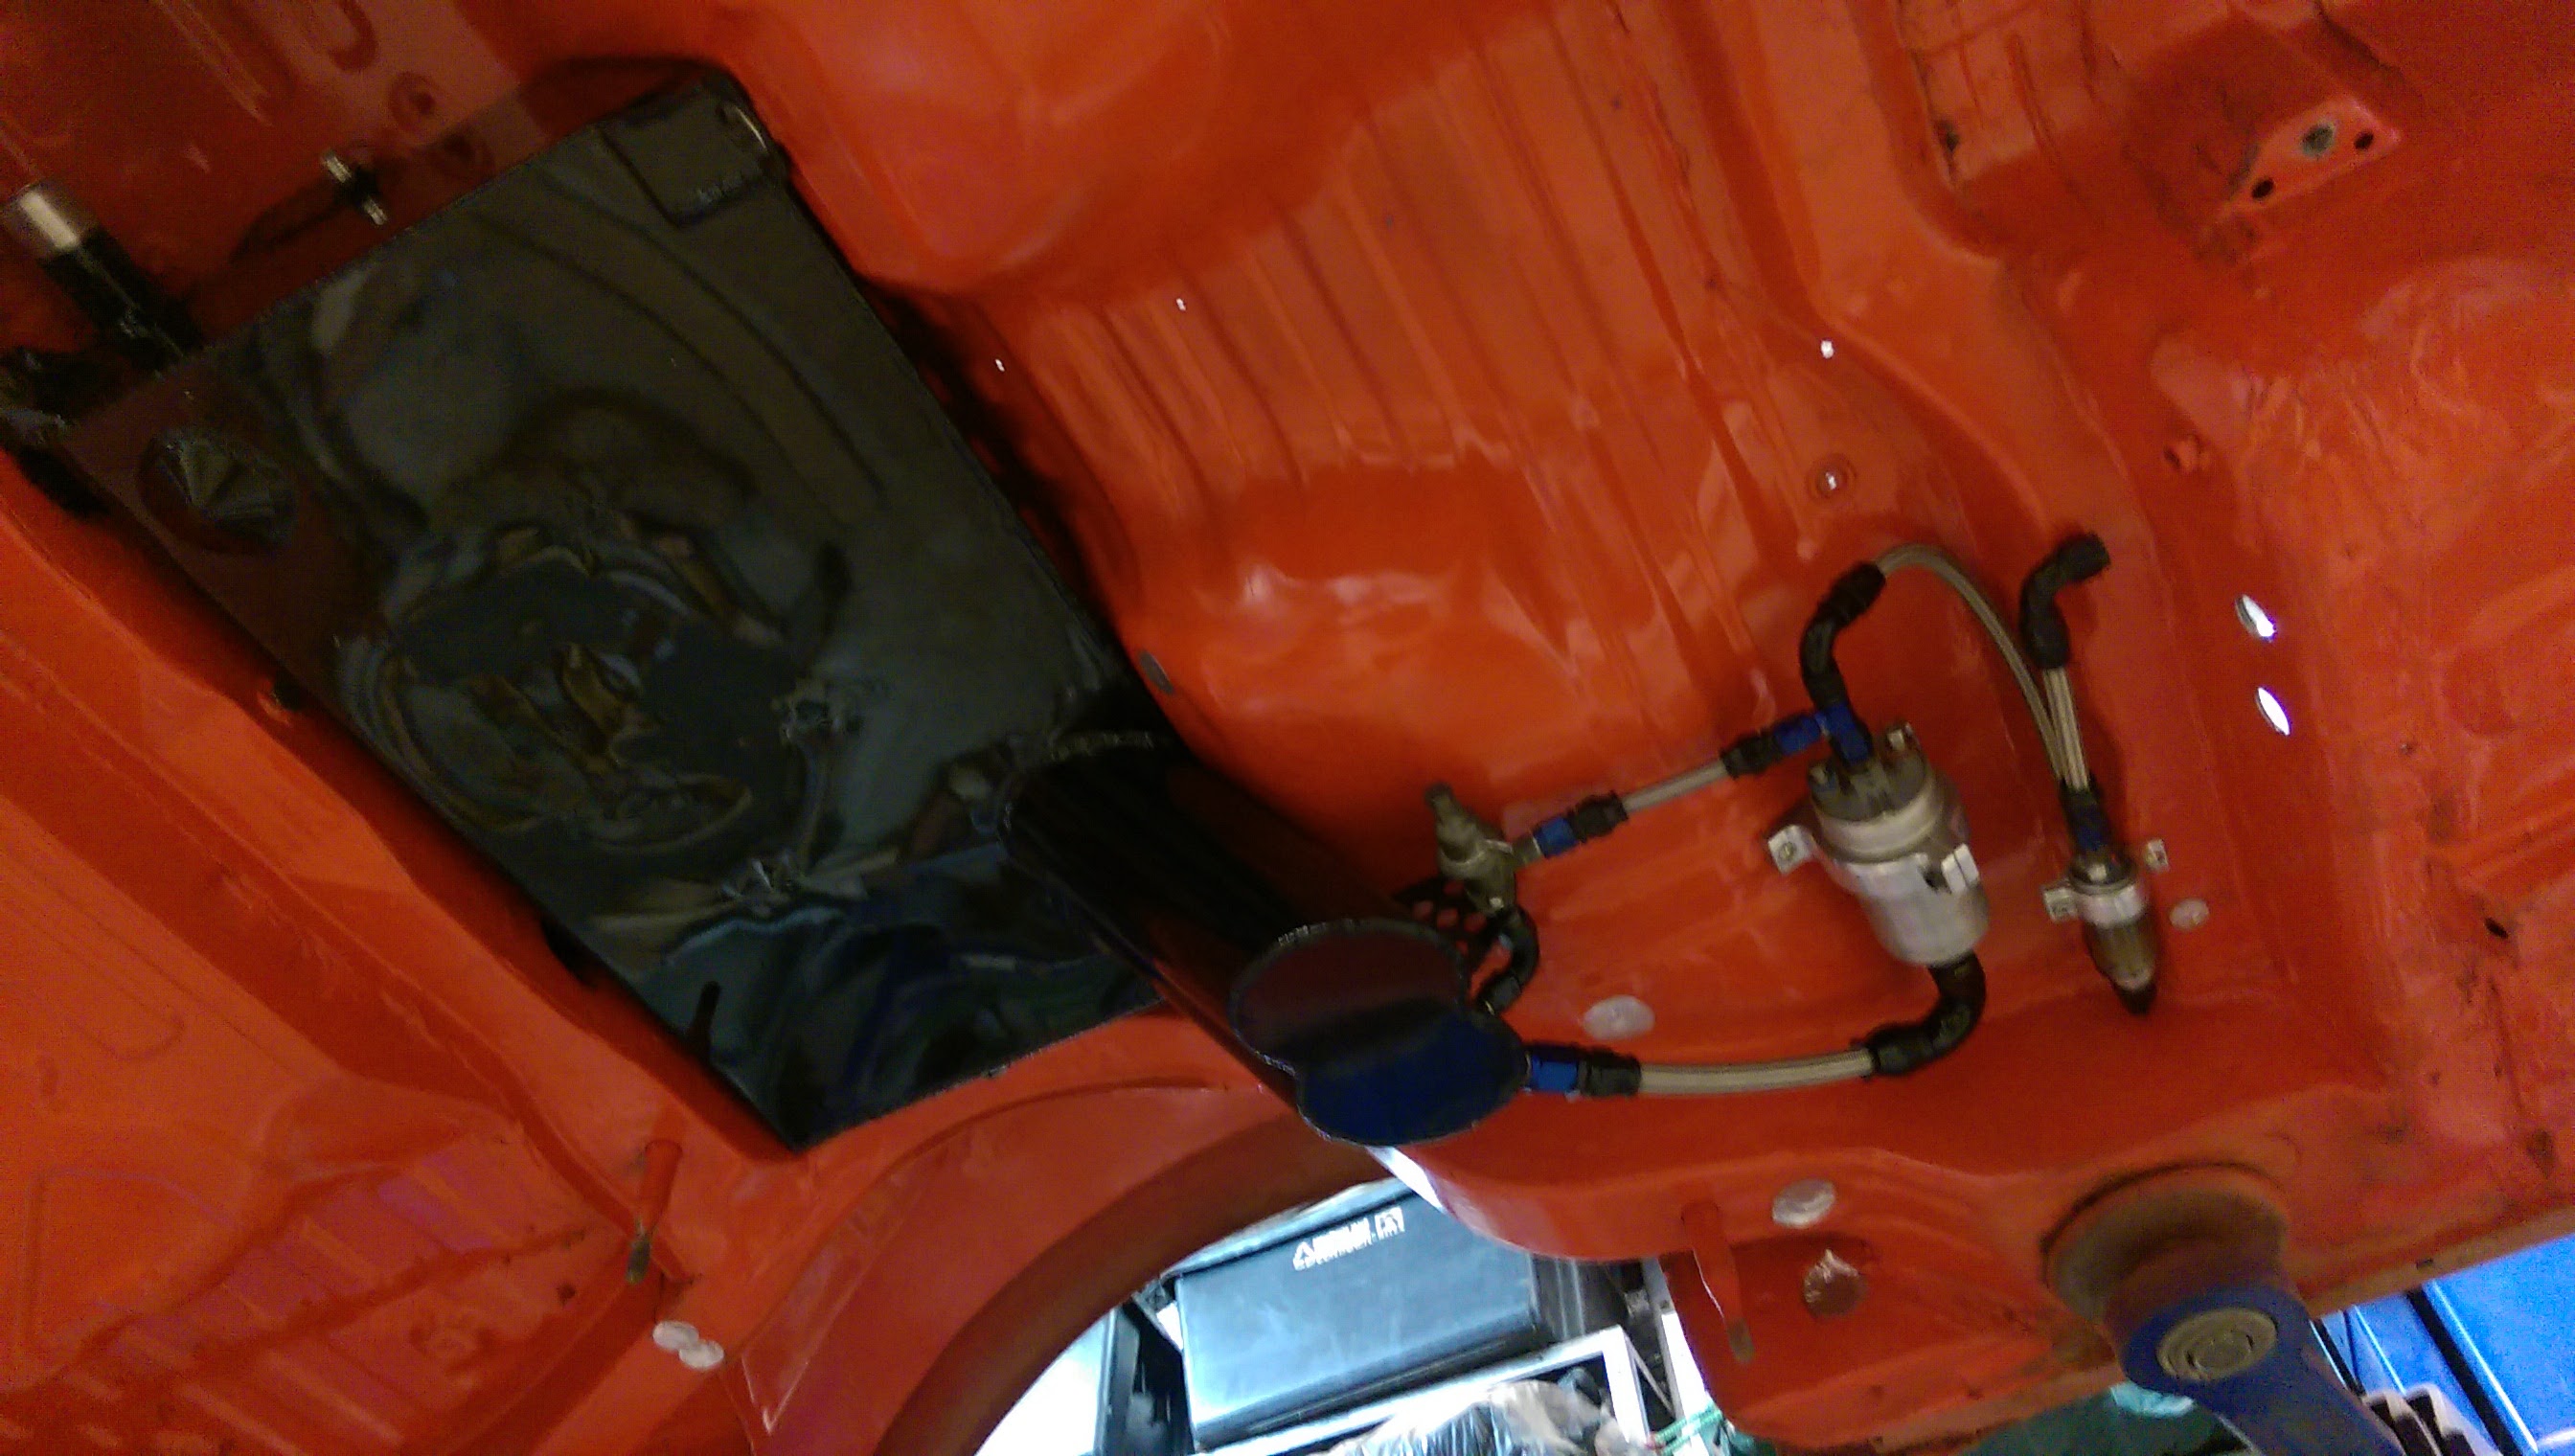
Fuel tank, pump and filter in, the tank needs to be in before the rear subframe goes in.
Assembled all of the hubs, rotors, calipers, shocks etc and got them bolted on.
Feb 6th – Another weeks has flown by.
All of the rear end is back in.
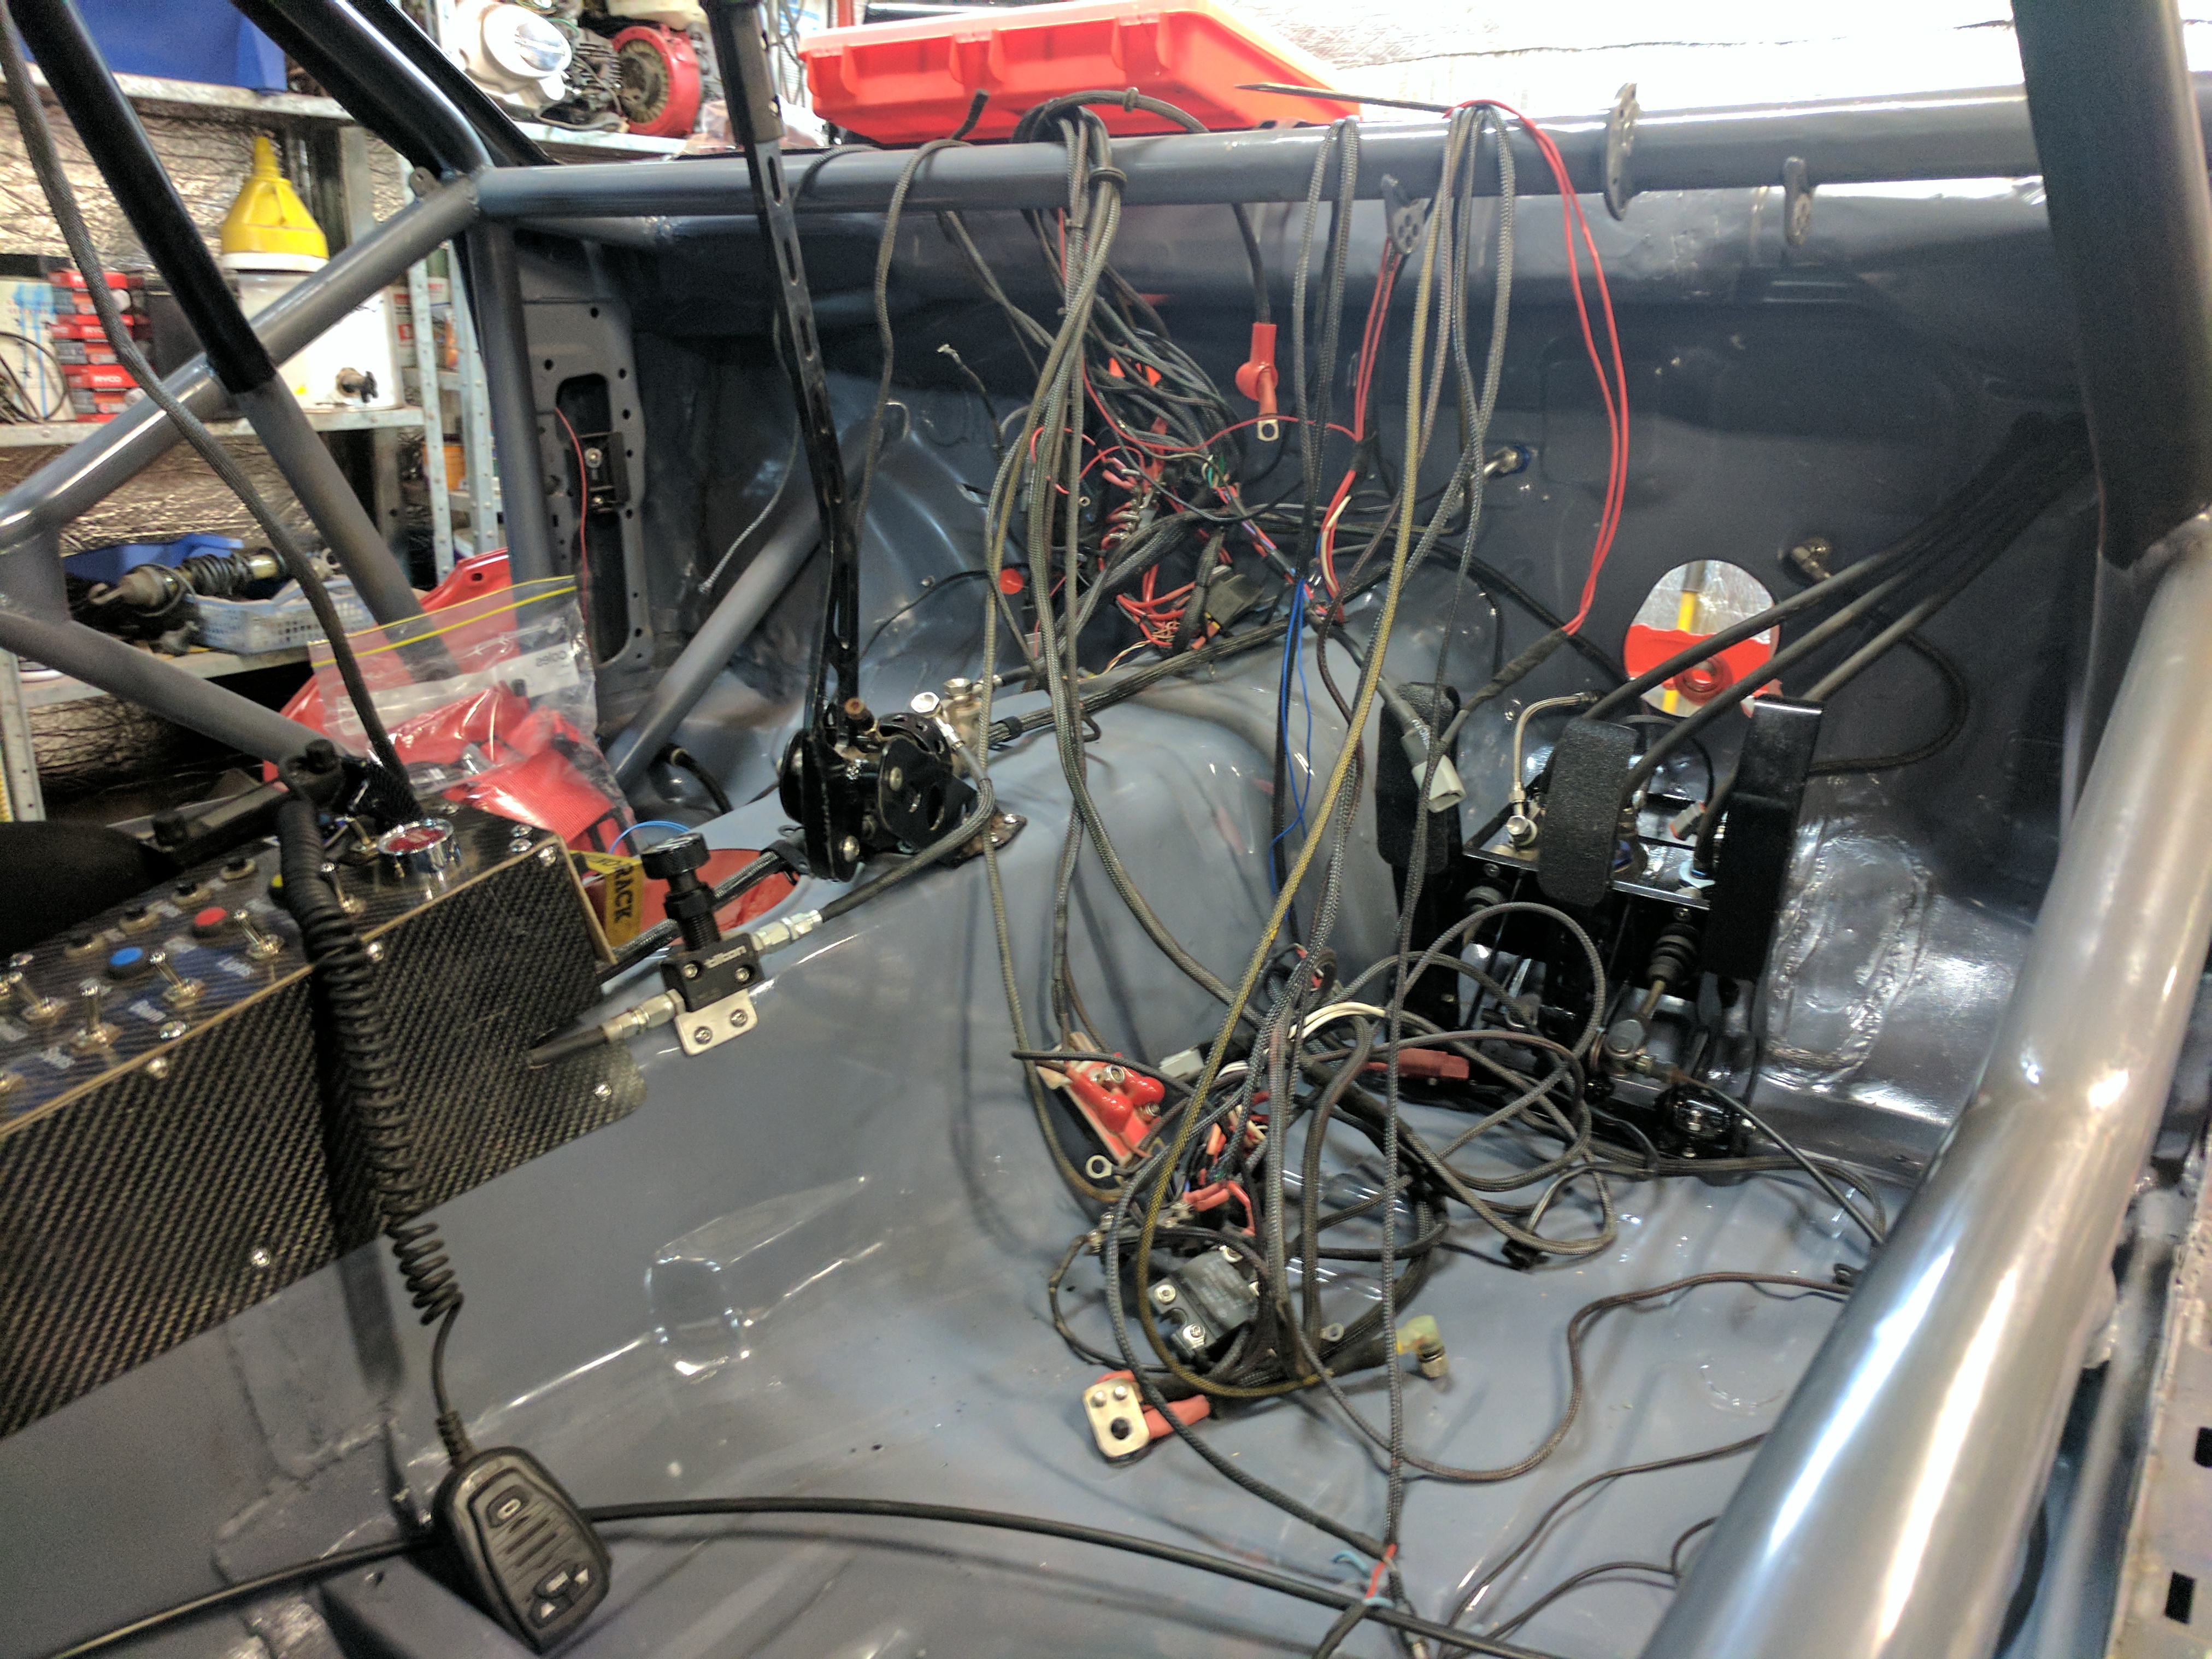
The wiring is layed out in the car, switch panel mounted, brake and fuel lines fitting, handbrake fitted – all made a lot more difficult because the floor is new, all the mounting holes need to be done again.
Next job was to start the fiber-glass work – need a new bonnet, front bumper and front guards, as well as repairing the rear flare on the right side that had a few, well lets call them flesh wounds.
Front bumper done.
Bonnet with gelcoat done, with the cloth layers cut out and ready to lay up.
14th Feb – Bonnet, front guards are out of the molds. Next is to trim these up and sand them ready for paint.
Got a few more bits fitted, like the radiator, and more of the wiring, like the battery kill switch, radiator fan, etc.
Feb 19th
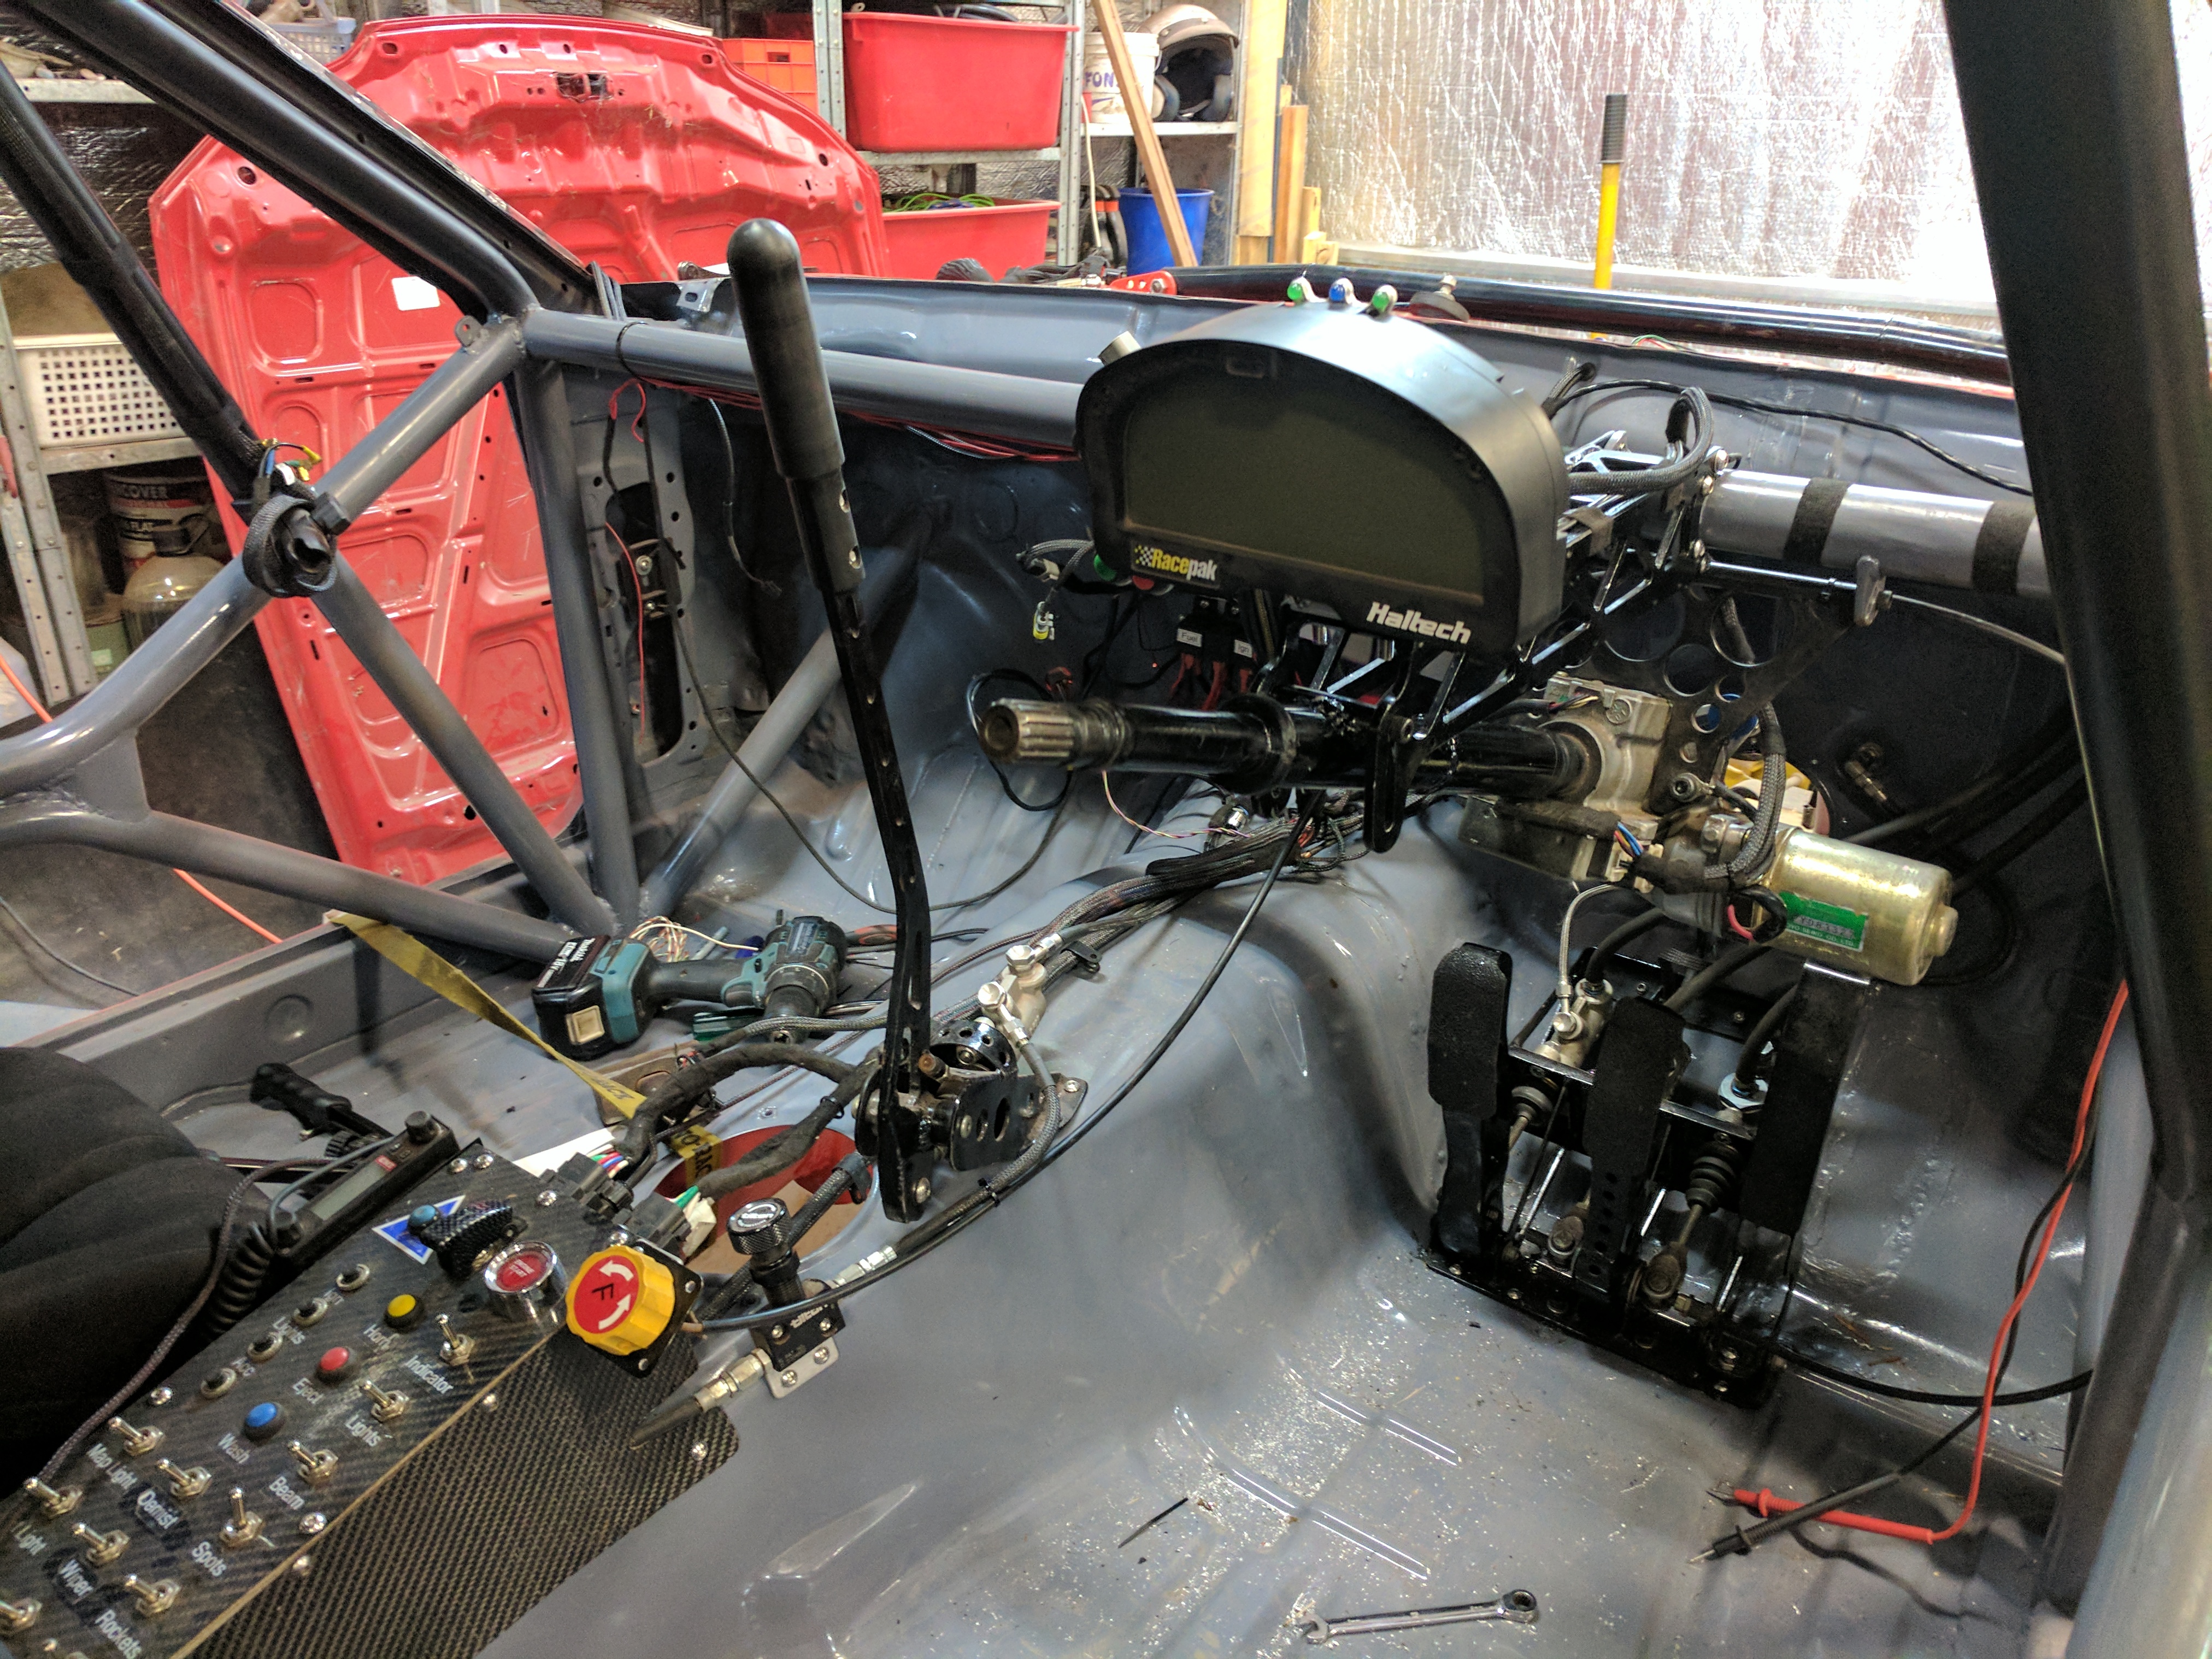
Steering and dash fitted, more wiring finished, etc etc.
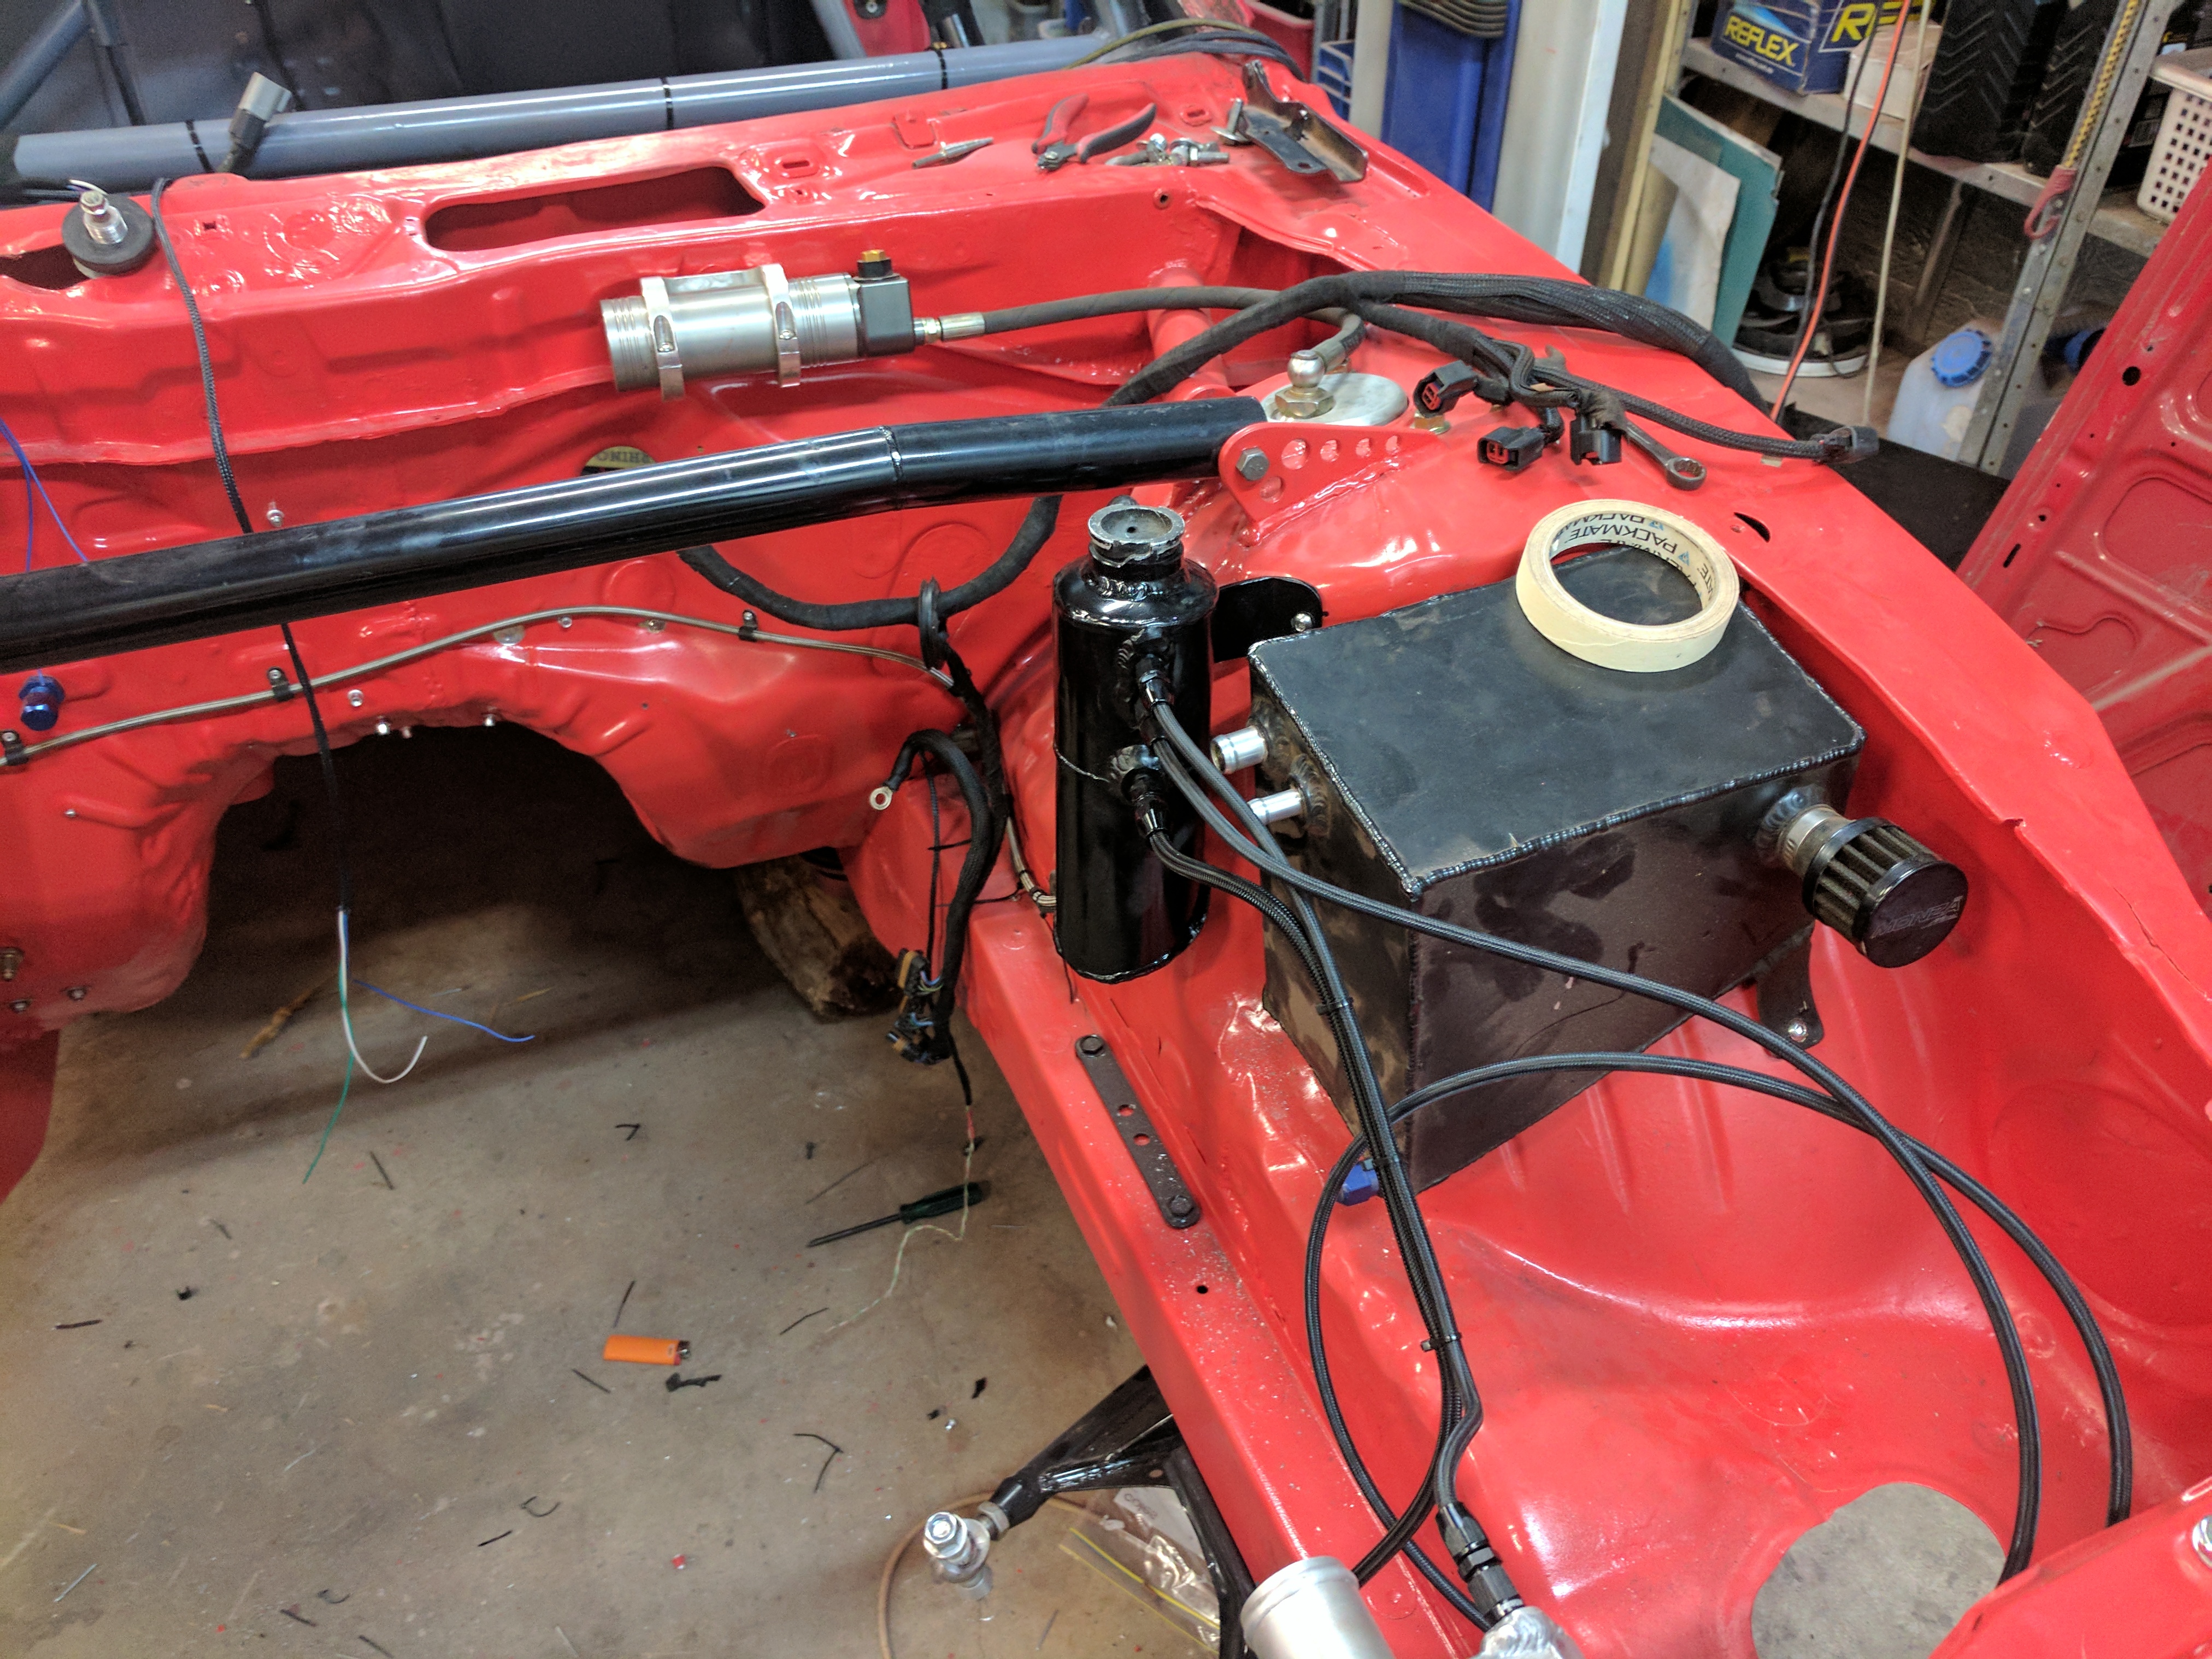
Oil catch tank, radiator overflow tank and lines all going in.
JC helped me out and trimmed up all of the fiberglass parts, so they are ready for a final sanding and painting.
Engine and gearbox went in, engine mounts welded in, cross member in and suspension connected. For the first time in about 10 months she is on her own feet again!
Now just the small task of making it run…
Feb 24th
A day making a few small parts and fitting them to the car. The throttle setup of the car was something that I was not happy with, there was too much travel of the pedal from idle to full, and it was quite linear. I wanted a lot less travel, but a decent amount around idle/low speed, but then rapidly to full throttle with only a small amount of extra pedal movement.
Machined out this rocker, and set it up on the pedal box with some new linkages (the old linkages snapped off in the crash) and I now have it acting like I think I want it to be – although another whole day has passed. The test will be seeing what it feels like when I have a running motor…
Spent the following day being totally exhausted.
But we now have a new exhaust system in place. The other one had its muffler crushed in the post crash extraction, where we had to drag the car out over the fallen tree that we hit, and it was also very beat up where it exited the side of the car – not to mention that it was made from parts of two old STI exhaust systems that were donated from an exhaust shop’s bin.
And that’s us all up to date, although there was another whole bunch of other tiny things achieved as well.
Had the day off work yesterday while the weather was cool, and so got some more jobs done.
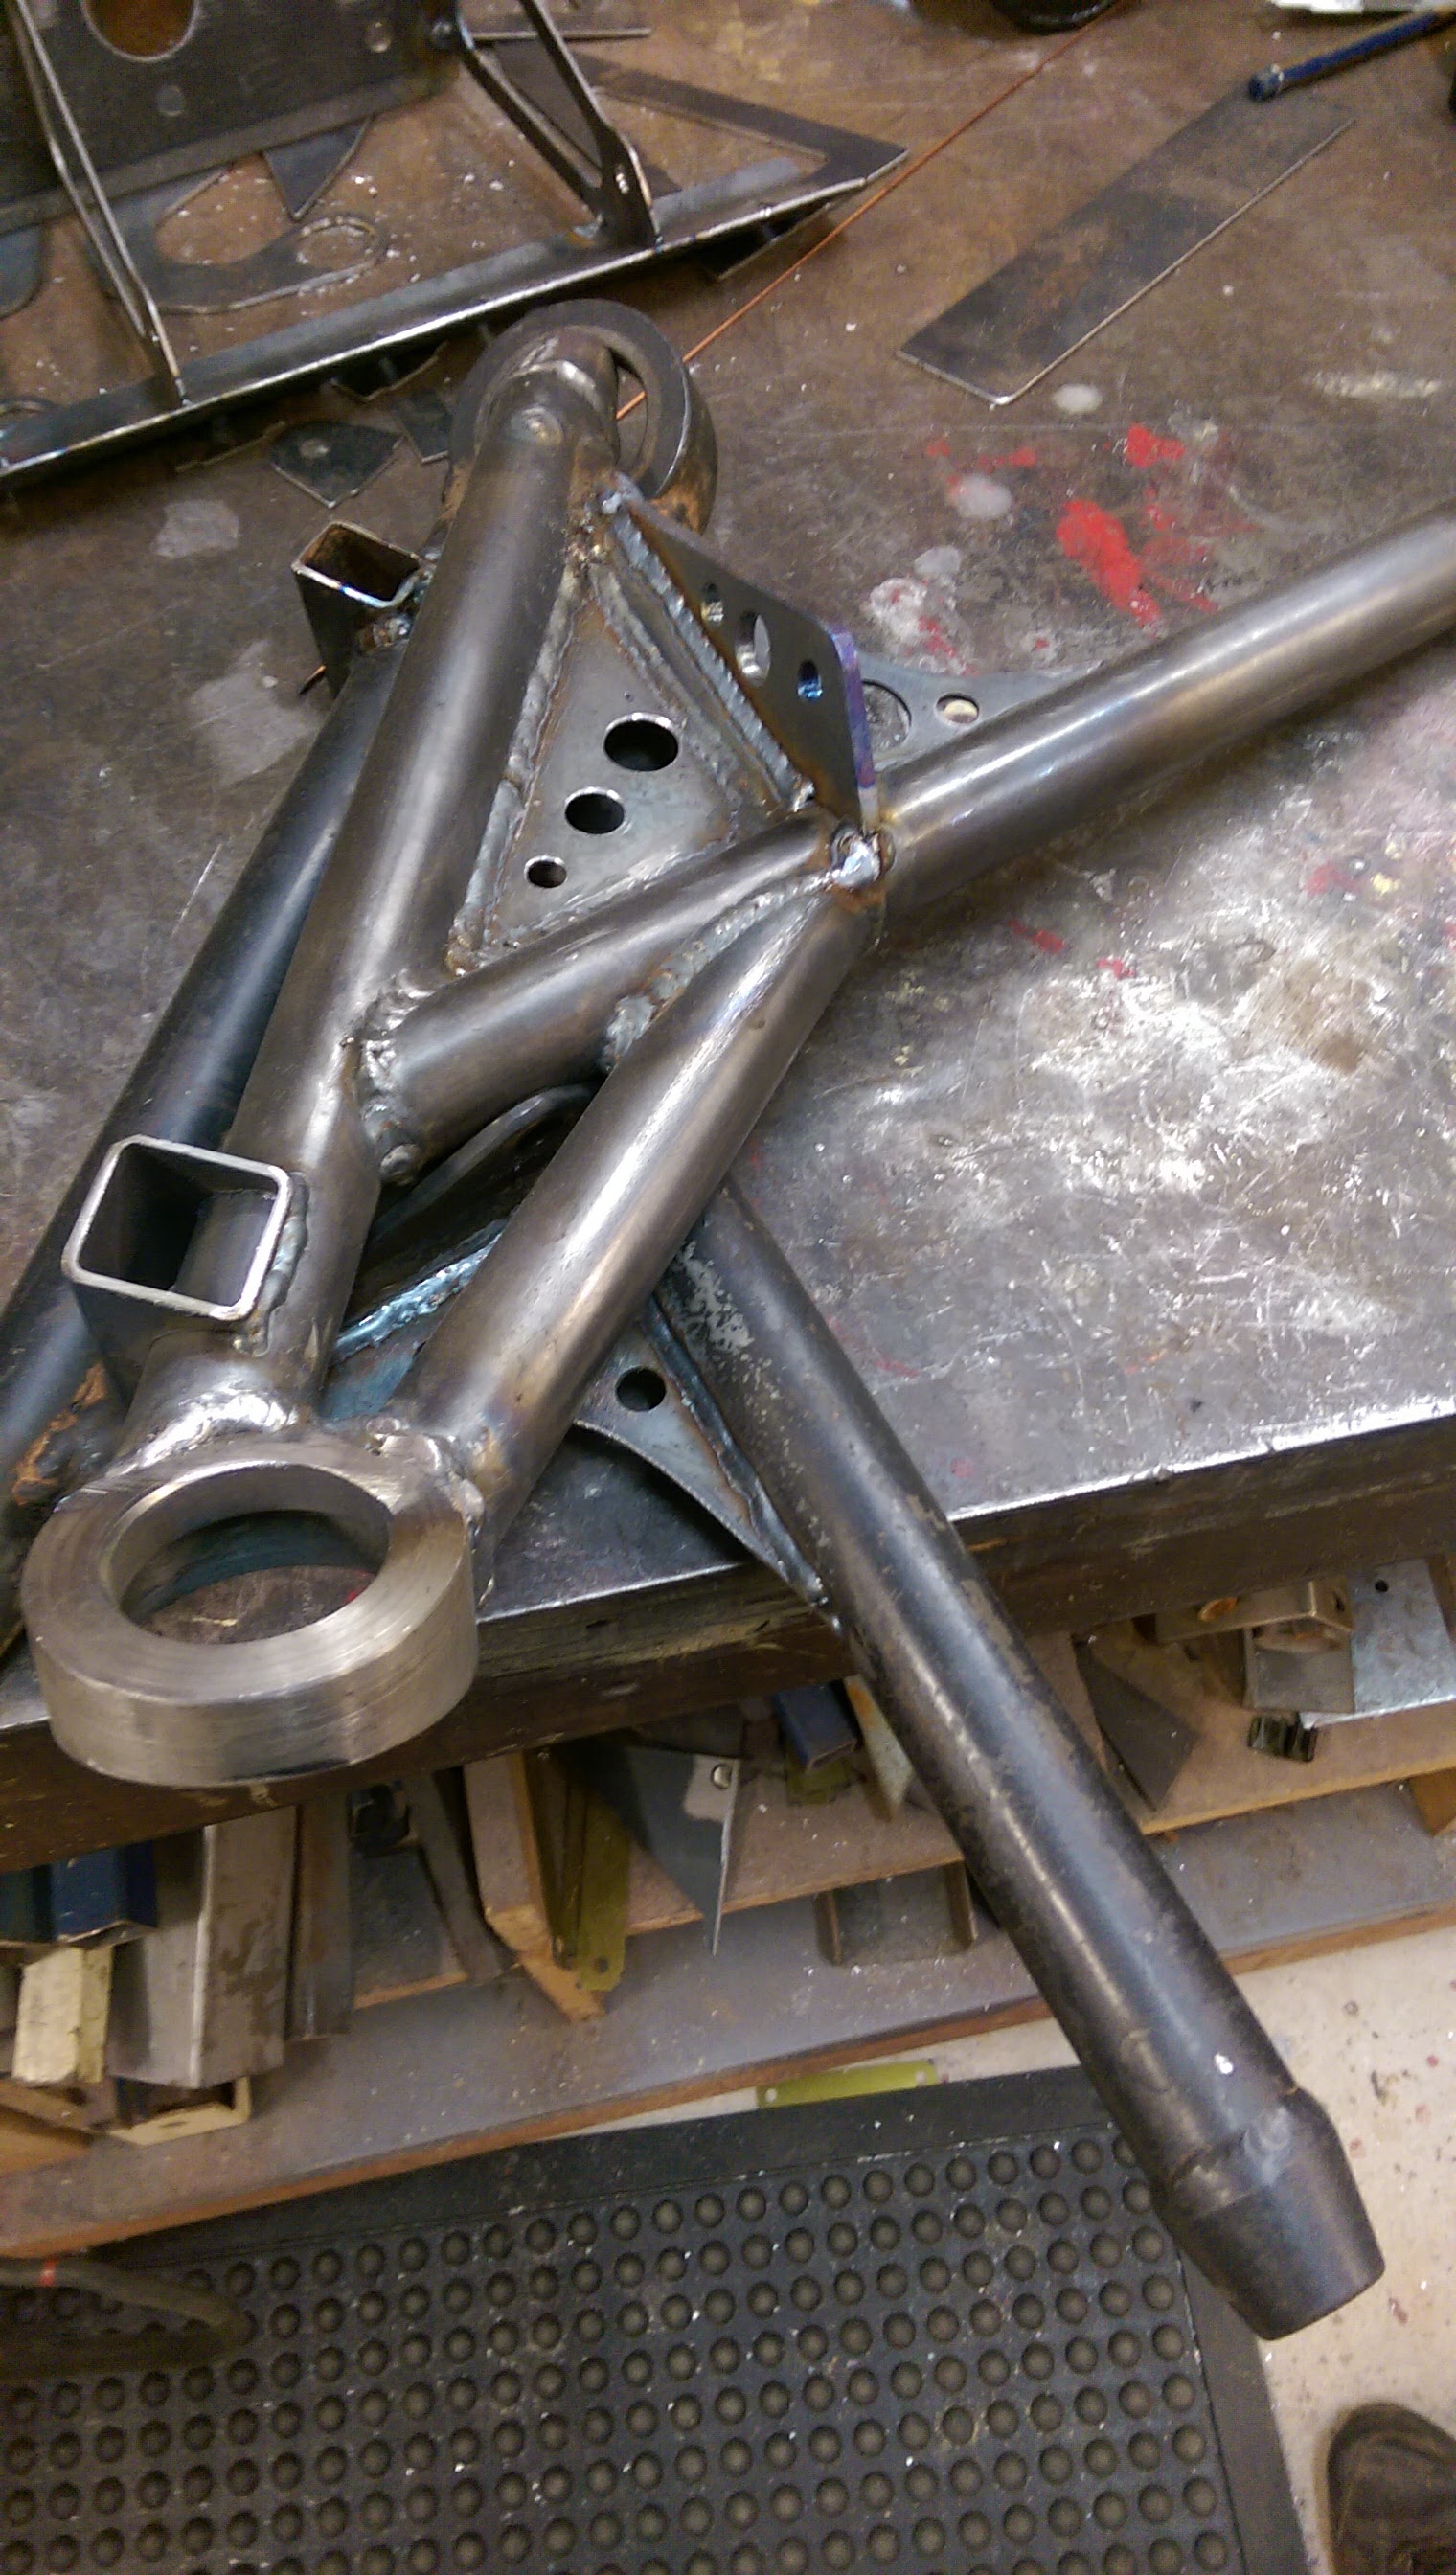
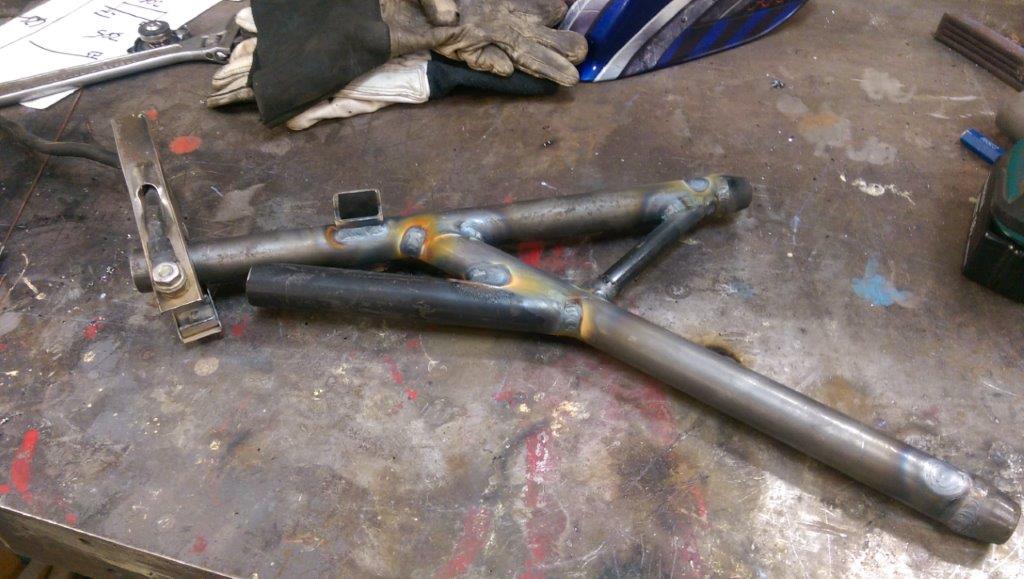
Added some more to the front arm suspension jig, to correctly align the ball joint mount, as it is lean back, and well as angled inwards. For the length of travel that I have in the front, its important that this angle is right, so that it doesn’t hit the full travel of the ball joint. This took a good few hours to get right, and to make up the appropriate parts to hold the arm securely in the right spot. I also made a little piece that bolts into the jog to allow me to use a hole saw to cut the suspension arm tubes at the correct angle to fit the circular mount that holds the ball joint in.
Got the ball joint mount welded on, added in all of the bracing and finished the swaybar mount.
The front suspension arms are done, just needs some paint. I still have the two spare arms to finish, but they will have to wait until after this first event.
I pressured up the fuel tank to check for leaks, then cleaned it all out to make sure there are no bits of metal left inside it. No leaks or other mods needed, so it is sitting in the pile of things to paint. Another job ticked off.
The front cross member was all bent up in the crash, so had to prepare another one. Cleaned all the oil and crud off it, and welded up the areas that are prone to coming apart. Added some extra thickness to the mounting bolt holes, as the spare cross member that I have had the hole on one side elongated, so the mounts are now stronger, and back in the right location. So that’s all complete and in the ‘to be painted’ pile. Once its painted, the rack needs to be bolted on, and setup in the car, so that I can weld the last mount to the chassis of the car. That will be the last major bit in the engine bay, then it can be cleaned up and painted.
Th crash also totaled the right hand side engine mounts, so they need to be remade as well. I made a start on those, just need to wait until the engine is in the car to get them lined up before I finish weld them. It sounds bad, but them bending saved the engine block from being ruined, so definantly the lesser of two evils.
Hopefully tonight after work I can get a few more things done.
That’s how long it is until the first event of the year! Take into account that scrutineering is during the week before, its just over 8 weeks to go………
That is all the more scary when it currently looks like this.
Huge thanks to JC who spent the day yesterday helping fitting in the floor, which is now all tacked into place. A bit more welding, and some grinding and then I can paint it and start the re-assembly.
Since the last post:
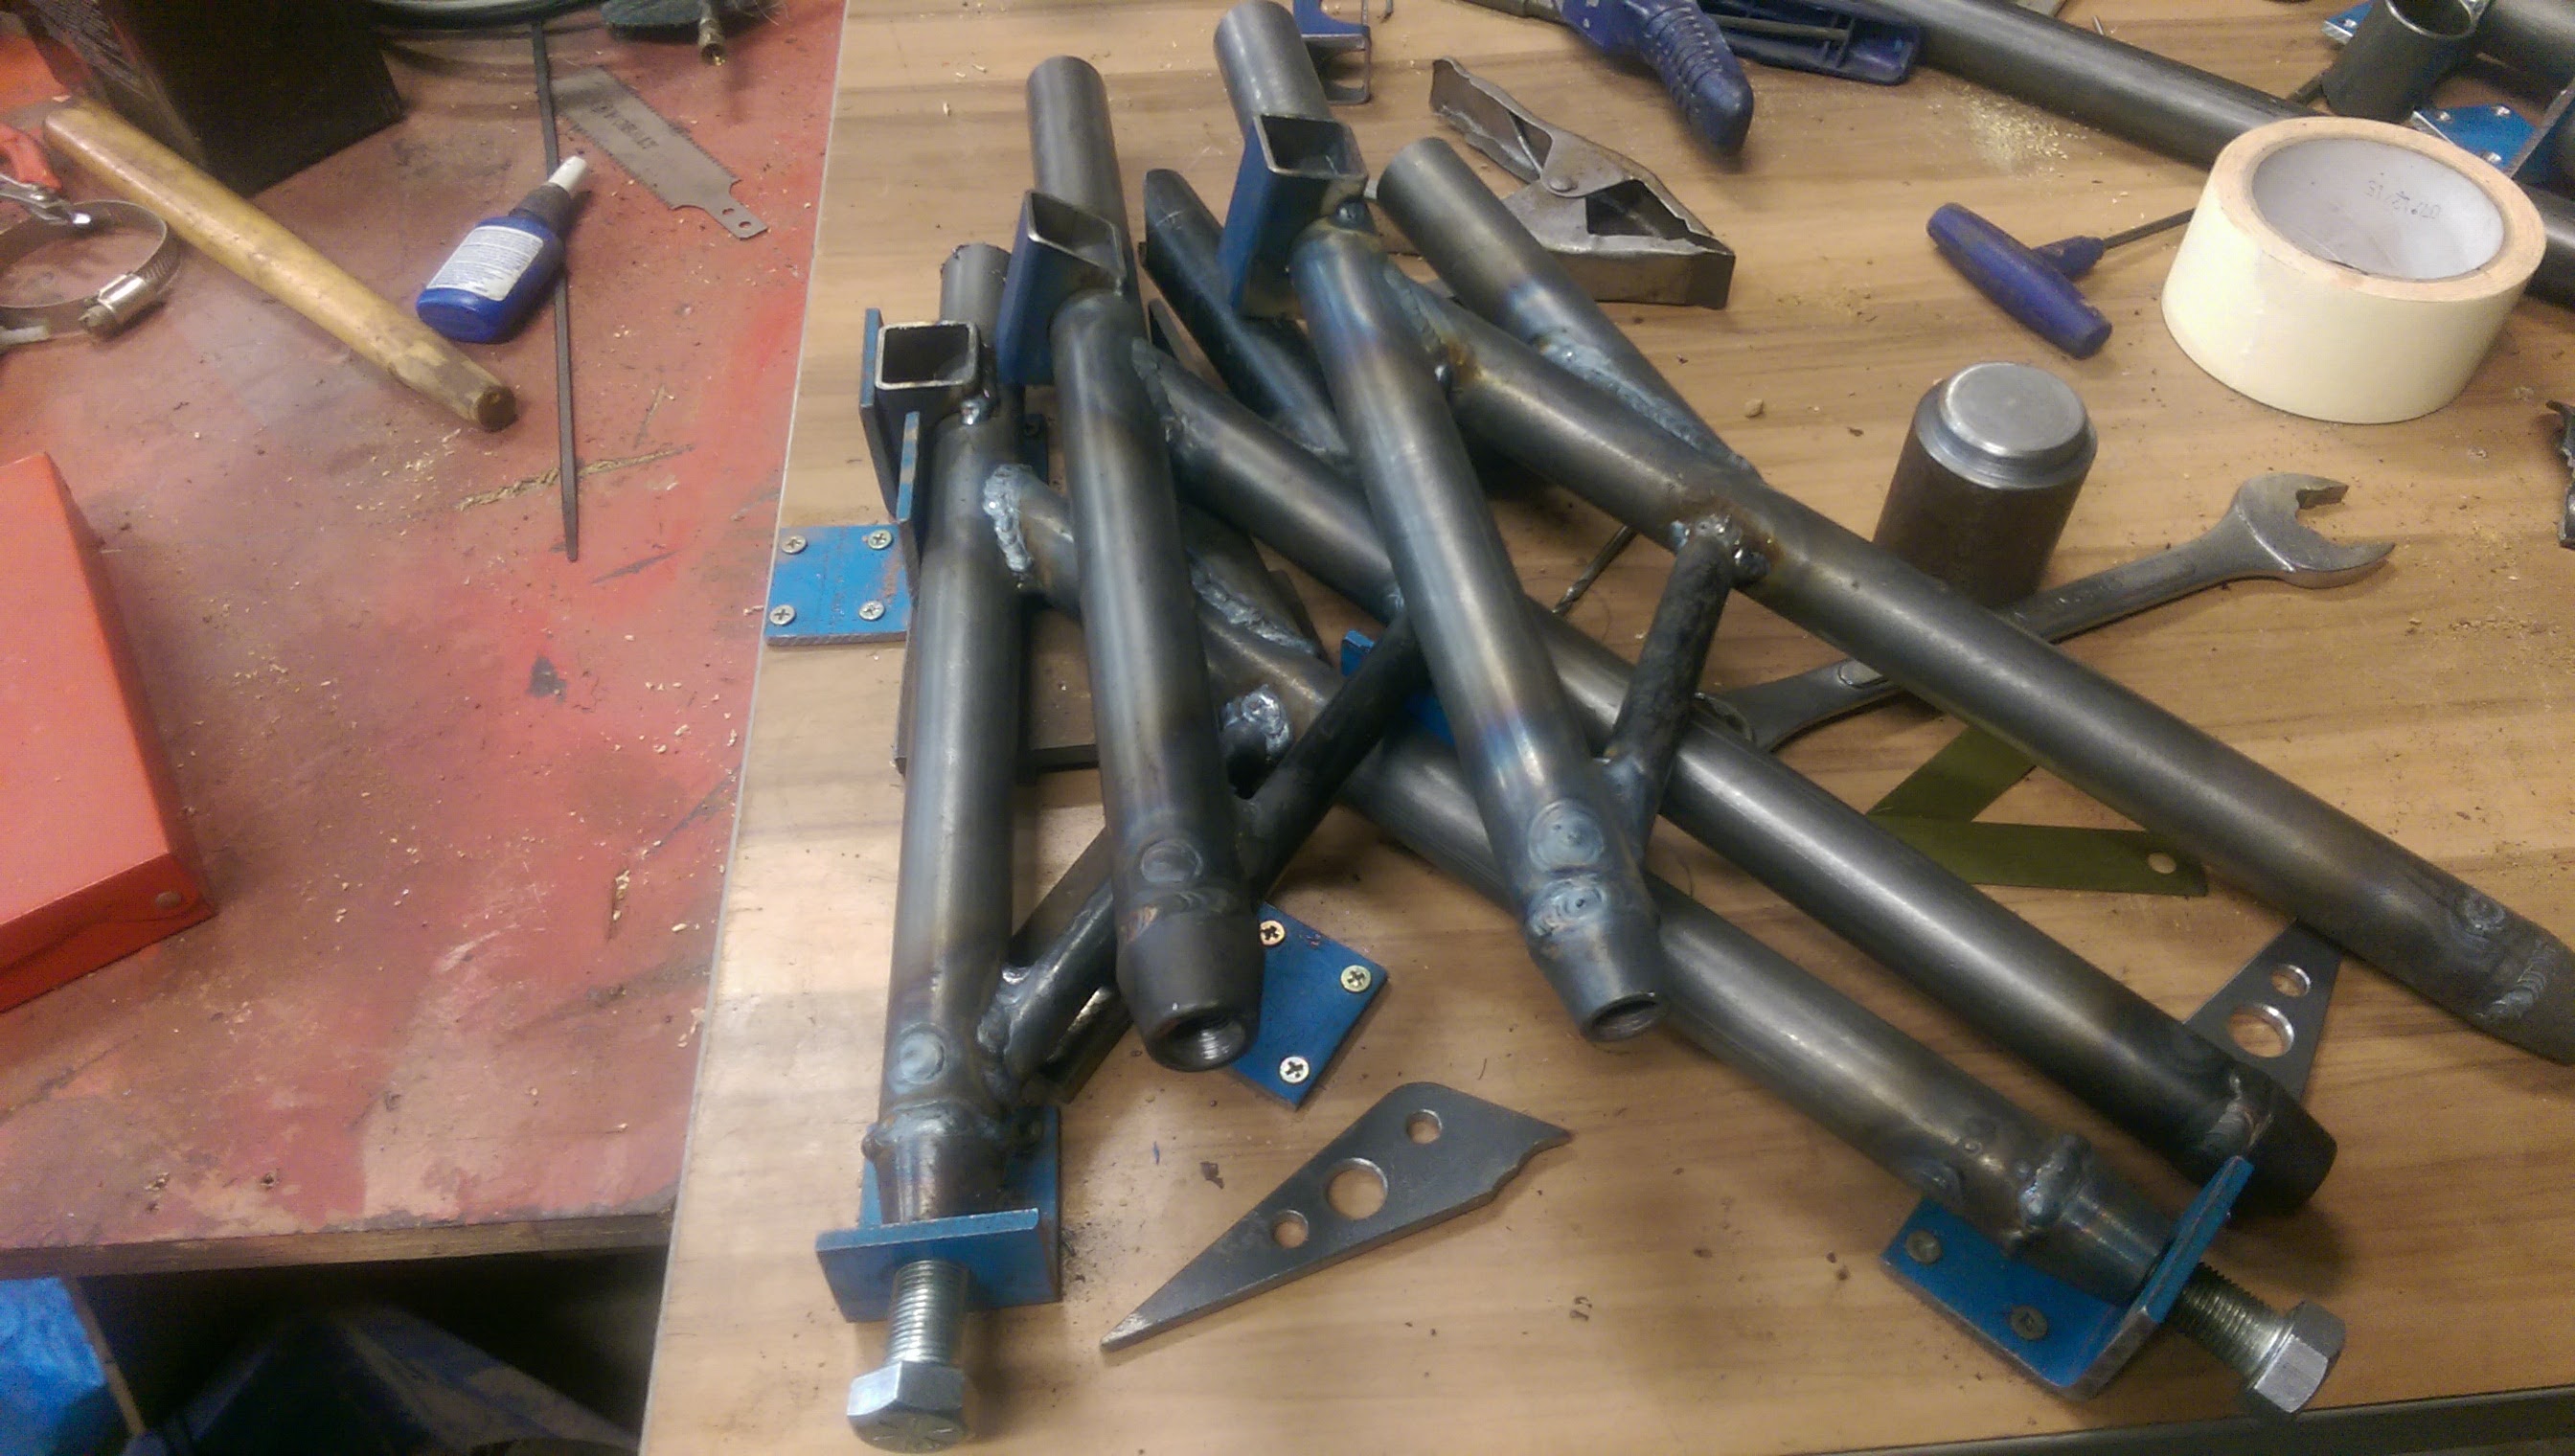
The front suspension arms, including spares are 90% complete.
All of the seam welding was done
The new pedal box is in progress
New fuel tank completed
New tank meant new fuel pump and filter placement, so that needed a couple of brackets.
Strut tower re-enforcement and strut brace mount complete
Plus I’m sure a lot more, all that I failed to take a picture of.
I’ve ordered a bunch of different parts, ready for the reassembly- so many more parts than you would think have been destroyed. Everything from gearbox cross members being bent, to simple things like relays that are now in two pieces.
The Darling 200 rally was on, so no car progress was made on Saturday.
Sunday was finishing off the cage bars, and the plan was to get the floor done.
The cage is now done, but as usual I found another bunch of things that I should finish before the floor goes back in, so I decided to leave it out for now. No floor makes access to inside the car and under the dash a lot easier, at least that is my excuse.
All of these other things that I found involved burning myself with the MIG welder and then the grinder, so I figured I might as well get side tracked and go and do something else that sounded more fun.
I got the inserts for the suspension arms machined.
And with that now done, and the suspension arm jig done I figured why not make the replacement arm… It’s not procrastination if you are achieving things, right?
After I weld on the ball joint mount, its ready for paint and then that task is done. If time permits I want to make a set of spare front arms, we’ll see how things go.
What other excuses do I have?
Oh, the radiator need to be modified, that is a good excuse.
I cut off the stock shroud mounts, made a new bottom outlet and cut off the filler neck/cap. The bottom outlet was replaced by a slightly bigger one, the same size as the water pump inlet as its much easier to find hoses with the same size on both ends. Welded up the old mounts, and sealed off the radiator cap opening as I run a separate coolant header tank.
Added the air bleed and the return lines to it, and made some threaded inserts to mount the fan and and welded those into the rad. Now all I need is a fan that has blades on it….
Finished off a bunch of other odd jobs in a desperate attempt to not have to do any more overhead MIG welding. After those were complete, I had to man up and fire up the welder ready for the joys of showering yourself with red hot metal. There were a number of places up under the dash area, and in the foot well that needed to be welded from the inside, to join the original car to the donor parts, so I got all of these places welded back together, with a touch of seam welding to ensure its all stronger than is was before.
Sadly it was now getting too late on Sunday night to fire up the angle grinder for an hour to clean everything up ready for paint, so that will have to wait – shame…..
For much of the last two months, not a lot of car progress has been had. Between the flu, doing road closures at a few rallies, a car club slot car day with my little boy, and a couple of weekends cleaning up the shed and the used car yard and two months has gone.
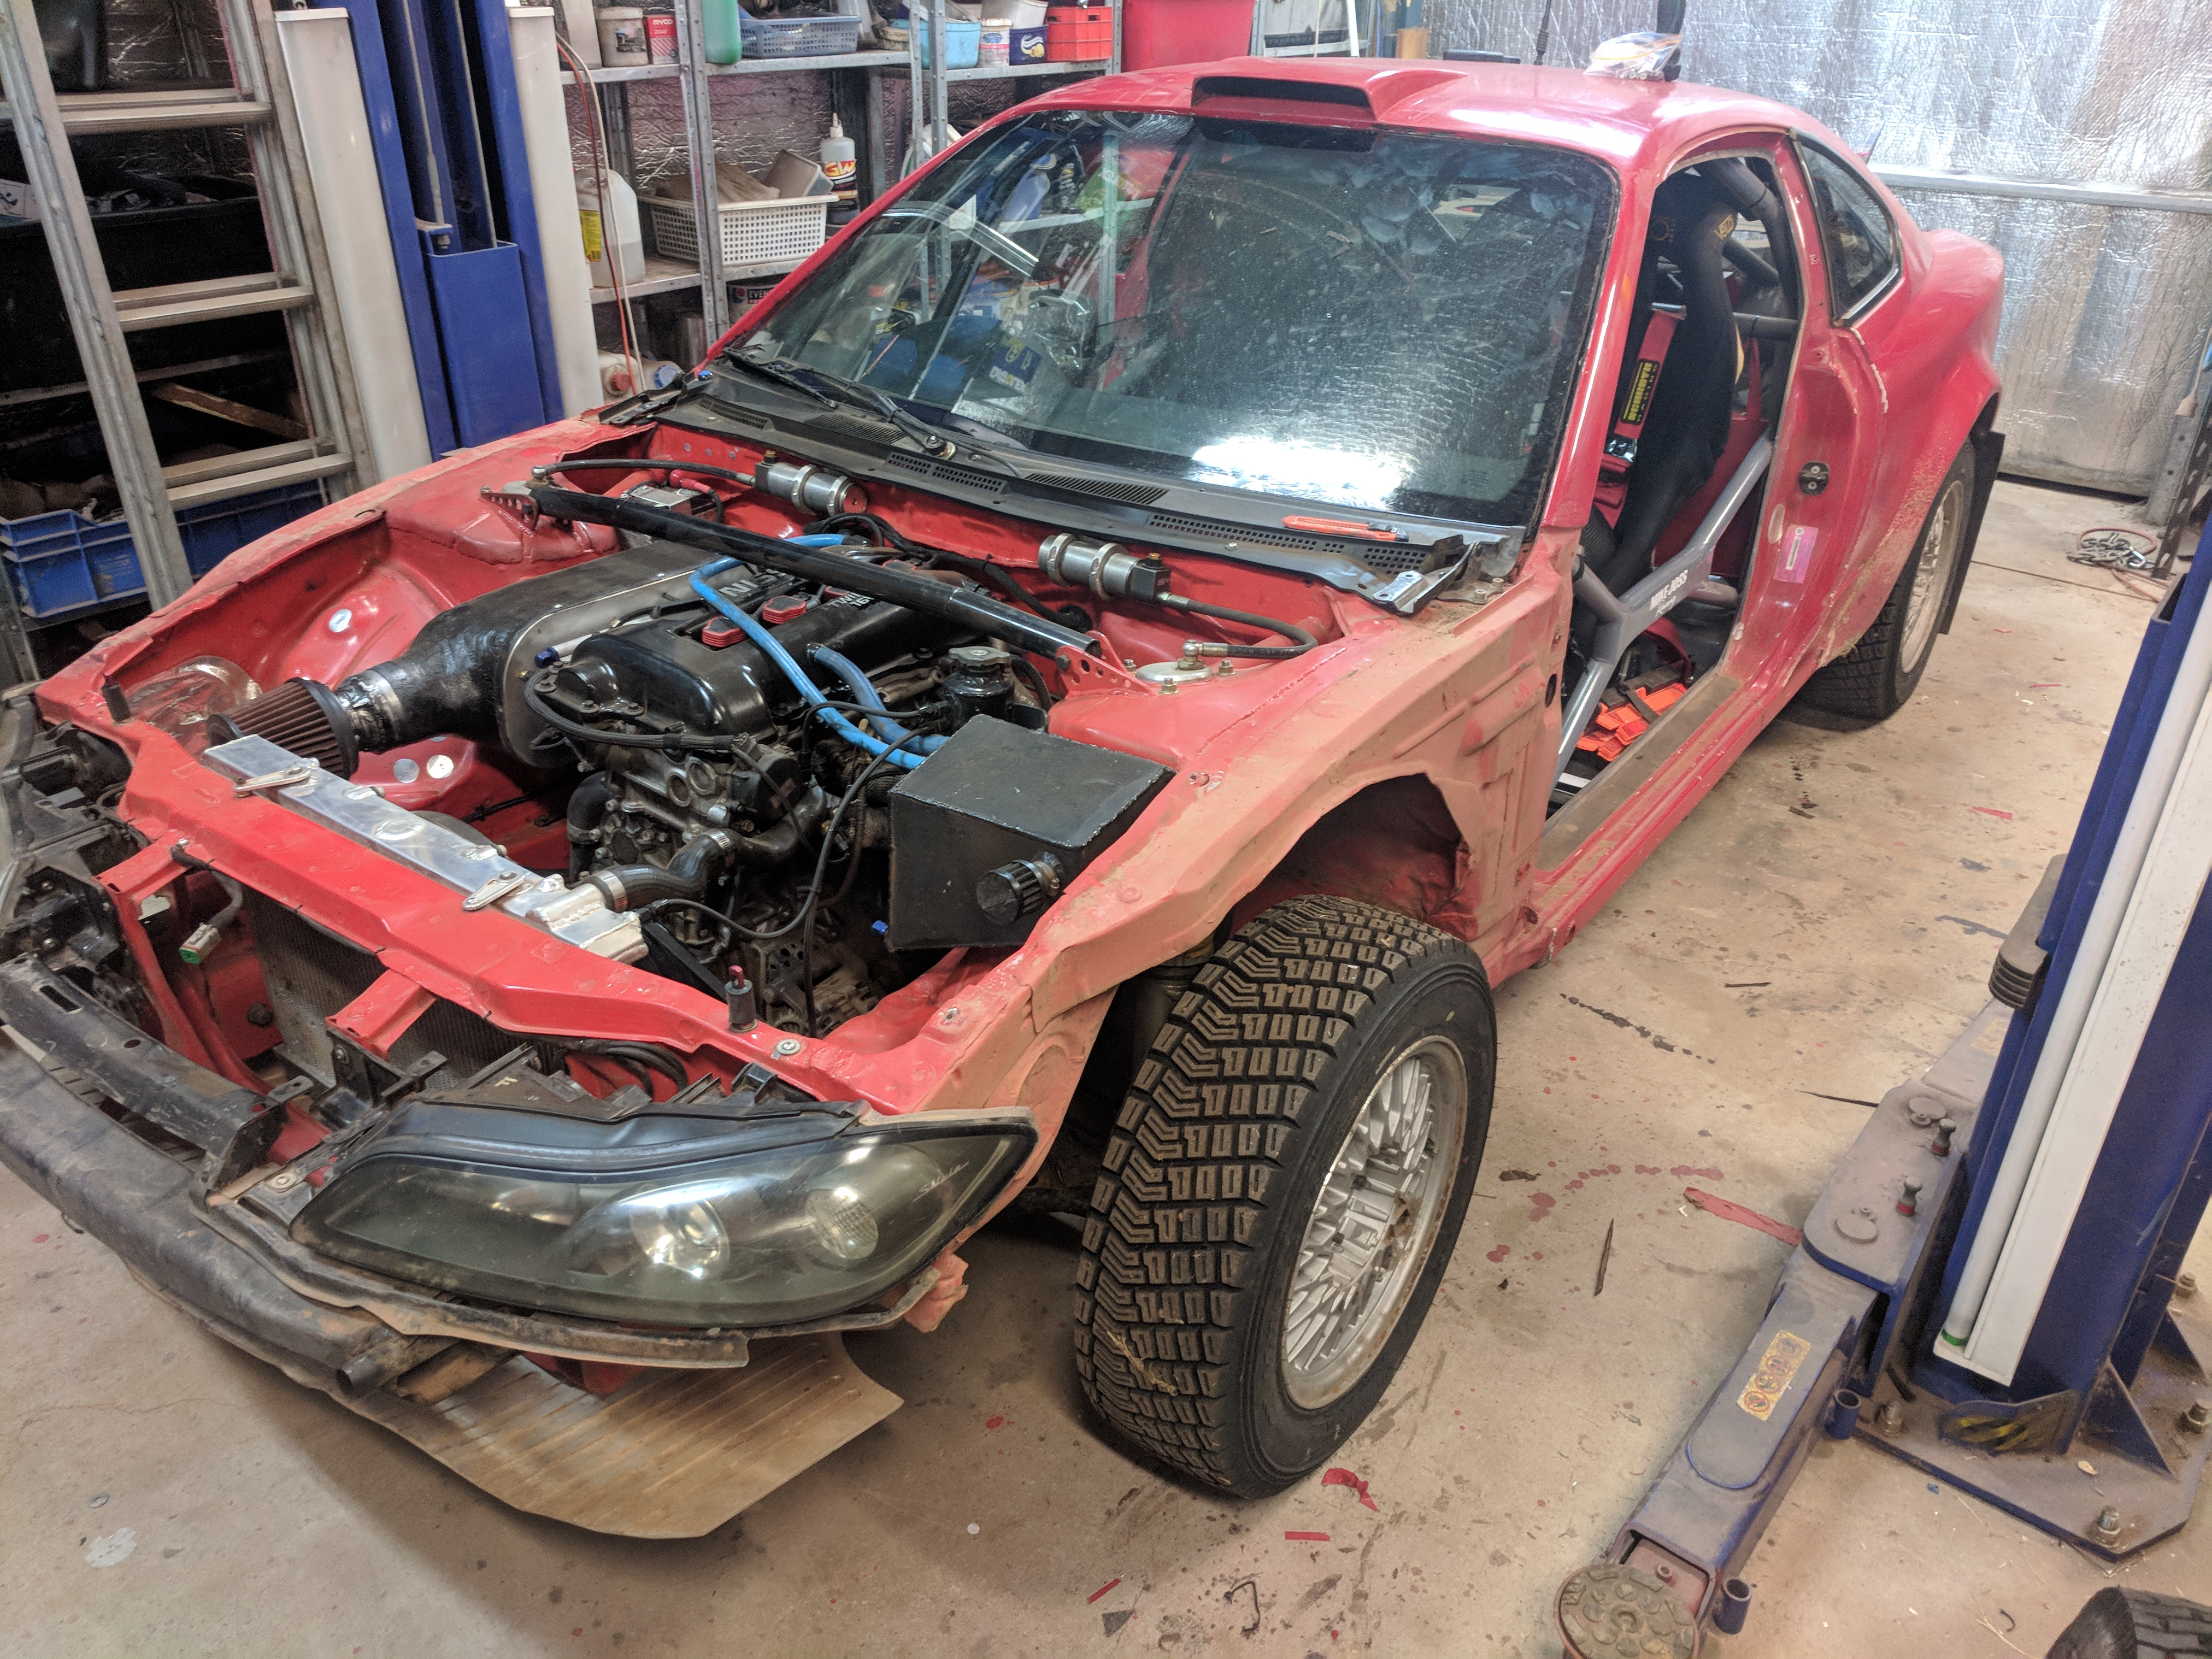
A few managed to get a few car things sorted out, starting with cutting up one of the new S15s that I have collected in recent months.
Lots of right rear damage and passenger side door damage. Cut the front off, and the left rear outer 1/4 panel and have stored them behind the shed. The rest has been returned to the scrap metal yard.
With the rally car totally in pieces, there are bits of it spread throughout the shed that are taking up a lot more room than they do when its all together, I got too frustrated with it all laying everywhere so started operation shed clean. The plan was to spend a day, get it all tidied up and then go again. 5 full days worth of weekends, adding new shelves, modifying a work bench and moving it to the other side of the shed, adding more insulation, taking a full trailer load of scrap metal away and its still not complete! I am at least at the stage where walking in the shed no longer involves tripping over things at every step.
I ordered the parts to fix the rear shocks that I damaged at the Forest Rally, so they are ready to be dropped off, refilled with oil and re-gassed as soon as I get a chance.
One of the jobs to do was to fit the thermo to the new radiator, the other radiator was twisted and leaks after the crash. Took the fan off and…
Hmm, need to add a new thermo fan to the shopping list…. Looks like it was spinning when the radiator bent.
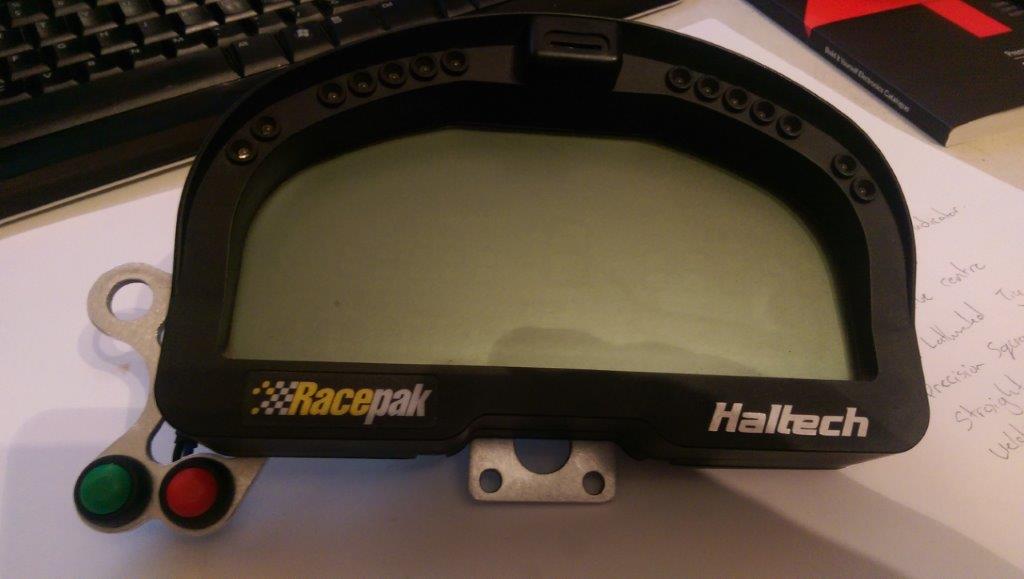
One of the items that I wasn’t happy with was the rush job on the mount for the digital dash, so while it was 38 degrees on Saturday (too hot for me to go outside) I sketched up a new one, and let the mill cut it out while I stayed inside in the AC. Was really happy how it turned out!
Sundays weather was far more tolerable, so got stuck into the car and got a decent amount complete.
Made a nicer version of the suspension arm jig, so I can remake the right front arm. The previous one worked, but it was rough and din’t make it easy to weld up the arms while they were in the jig… This one is no masterpiece, but its a lot more accurate than the old one and is much easier to make the arm in. Hopefully tomorrow I can get to GoGear and get some more moly tube, so that I can finish off the arm on Sunday.
I also managed to finish the top tube out to the strut tower, and have the lower tube 80% complete. Another thing on the list to finish on Sunday.
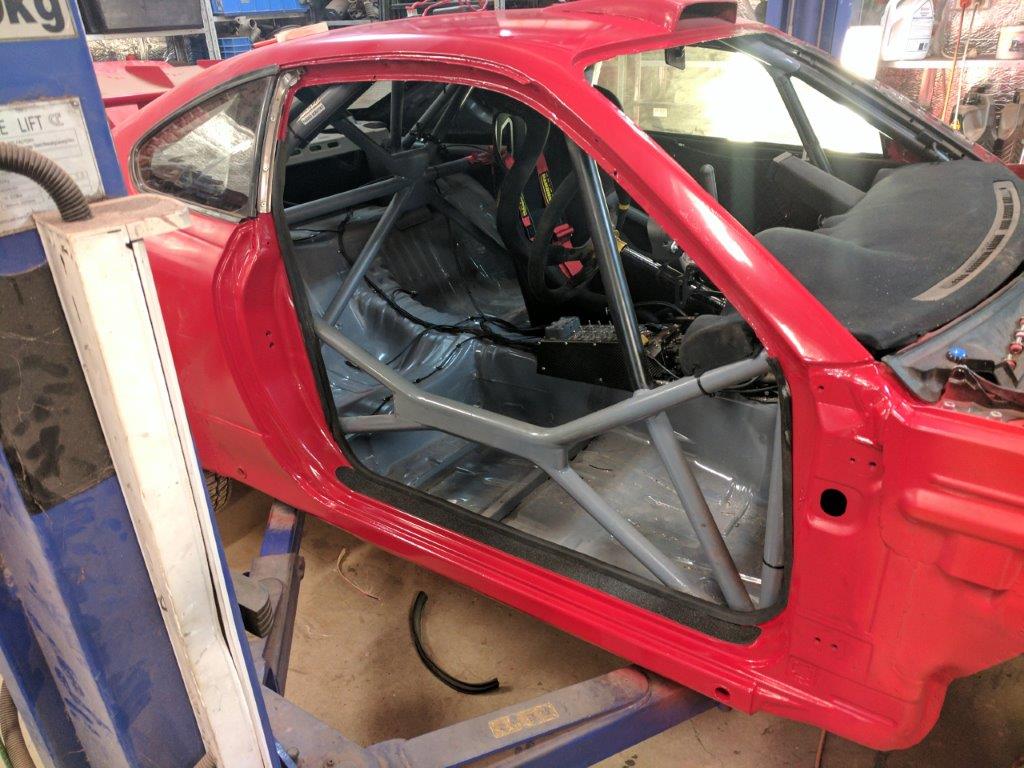
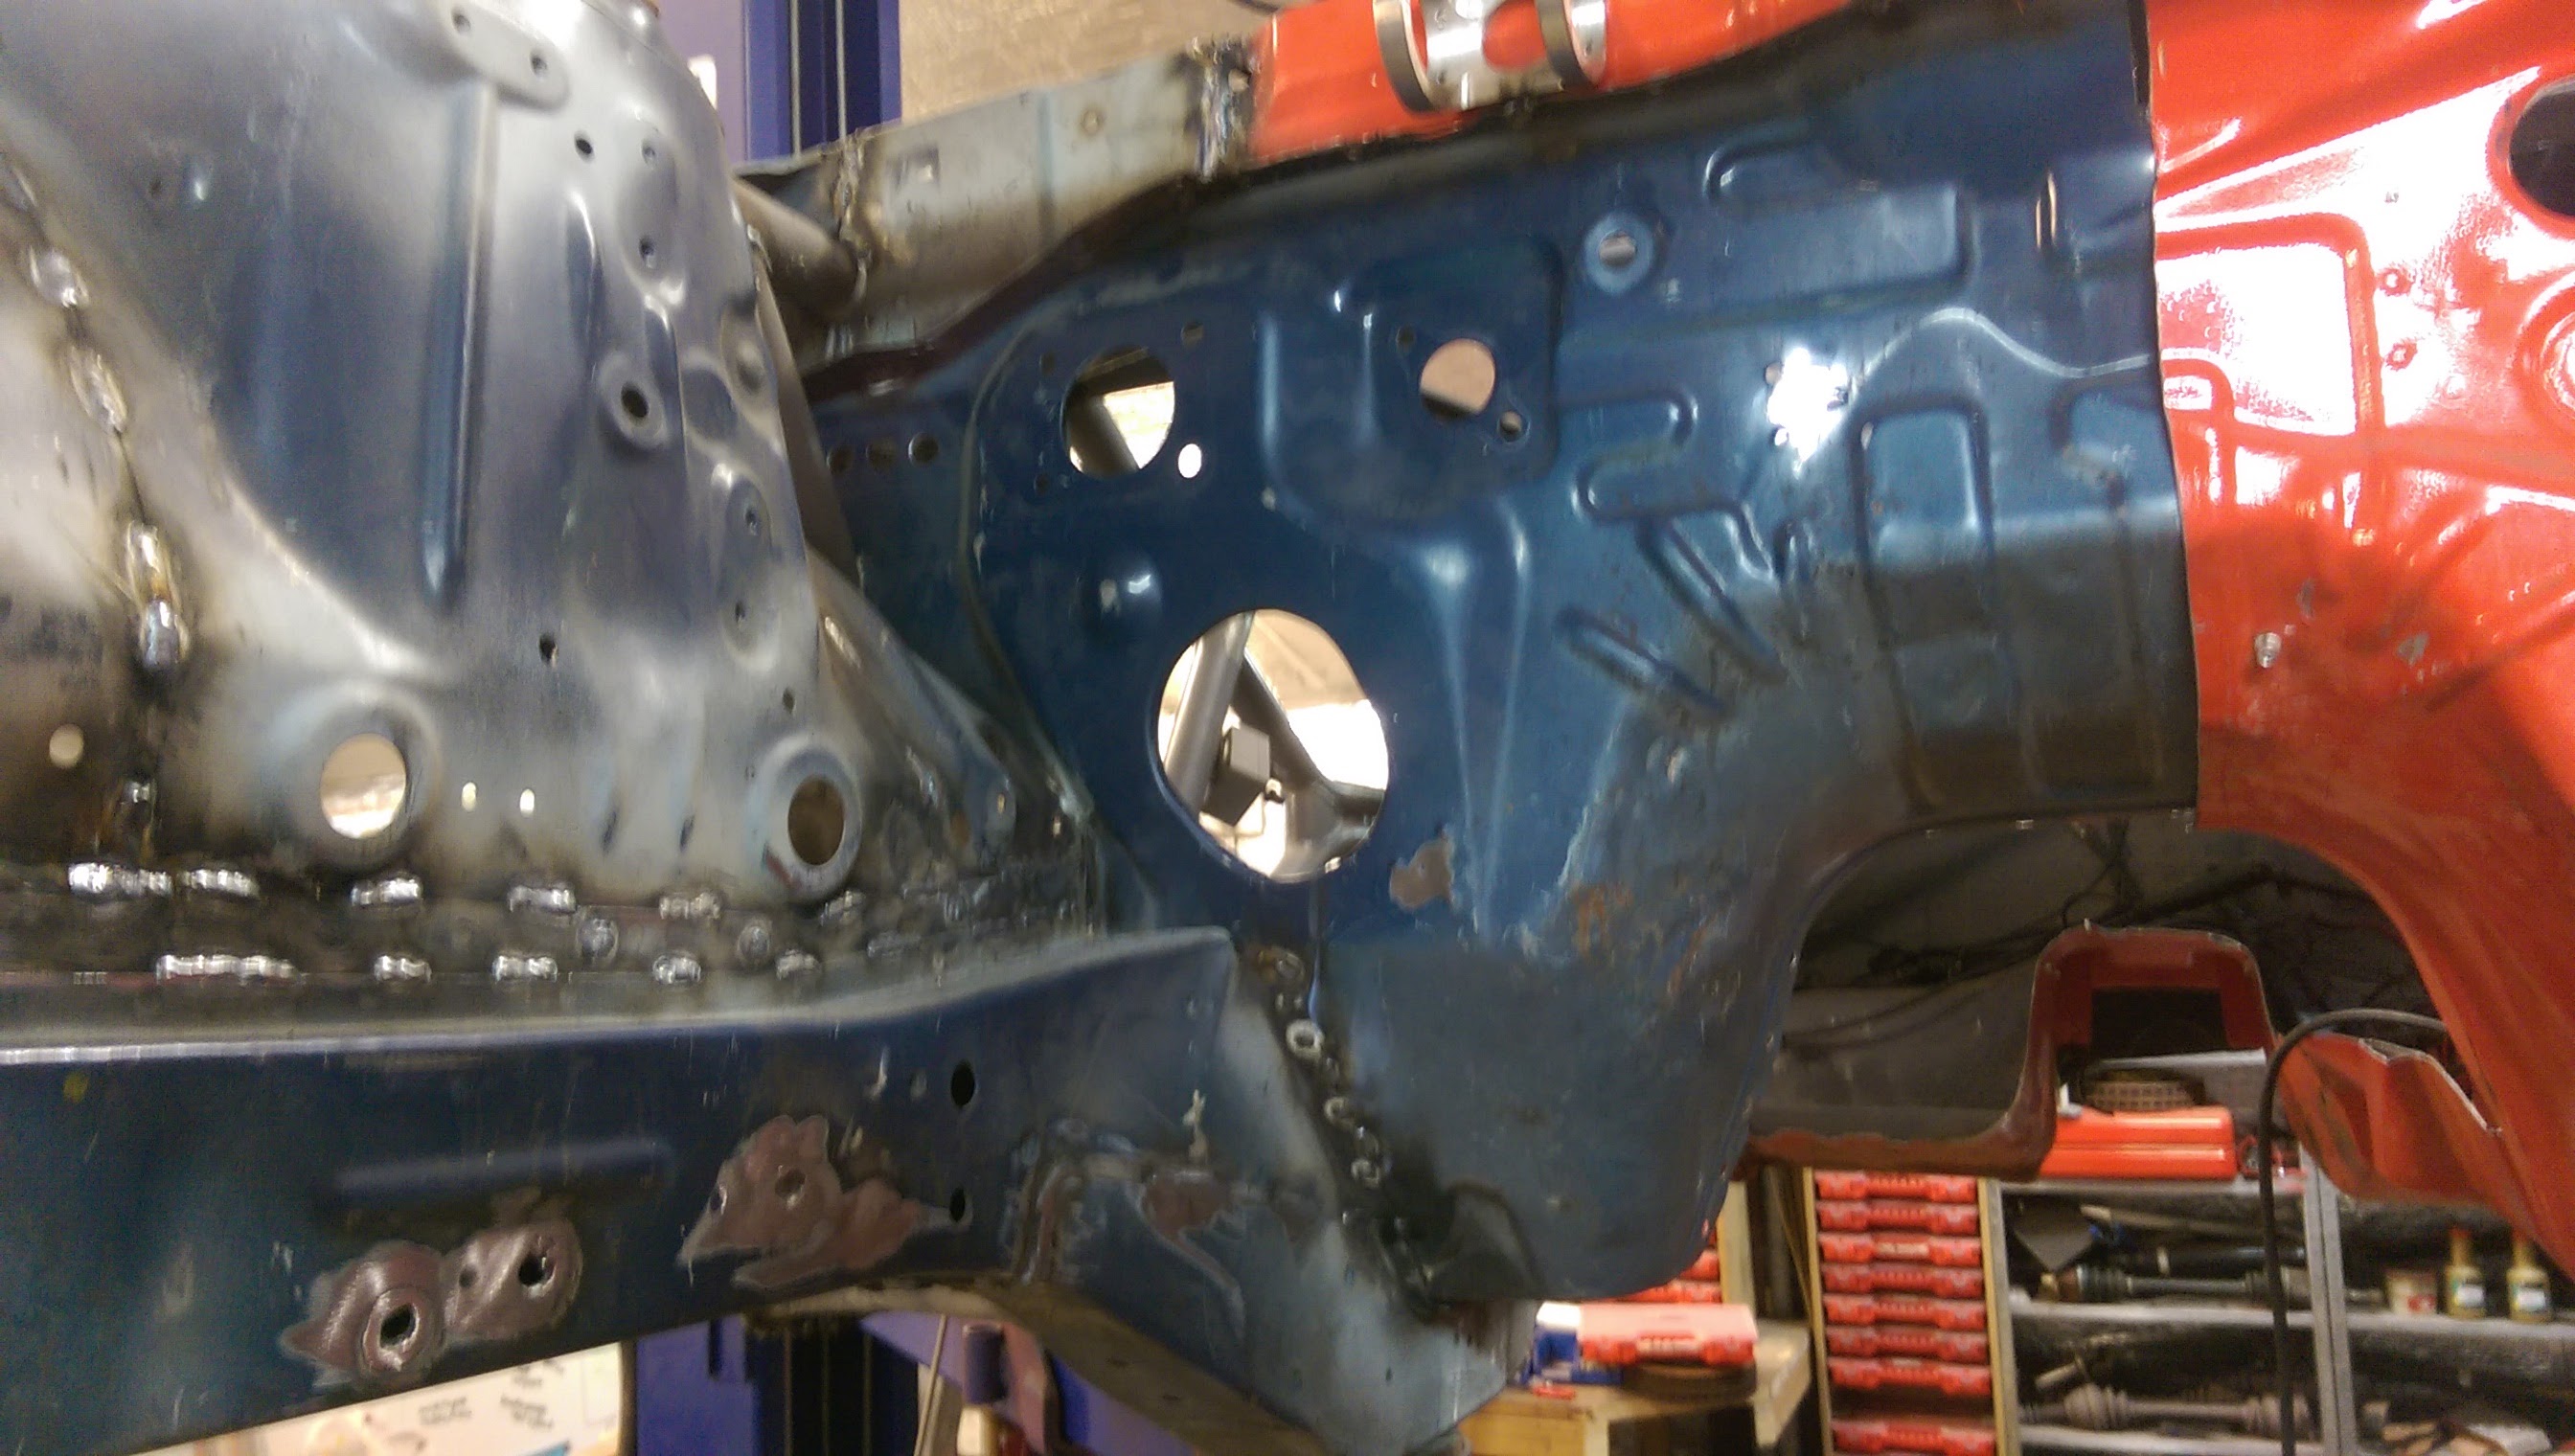
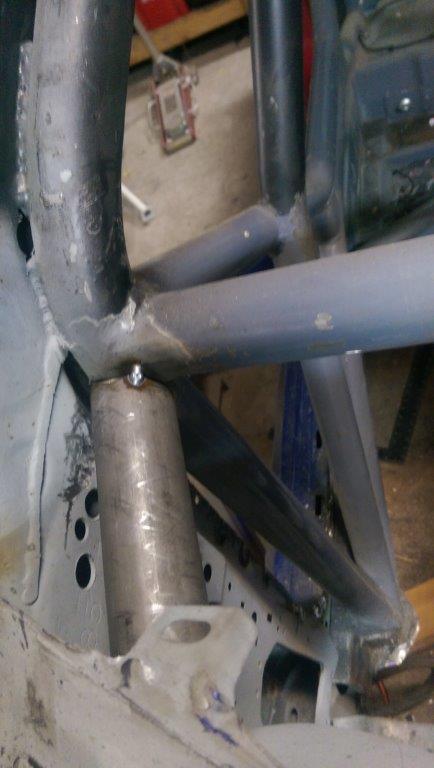
The inner an outer sil panels are now all welded up, as are all of the layers of the A pillar.
As soon as the cage bars to the stut tops are fully welded, I’ll put the floor back in and start the process of getting the chassis ready for some paint and while that’s not even close to the end of it, it will be a big milestone that will keep the motivation up.
The first things that I needed to do was to get the front right chassis rail pulled forward a few mm to get it all lining up perfectly. Pulling it forward also pulled it in a bit, so it took quite a lot of fiddling, making improvised braces and pulling devices to get it all done. Another 30 min job that took 6 hours.
After that was all in place, put the bonnet, doors, guard etc all on, sat the new windscreen in place and checked for alignment. I’m really happy with how its all fitting together.
Then it was time for welding, and welding and welding, or so I thought…
Soon after that started, I ran out of welding gas, and being a Sunday it meant that I needed something else to do.
The crash has bent the steering arm and also the actual rack itself, so time to make another one. Pulled one of the spares apart, stripped it, cleaned it all out, re-greased it etc.
While this was going on I started off a job in the mill for a mate, and let that run in the background, allowing the sound of metal chips to radiate through the shed.
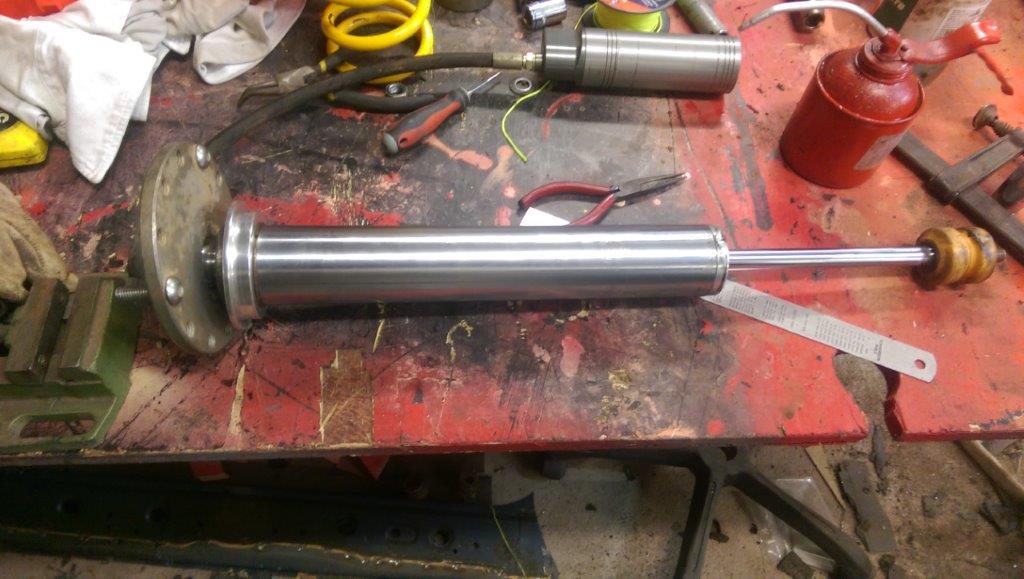
I was concerned about the right front shock, as it took all the impact, and it has bent the ears on the lower tube. I pulled the insert out, which I’ve never done before, so was quite nervous – but they are simple inside, well inside this section of it anyway!
After a number of tests with dial gauge to check it, it seems to still be perfectly straight. There is also no runout when supporting it at both ends and rotating it around. The action of the small shock shaft, and how the insert slides into the case is still silky smooth. While I’m still going to get them checked, they may have actually survived!
The tabs on the main case were twisted a bit, so they need to be straightened. My biggest issue was how do I hold this thing in the press without squashing the tube, but still bending two 8mm thick plates?
The answer is obvious, rig up a totally dodgy setup.
The porta power is holding down the part of the bracket that is still in the correct position, and previously the right hand side was sticking upwards a little. A quick squeeze with the press and it came back nice and straight, with not a lot of pressure.
I’ve not got the two tabs sitting on the same slight angles as when they were made.
The insert still fits perfect too, so I didn’t make it worse, which was a worry as it was all sitting in the press and I was about to pull the handle….
I didn’t have any of the recommended grease, but its easily available and for $12 I’m going to go with the manufacturers recommended stuff rather than what I had at hand, so they will stay apart until next weekend, will re-grease them and re-assemble them then.


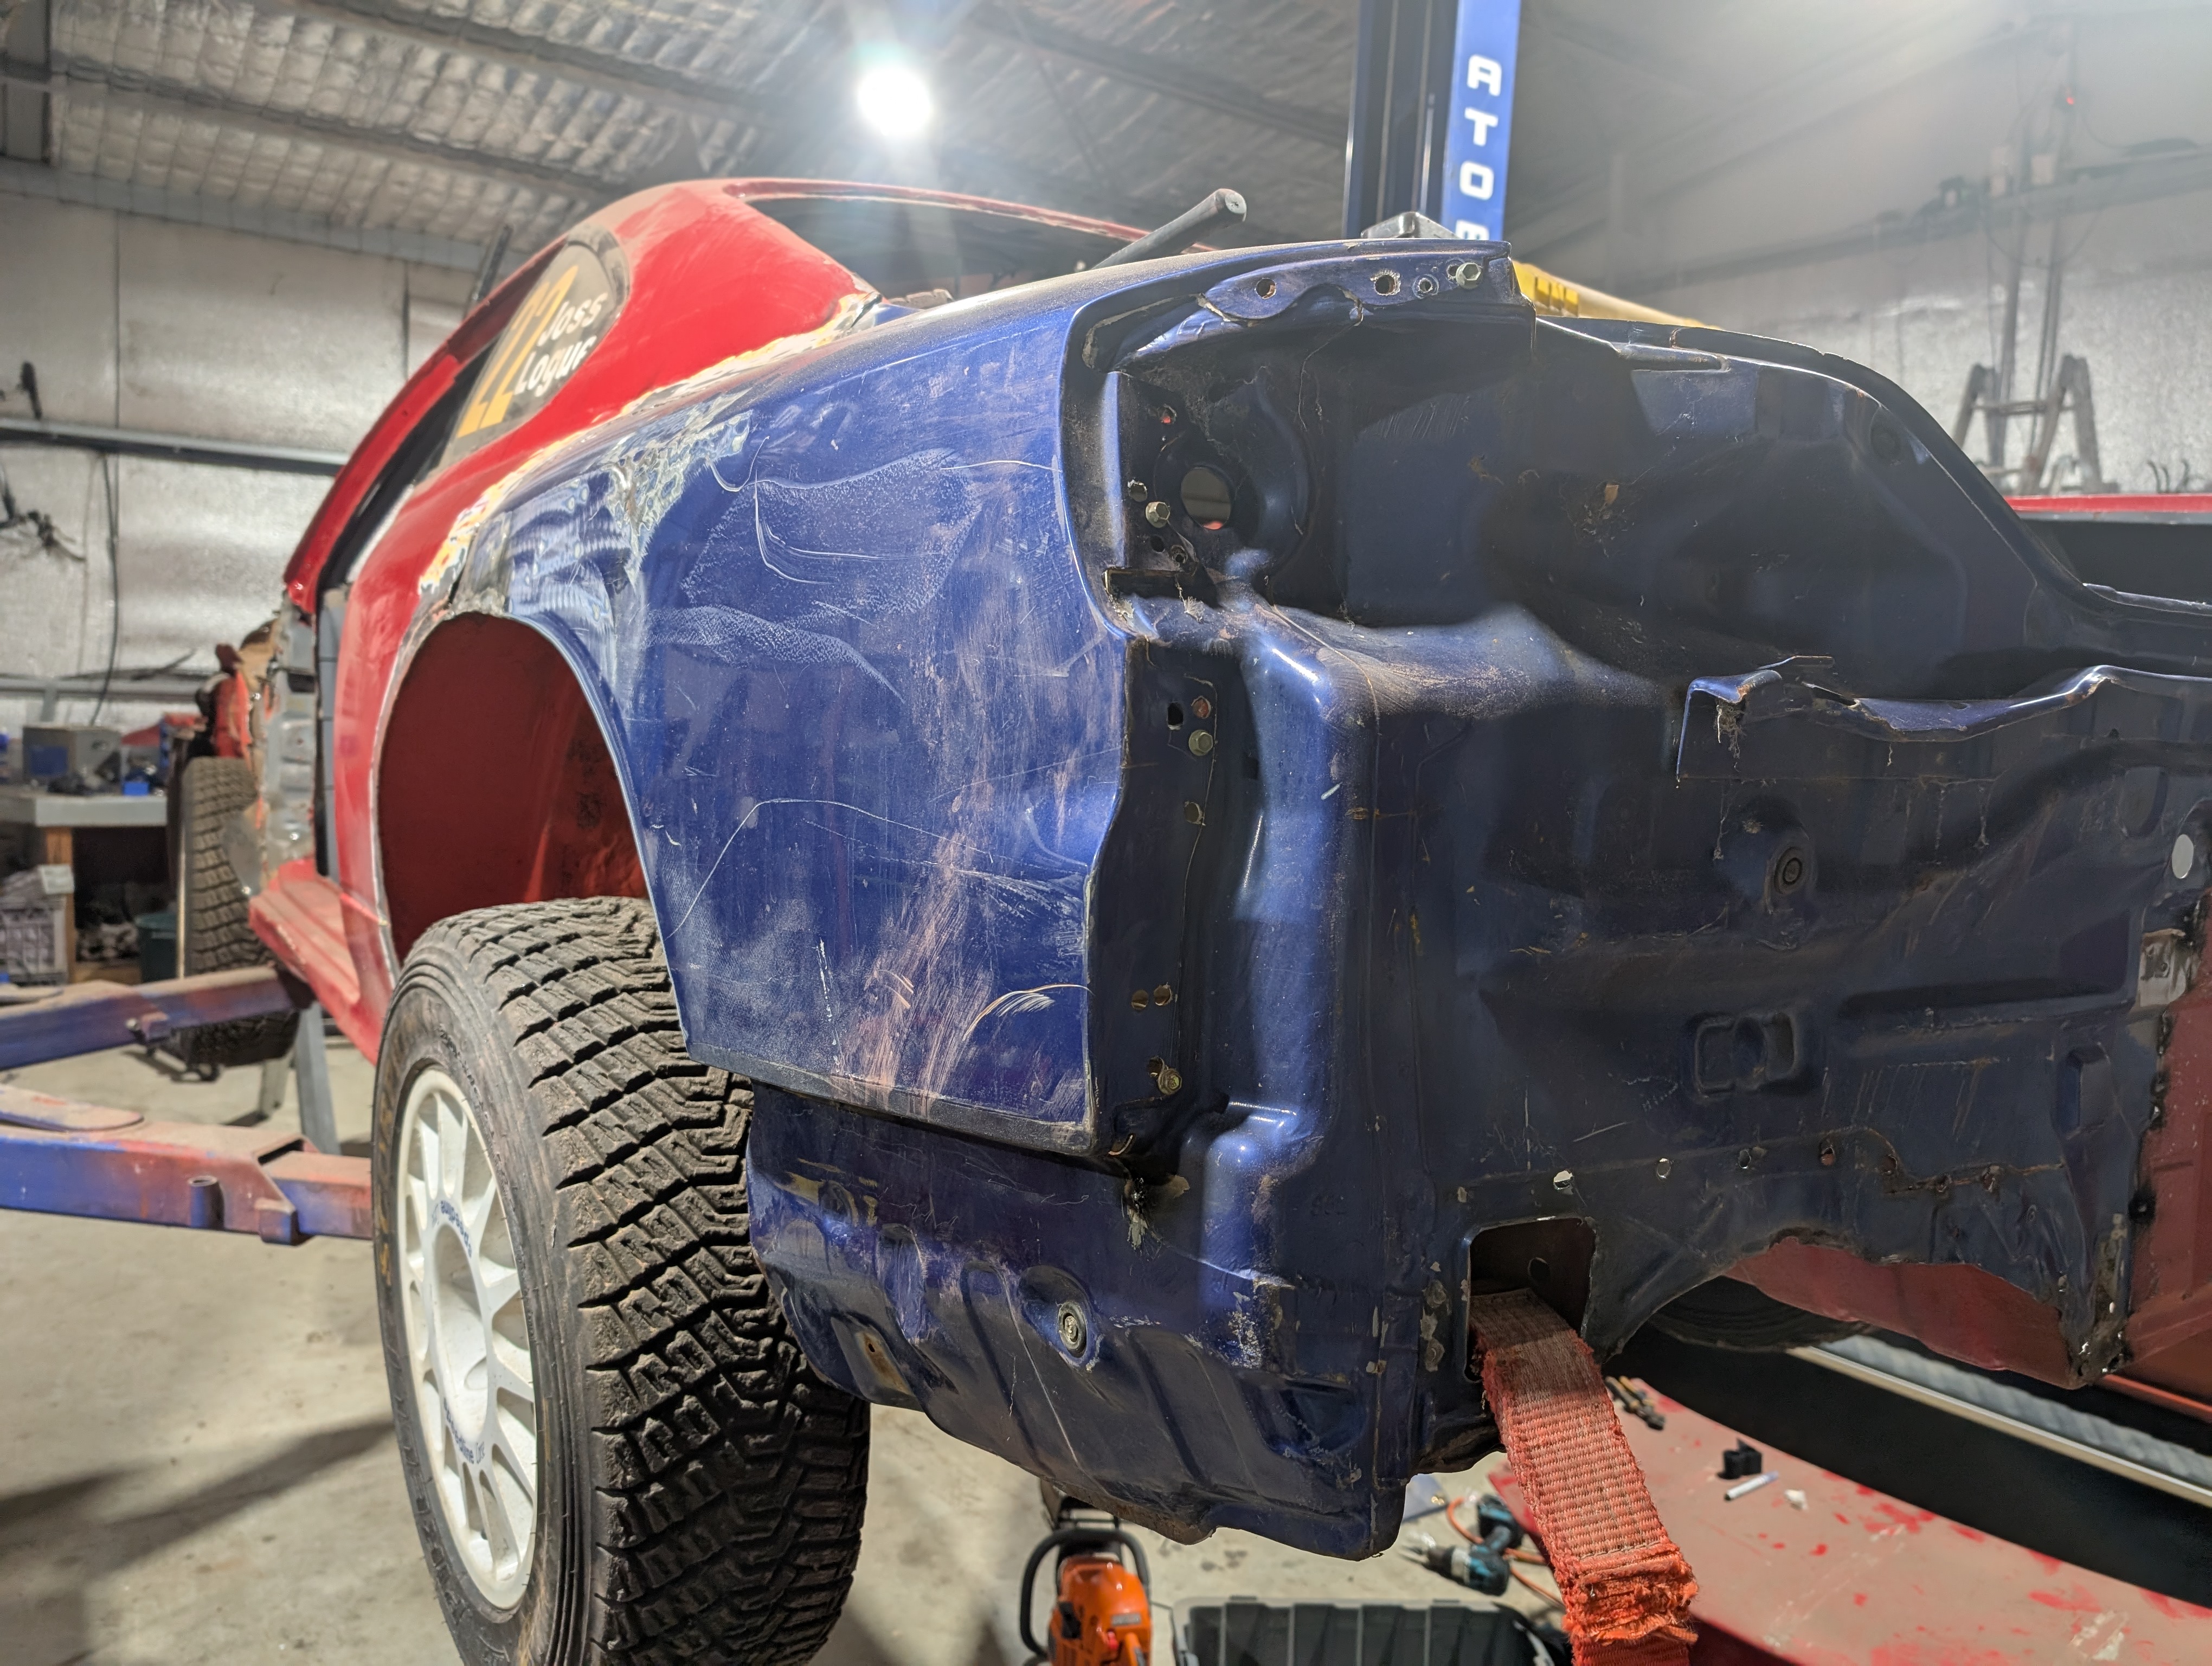
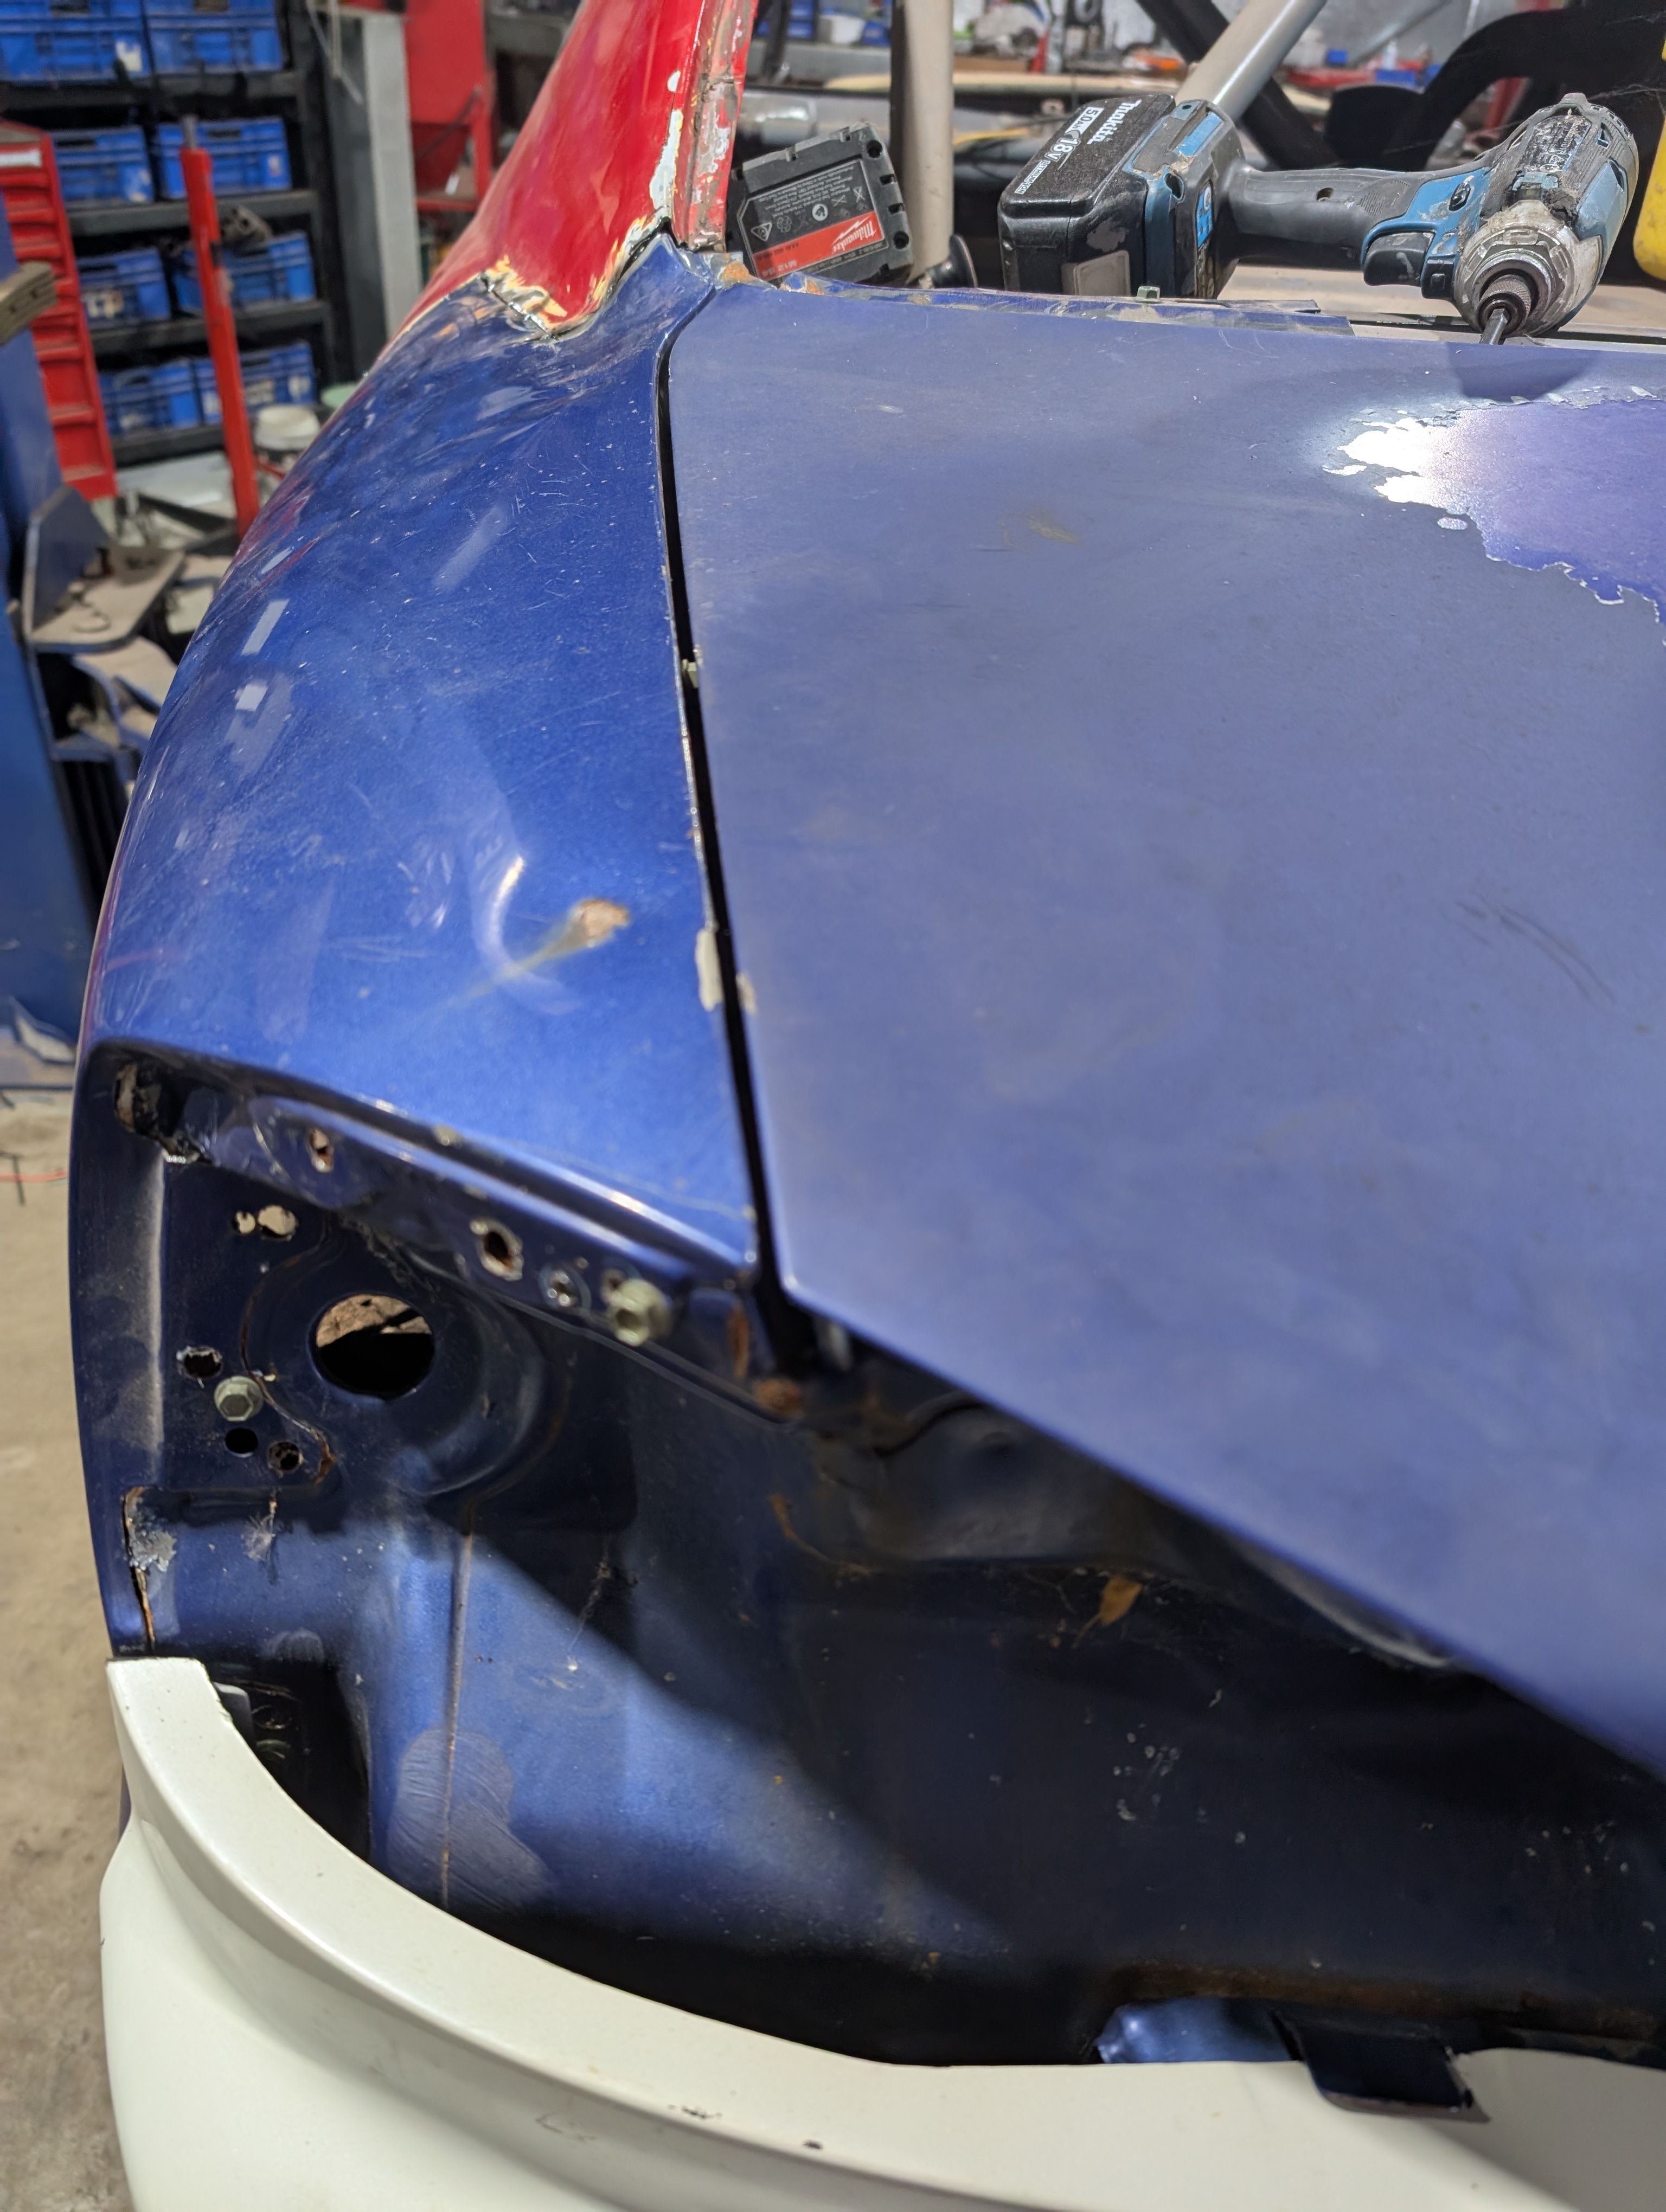

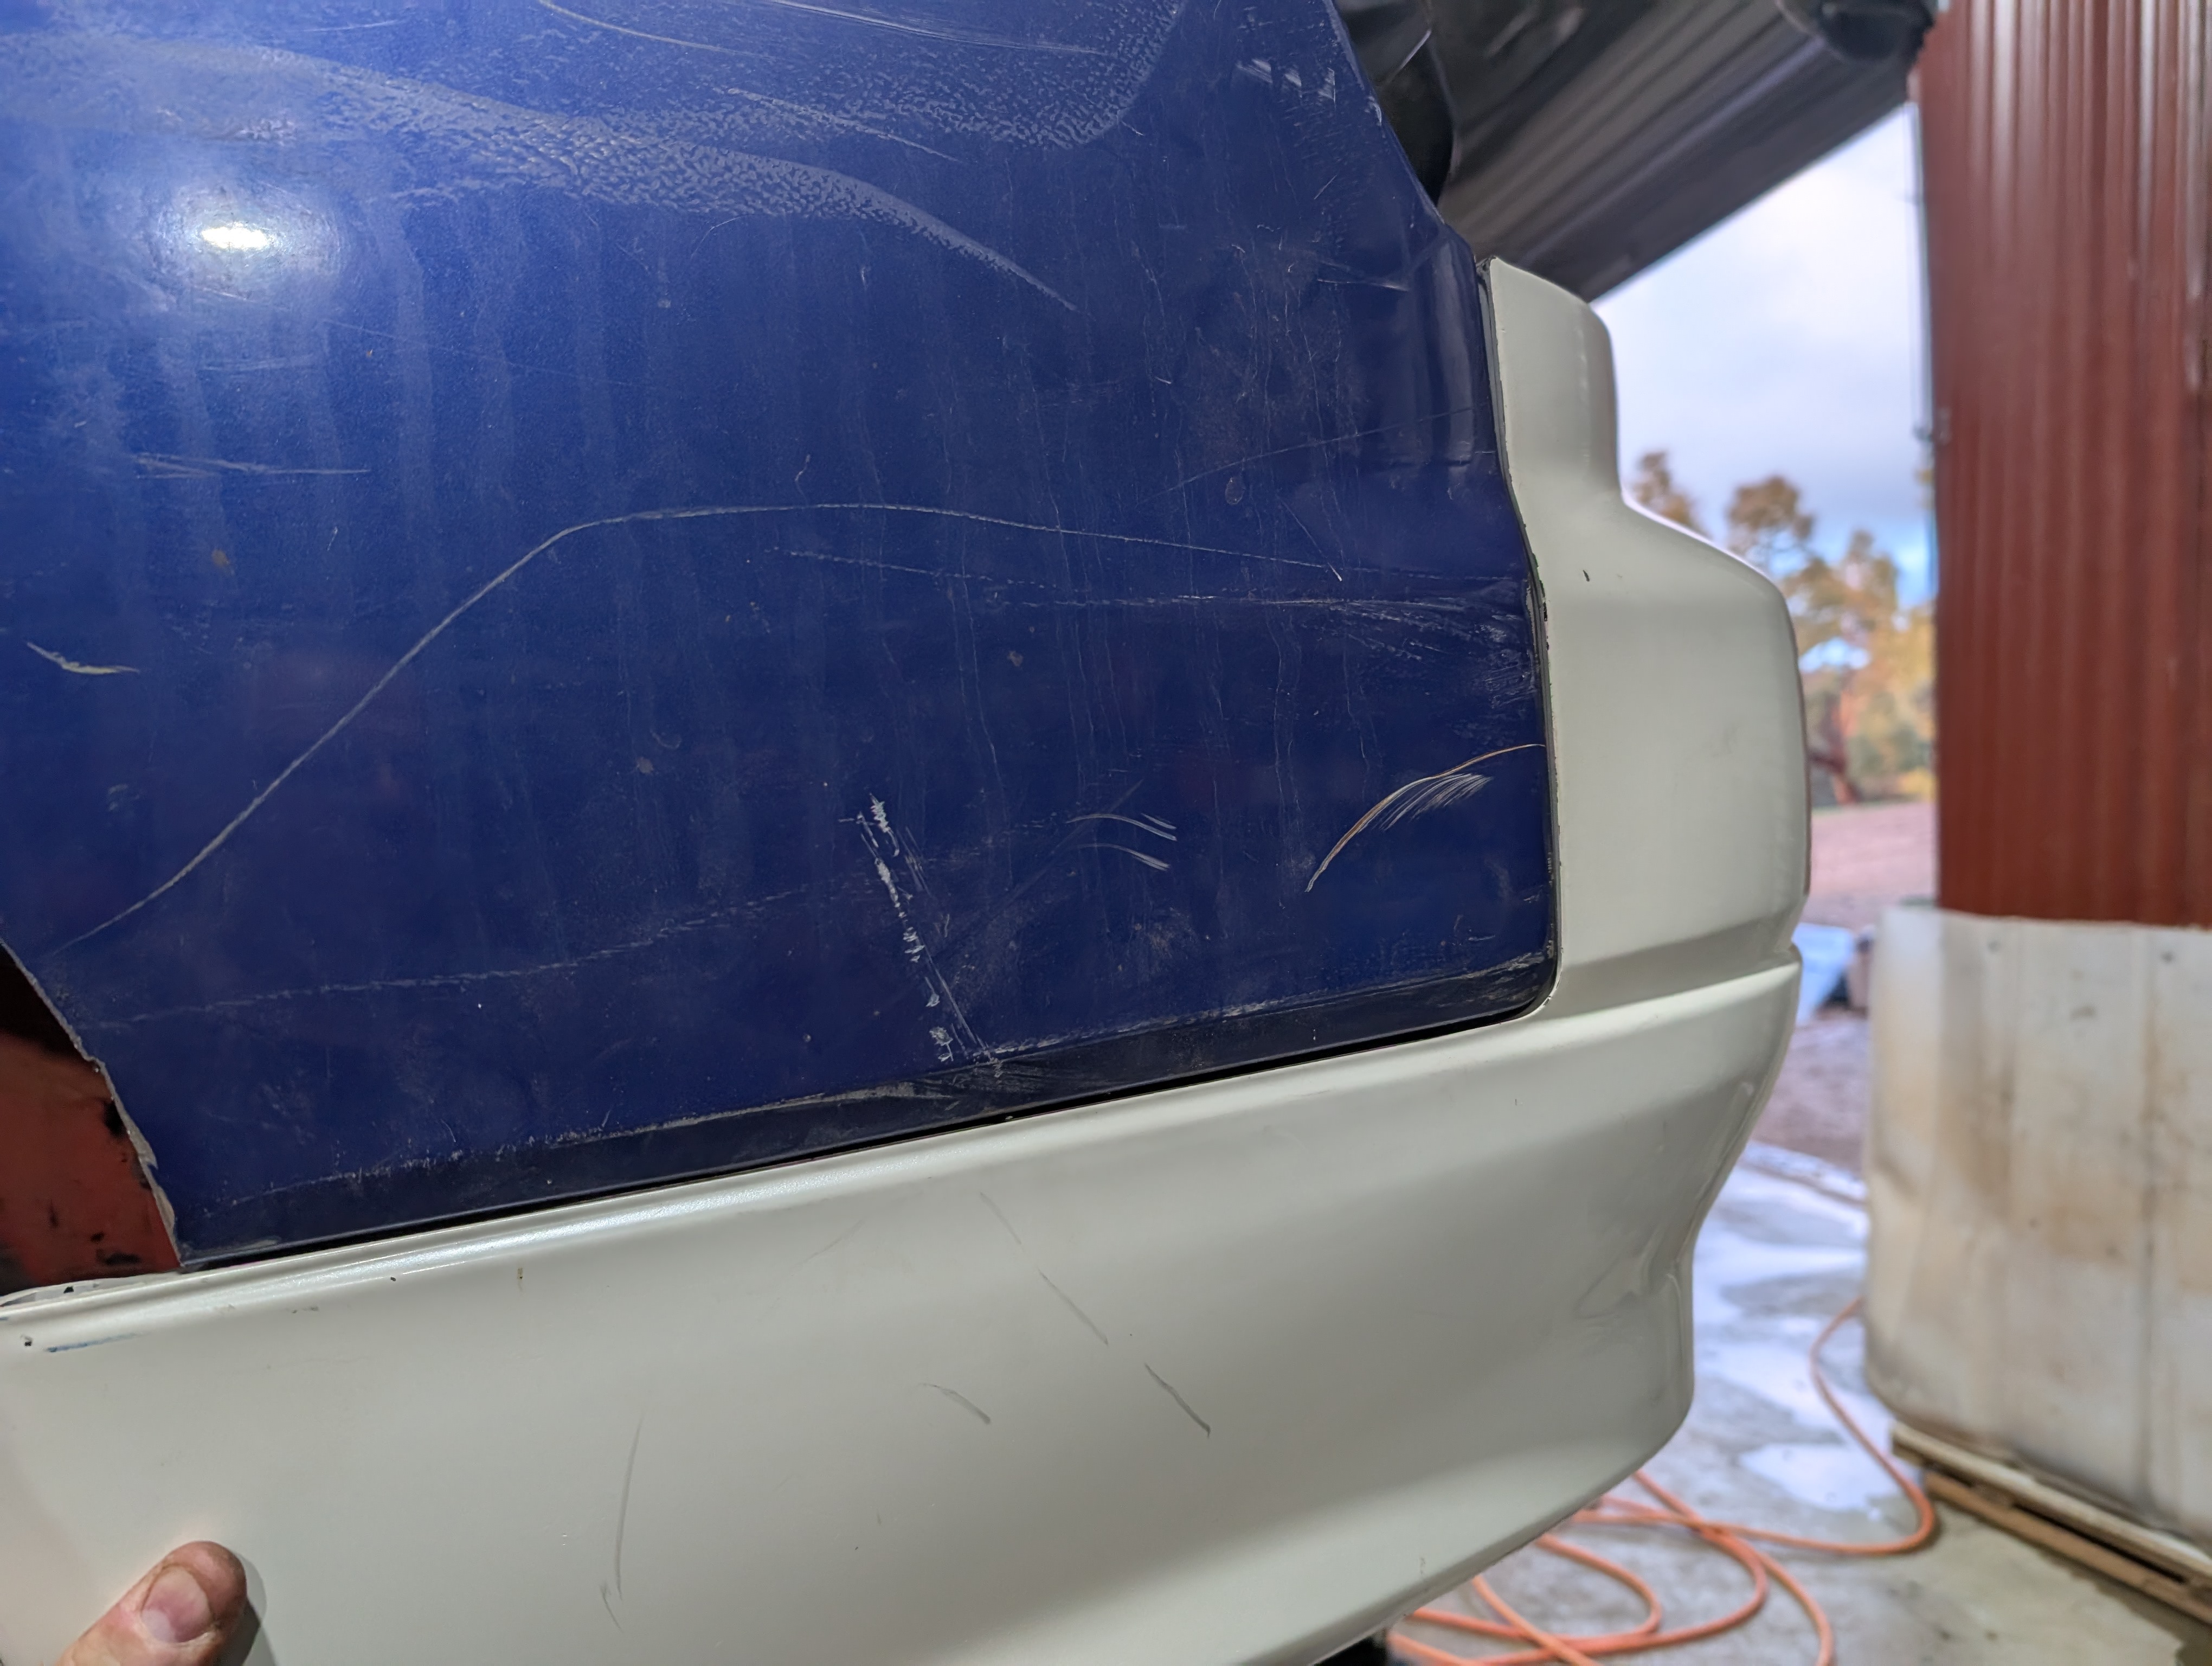

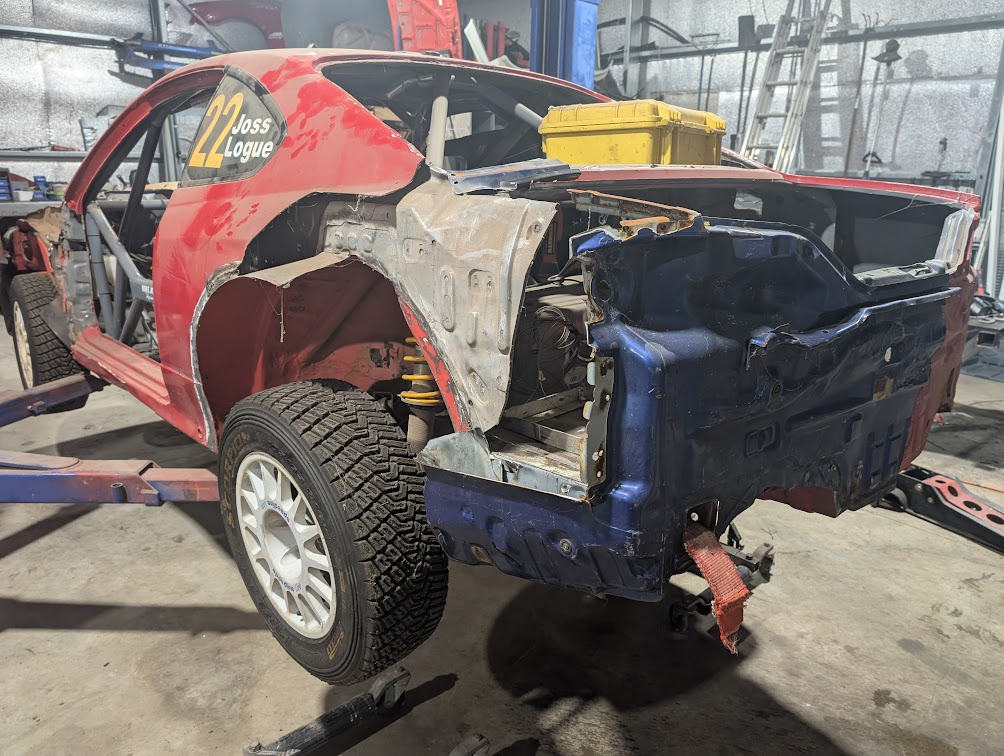


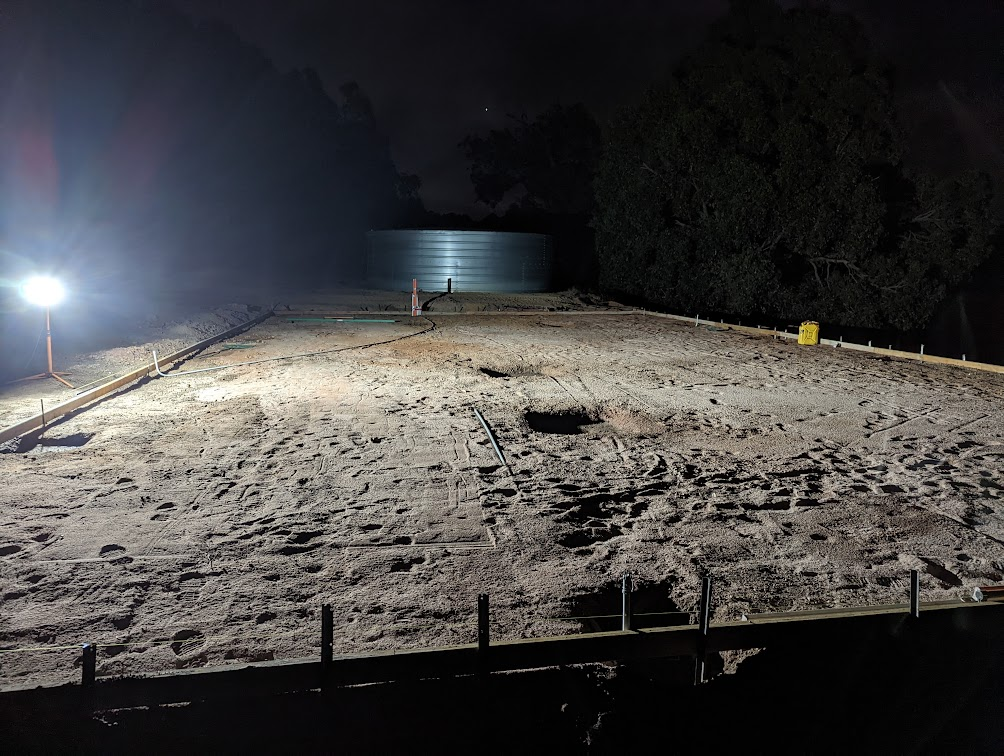
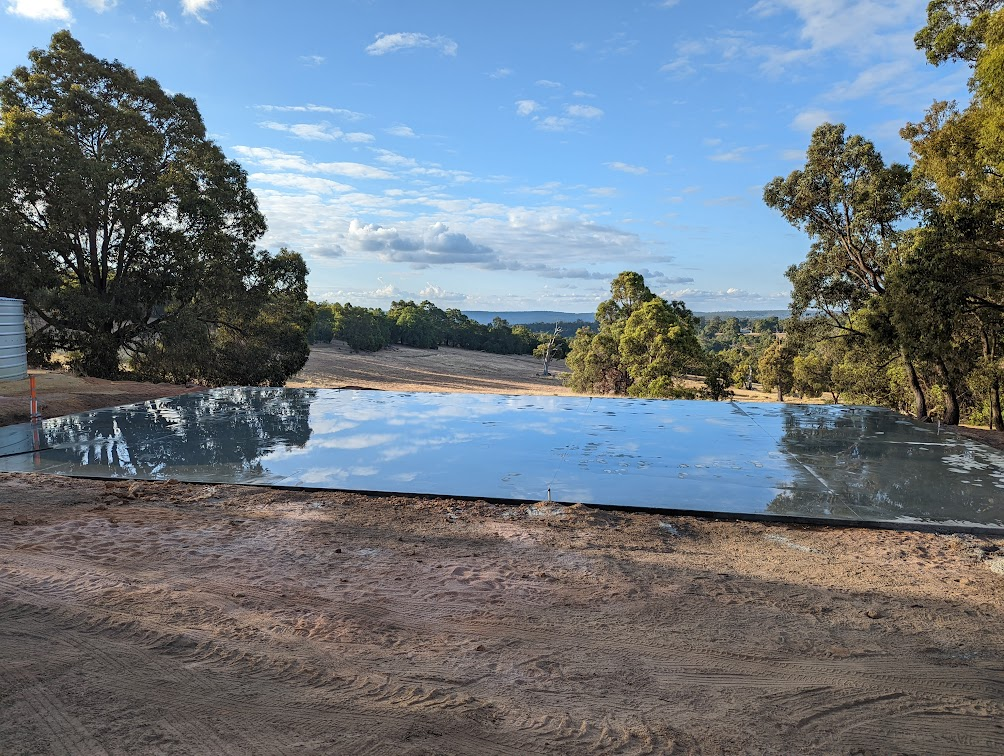


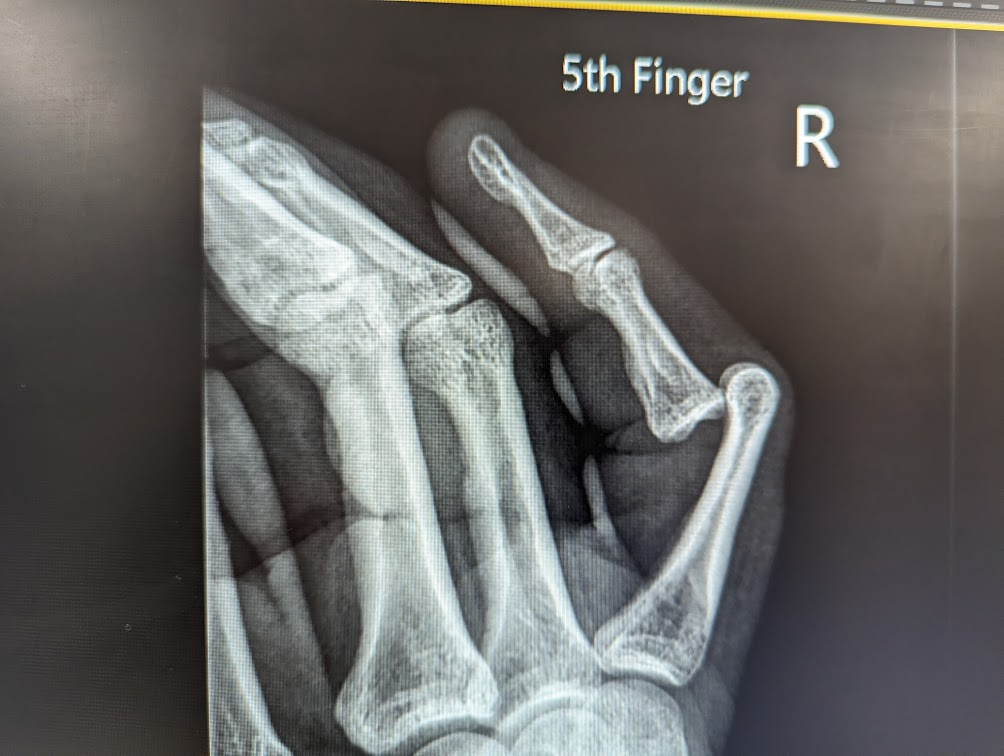
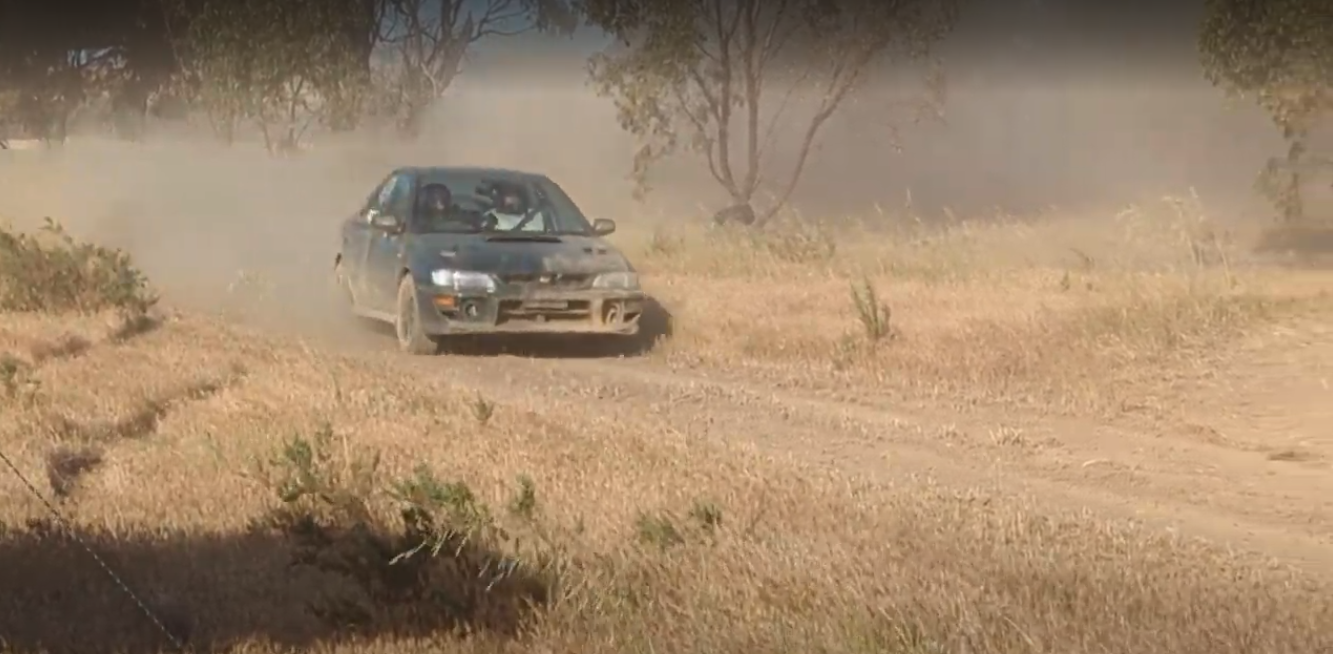


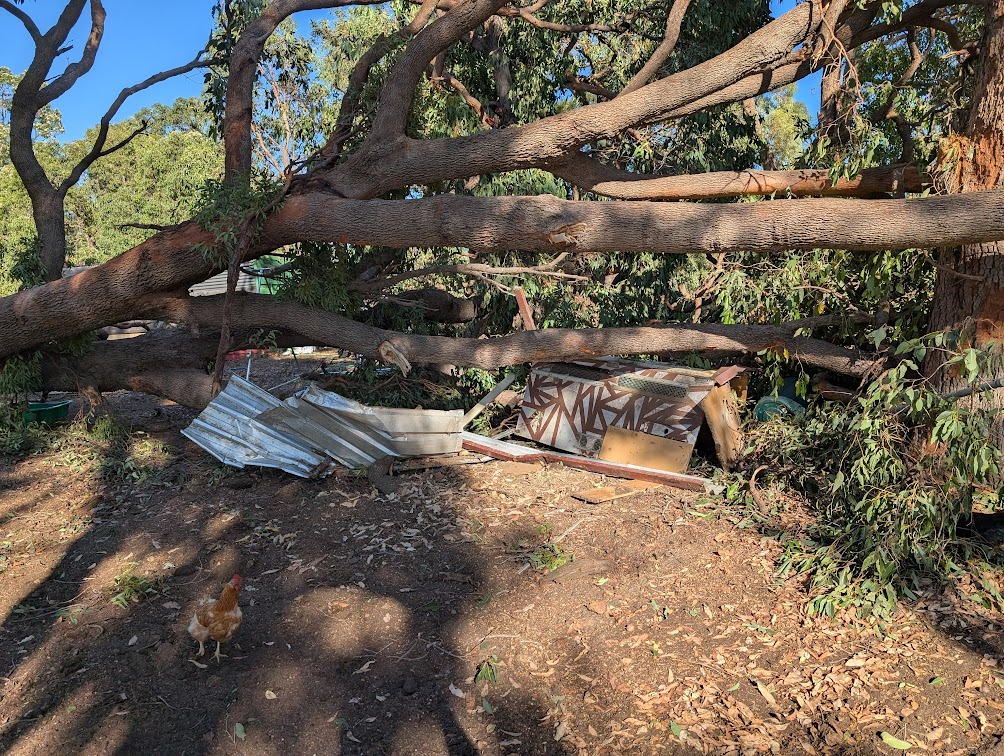


 Photo by Blake Rattenbury Photography