Author: mj

Under car Aero

Last Sat I was feeling very unmotivated, so I decided to do something that for me was more “fun”.  Even though at this stage the aero under the front of the car is not on the critical path for the engine tune, I still wanted it done before the first event.  So, in order to aid motivation, I started it ahead of schedule – despite being behind on most of the other tasks 🙂

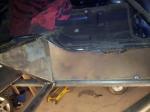
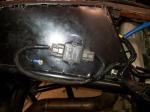
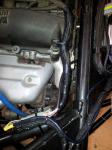
So, the picture here are showing the floor of the engine bay area, from underneath the car.  There are tunnels on each side, extracting the air out behind the front wheels.  These diffusers work with the air underneath the car, causing a low pressure area under the floor, which sucks the car down onto the road, creating more grip.  The reality is a lot more complex than that, but I’m not sure its worth the pages of text to explain this complex subject (of which I still only have a moderate understanding of, despite many books and research)

Who knows if these will actually work…..  When I get some time to test the car I will run it with and without the floor and see what the handling differences and lap time are like.  I also want to buy a pressure sensor and hook it up to the data logger, so that I can measure the pressures under the car to see if these things are working, and how well.

At the meelup hillclimb at the end of 2010,  the cheap, not very good wing that I found and put onto the rear of the car made a difference that I could easily feel in the car – so hopefully these tunnels that I have actually designed will do an even better job.

This slideshow requires JavaScript.

Friday Night’s Jobs

After one night, I’m still on schedule! Yeah!

First item to attack was to finish off the last bits of the cooling system.

I modified the header tank to also incorporate the overflow tank, painted it and fitted it.

Another view:

The top part of this tank will collect all of the air bubble that are produced in the coolant.  Hopefully these will be drastically reduced with the electric water pump – the normal mechanical pumps can cause cavitation the pump at high RPM, putting air bubbles into the system (bad for cooling) and also robbing horsepower.

The system catches small amounts of flow from all of the highest points in the water system and directs them towards the header tank.  At the bottom of the header tank, a pipe at the very bottom of the header tank connects to the inlet of the water pump, causing a continual flow from from these high points into the header tank.  This will drag the bubbles into the header tank, where they will stay.

These air bubbles will stay at the top of the header tank, where they will be forced down into the lower catch tank as the water expands when it heats up (there is a hose connecting these two tanks together).  As the motor cools down again, the water shrinks again and only water will be sucked back in – the hose connects to the lower catch tank at the very bottom.

I then got onto doing the fan.  I got a 16″ fan from SuperCheap during their 20% off everything sale – hopefully it’s capable of doing the job.  I welded spuds into the radiator to mount the fan.  I am not a fan of mounting them straight to the radiator fins as some people do (See what I did there….).

If this was my road car I would have made up a fan shroud for it, as it increases their efficiency when you are stationary.  When you are going at speed, the fan is not actually needed, so I want to keep the airflow at speed as good as I can make it, and hopefully just have it be enough to keep the car cool enough while stationary.

I then routed all of the coolant pipes and tied them up nicely, same with the vacuum hoses under the throttle body.  Added the MAP sensor and the boost controller, ready for the wiring tasks in a few days time.


I filled large portion of the system will coolant, then hooked up a battery to the water pump and turned it on.  It was very pleasing to see all of the flows, complete with stacks of bubbles/air, going into the header tank as the system was bleeding itself.  I kept topping up the header tank until the system was full, and the water pump was running silently.  Very pleased with how it works!

I have a wedding to go to today (Sat), so no progress will be made – see you Sunday.


The need for speed… Speed of construction that is.

There is something like 56 days left until the first event at Collie. Considering the work left to do, that’s not very long at all (especially cause it need to be finished at least week before that date to get tuned, wheel aligned and scrutineer’d!).

So in order to stop myself from slacking off, and to get me motivated (there is no motivation like the last minute after all), I put together a schedule of everything that I had to do to get it finished enough to race it. After printing out a calendar of every day between now and then, and putting jobs in for every single night after work, every weekend, every public holiday and any other days off that I have. Sadly, all the boxes are full….. Its going to be tight!

Let the fun begin!

More water

Being sick for the last week has really hurt my progress, but was finally well enough to do a couple of hours last night.

The water systems in the car are now about 95% done.  I just have one mount to make and  a couple of tidy up bits to do.

The swirl pot is now all mounted and plumbed into the radiator.

In order to get a water hose that fitted right, I had to machine up an alloy adapter so that I could join two of the rubber hoses together.

The vent lines in the top of the pic above also need to be tied together nicely where they run across the front of the motor.

I’ve filled up the system with water, and tested the electric water out to make sure that was all working.  It really pumps a large volume of water around the motor!

I’ve also trial fitted the electric radiator fan, to see how that’s all going to work.  More on that soon.  Hopefully I can finish the water system off tonight, so that I can start on the intake piping on Friday night.  After that, I need to do the engine computer and fuel lines, then I can try and start it!

All about water

Last night I spent a lot of time making parts, but didn’t really make a lot of visible progress.  In the same time that I took to bolt in the engine, gearbox suspension and steering, I made a couple of parts…

Firstly, I made a new inlet pipe for the coolant to go into the motor.  The last one that I had made was coming out on a much larger angle, where as this one is much straighter, enabling me to move the water pump into a location where there is less stuff getting in the way.

(Its the black bit in the center of the pic with the hose connected to it)

I was then ready to fit the water pump, hopefully for the final time.  First I had to flush out the radiator with water, to make sure that is was clean of any metal shavings after I had cut it open and re-welded the outlets.

Then it was time to fit it all in.


I then made the outlet for the coolant, which is on the opposite side of the motor (the one above was the water in, this next one is the water out)

This weird looking thing is a combination of an S15 water outlet and an S13 water outlet that have been cut up and grafted back together in a completely different shape.  The paint it still wet in this photo, hence the shine, but you get the idea of what a strange shape it had to be.


Next on the list it to graft this old S13 water inlet, to become part of the coolant swirl tank. I can then make the mount for this tank and get the coolant system finished!

A big night…

JC came around to give me hand on the car.  Together we got a stack done! (of talking that is :))

The engine and gearbox are now back in the car, hopefully they wont have to be removed again.  We’ve already learnt so much from this that will be better on the next car!

We also sorted out where all of the water pipes, water pump, air intake, intercooling piping etc will run. Next job for me is to start making them.

Then we got all of the steering rack etc in and bolted up, then got the steering wheel etc all mounted as well.


I then did the final cuts on the strut top mounts, so that was out of the way and I could then mount the suspension.

Finally starting to resemble a car again.

I’ve got the new brake calipers mocked up in position, one of the next jobs is to create the new ‘dog bones’ to hold these on.  Might start to tackle that one tonight, along with finishing mounting the water pump, now that I have bought another piece of radiator hose today that should be the right angled bend to make it all fit – I’ve changed my mind on the original mounting spot, and will now modify a couple of bits to move where its located as its going to make the whole setup much nicer.

New book

Got a new book for X-mas, of the small amount that I have read so far I like this book a lot!

This book is all about driving technique, but also goes into how to read things like the tyre surface to work out what car adjustments you need to make to go faster.  In fact, the whole book is about going faster 🙂

How to keep your cool when its 40 outside?

Last night I got some painting of the transmission tunnel done, and got some of the firewall insulation completed.

The drivers footwell area is mostly complete, there is just one small section that needs to be welded, so that’s been left…

The trans tunnel bar work is also now painted, ready for the gearbox to go back in tonight.

There are a couple of bits of the floor to complete still, but i had run out of paint….

I’ve got the cooler and radiator back in now, ready to work on the piping to connect them up as soon as the motor goes back in (tonight hopefully).

I hopefully have all the pieces that I need for the intercooler piping, after yesterdays trip to the shops.